 Magezon Blog Help Merchants Build Comprehensive eCommerce Websites

| * For more useful tutorials on Magento Page Builder, visit here. |
In Magento Page Builder, HTML Code content type is a useful tool for stylizing the elements. Especially if you have coding knowledge, or at the very least aren’t afraid of it, that would be a good kickoff to learning this content type. But what happens if you don’t? Hey, don’t worry. We’re here to show you how to stylize elements with Magento Page Builder HTML Code, in the most simple way. No further, let’s get to work.
Table of contents
Where to Find Magento Page Builder HTML Code
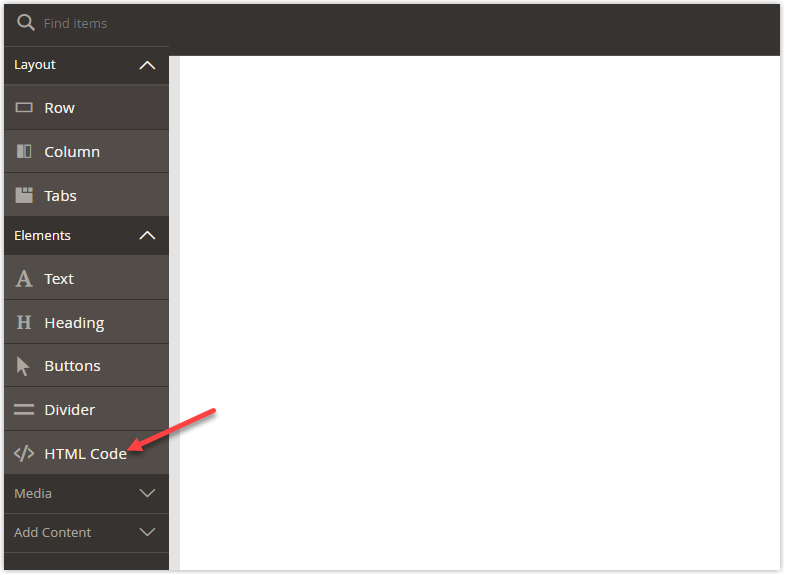
To find the HTML Code content type, access the Magento Page Builder workspace. Expand Elements on the left panel, and you’ll see Magento Page Builder HTML Code at the bottom of the drop-down menu.
Next, I’ll add the HTML Code content type to the Magento Page Builder stage.
| Create an effective landing page with Magento Page Builder: How to Build a Restaurant Landing Page With Magento Page Builder How to Create a Coffee Landing Page With Magento Page Builder How to Create a Product Landing Page in Magento 2 (Step By Step) |
Stylize Elements Using HTML Code
- Before going into the details, I want to highlight the main steps so that you’ll find it easier to get the picture.
- First, I’ll add the HTML Code content type to the Magento Page Builder stage.
- After that, I’ll create CSS codes for elements I want to style with CSS:
+ Button (Background-color, text-color)
+ Heading (Font-family, font-weight, and color)
- Copy and paste them into the HTML Code editor.
- Finally, save the settings and check out how these elements look on the front end.
Note: Keep in mind that you won’t be able to see the changes from the backend.

Try FREE Magezon Page Builder demo today
Easily create beautiful, engaging Magento website in any style whenever you want without relying on developers or designers. Just by drag & drop.
Step 1: Add HTML Code Content Type to the Stage
Before adding HTML Code content type to the stage, you must first add any Layout content type (Magento Page Builder Row, Column, Tabs) to this primary workspace. Below are the specific steps to follow:
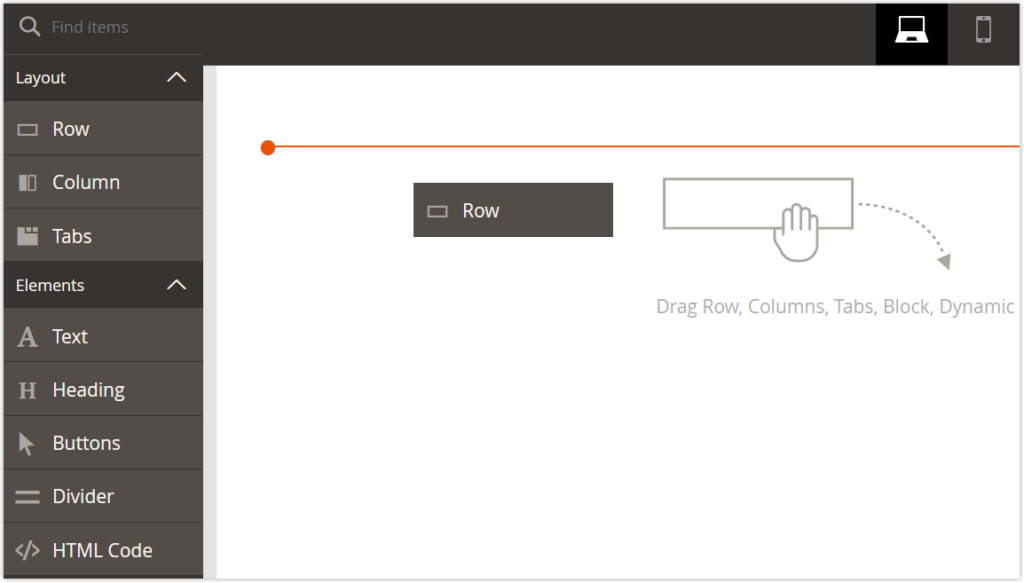
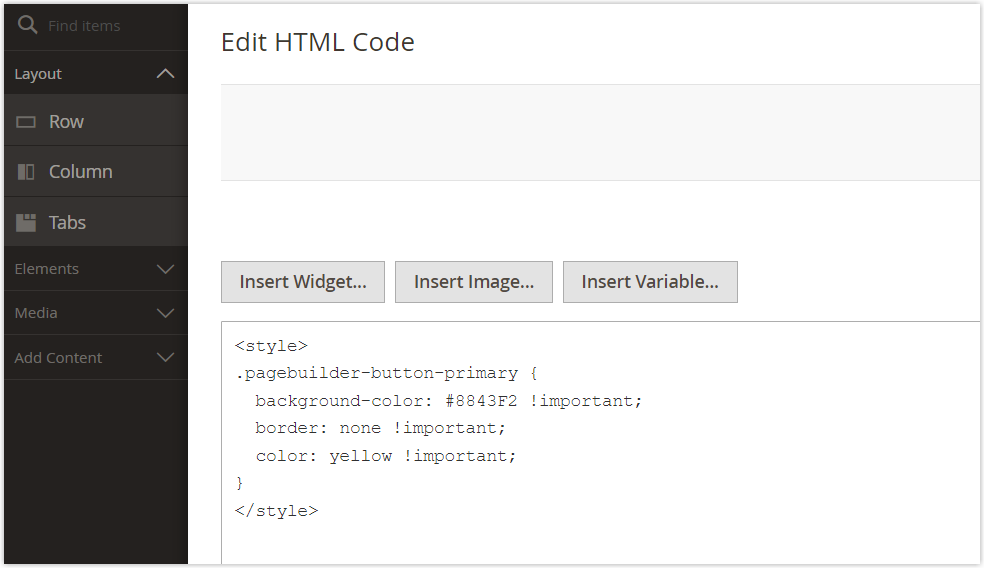
#Step 1: Click the Layout drop-down menu on the left panel. Then drag and drop the Row placeholder to the stage.
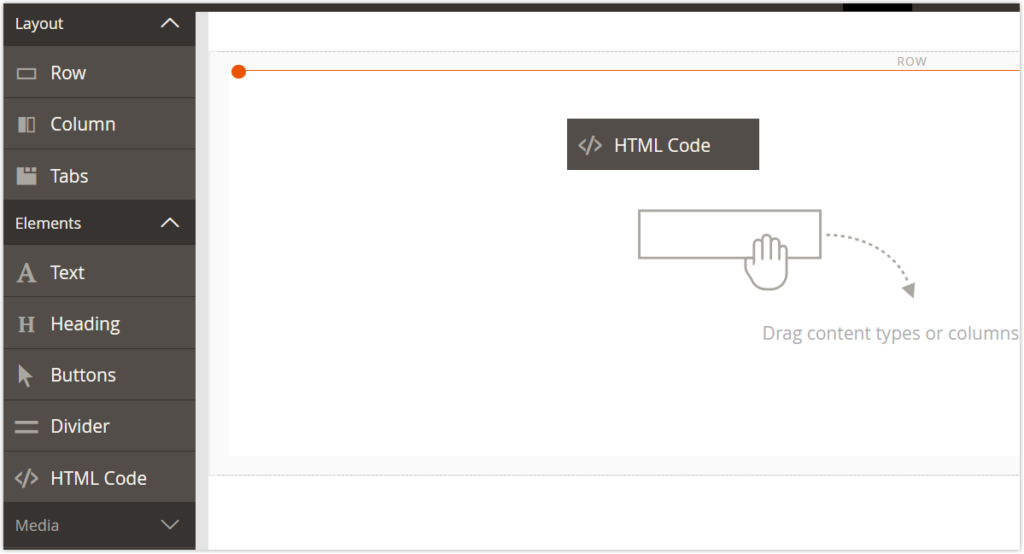
#Step 2: Under Elements on this panel, drag and drop the HTML Code placeholder to the new row.
#Step 3: After being added to the stage, the HTML Code appears like the image below.
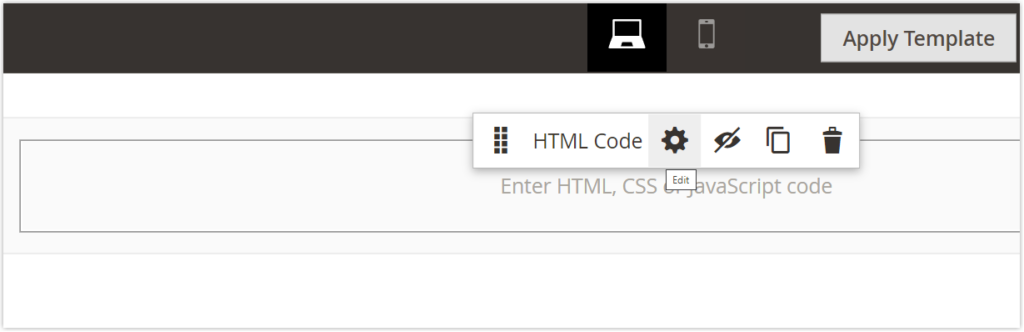
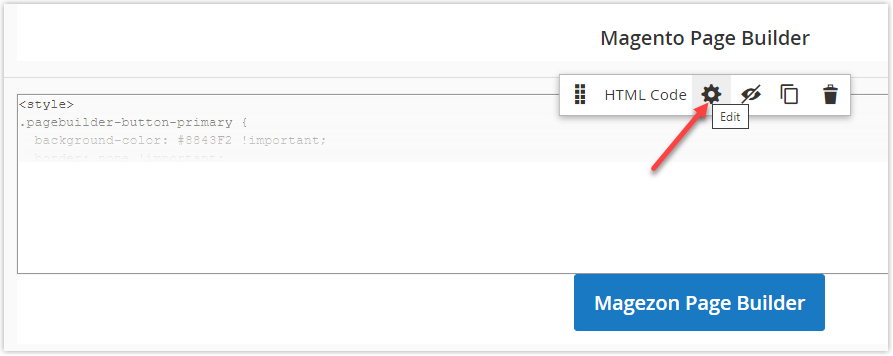
Now it’s time to move on to the next step: to use CSS to style the Heading and Button. To do so, click the gear icon on the HTML Code toolbox to access its settings. Let me describe the toolbox before getting to the point.
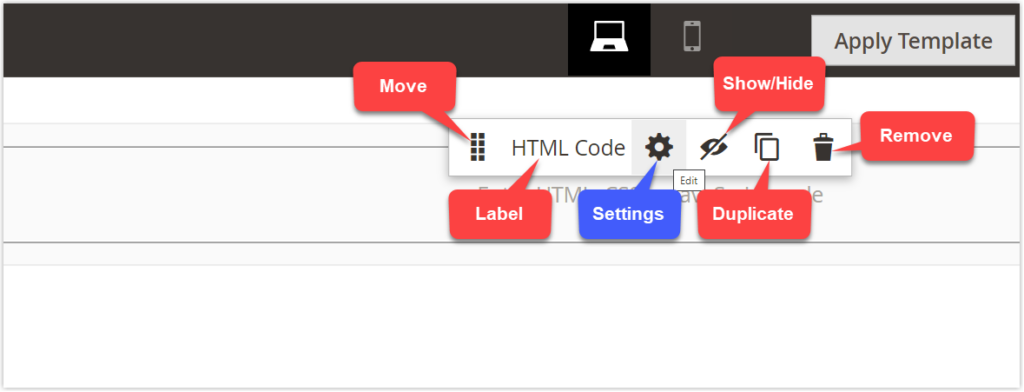
| Tool | Description |
| Move | Change the HTML Code container’s position to your desired location on the page. |
| Label | This option specifies the name of the current container (HTML Code). |
| Settings | Change the HTML Code container settings on the Edit HTML Code page. (To access this page, directly click the gear icon.) |
| Show/Hide | Show or hide the Magento Page Builder HTML Code container. |
| Duplicate | Duplicate the Magento Page Builder HTML Code container. |
| Remove | Delete the Magento Page Builder HTML Code container. |
Step 2: Customize Elements Using HTML Code
1/ Style Button With CSS
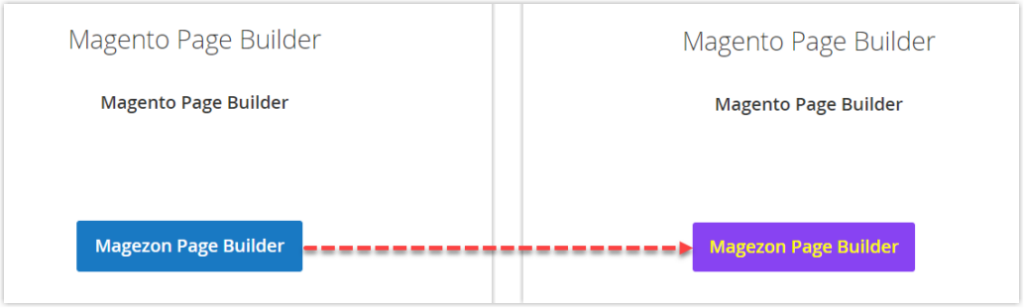
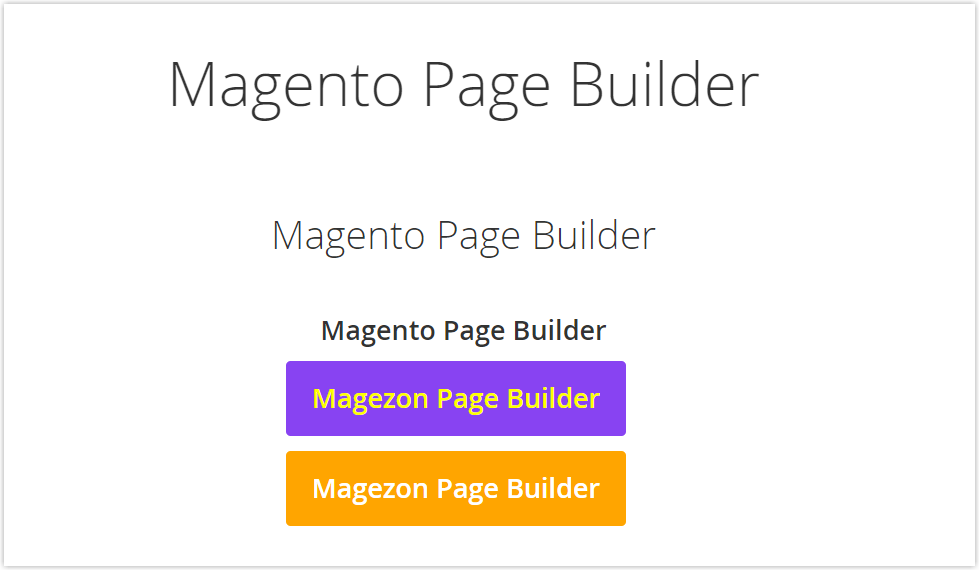
We’ll show you how to use CSS codes to style the button. At first, the button’s background color is blue, and its text is white. Now I’m going to turn its backdrop into purple and its text into yellow.
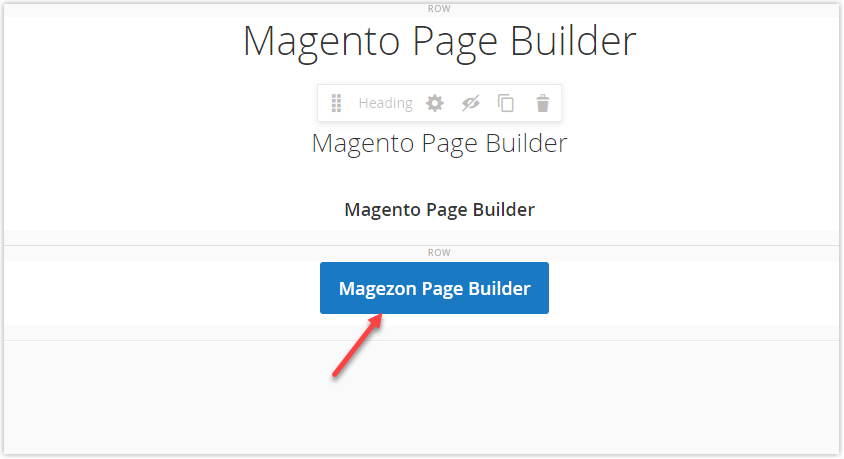
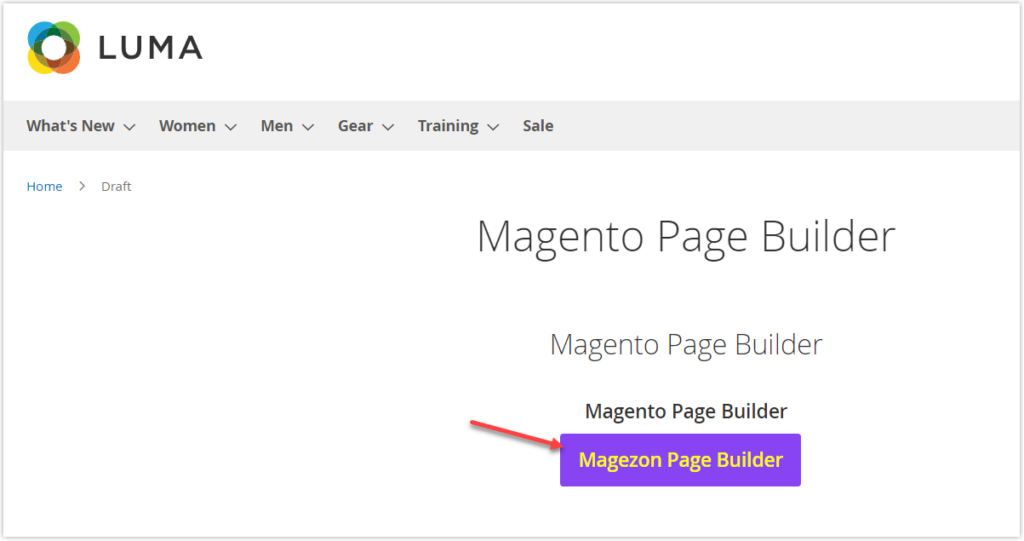
#Step 1: Create a center-aligned button without any other customizations. I call it the Default button.
#Step 2: Inspect the front-end page to get the button’s class (Ctrl + Shift + I). This class is used to style the button with CSS. Watch the video below to get the class.
Here is the button class: pagebuilder-button-primary
But first, let’s look at how CSS is constructed.
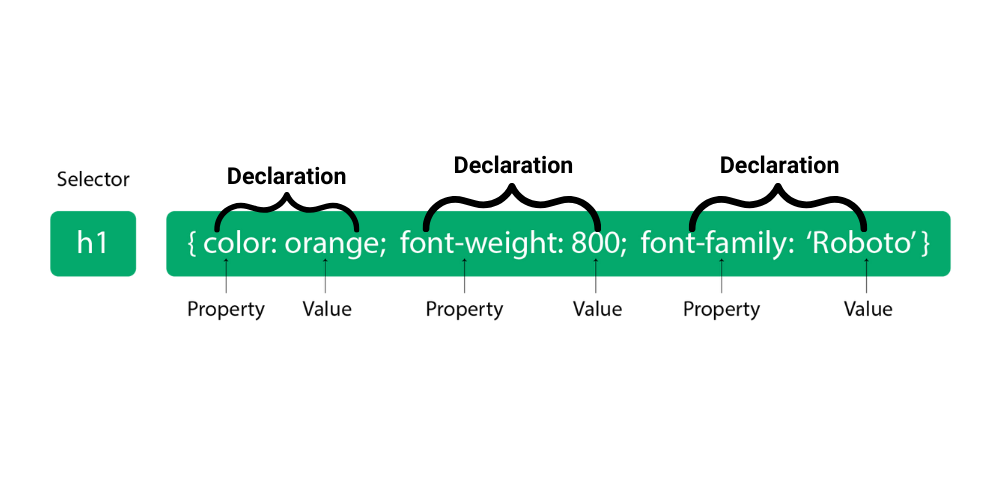
- CSS is made up of selectors which are used to define the elements you want to style with CSS. In this case, I use the h1 element as an example. (See the image below)
- Right after are the declarations enclosed in curly brackets.
- A collection of declarations enclosed in the brackets is called a declaration block.
- Within the selector, there are properties and values.
- To separate properties, use a semicolon (;).
There are 3 ways to apply CSS to HTML.
- If you see a dot before a selector, it means this element is stylized using its specific class name.
E.g., .big_title { color: blue }
- If you see a hashtag before a selector, it means a unique id name which is like a class name but can only be used once.
E.g., #big_title { color: blue }
- If there are no special characters before a selector, it means that this element has been stylized using its tag. I’ll use the heading element as an example to show you the difference between IDs and tags. An ID is used for a specific heading, whereas tags are used to identify all headings on a page. CSS with ID and CSS is far more common than CSS with tags.
E.g., h1 {color: orange; font-weight: 800; font-family: ‘Roboto’, sans-serif; }
Note that all elements that you want to apply CSS are contained between the opening and closing <style> tags.
→ You can learn how to add CSS on the W3School website for more details.
Okay, I’ve covered the basics of CSS. If you’re still confused, go back and read it again. Then simply move forward. Trust me, practicing CSS will help you comprehend it better.
#Step 3: Add the rules to the button class.
| .pagebuilder-button-primary { | Remember to: + place the period ( .) before the button class. + place an open curly bracket ( { ) after the class. |
| background-color: #8843F2; | This represents the button background color (purple). Remember to: + place the semicolon (;) after the declaration. |
| border: none; | This represents the button border (none). Because the default border has a blue color, and I don’t want to show it, I change the border value to none. Remember to: + place the semicolon (;) after the declaration. |
| color: #ffff00; } | This represents the button text color (yellow). Remember to: + place the semicolon (;) after the declaration. + place a closing curly bracket ( } ) after the last declaration. |
Note: To get the accurate button property, visit CSS Buttons on the W3schools website
#Step 4: Wrap the CSS codes for the button within <style></style> tags. Below are the codes that we’ll paste into the HTML Code editor.
<style>

.pagebuilder-button-primary {

  background-color: #8843F2;

  border: none;

  color: yellow;

}

</style>Note: Notice the red highlights.
#Step 5: Close the fullscreen and click Save when you’re done. Let’s see the result.
Nothing’s changed, I know. Let me tell you why. It’s because this button applies all default styling rules. To override the existing rules, use !important rule. As a result, the button will be styled based on the new rules.
Put !important right after the value. Don’t forget to finish with a semicolon. Here are the final CSS codes for the button.
.pagebuilder-button-primary {
background-color: #8843F2 !important;
border: none !important;
color: yellow !important;
}
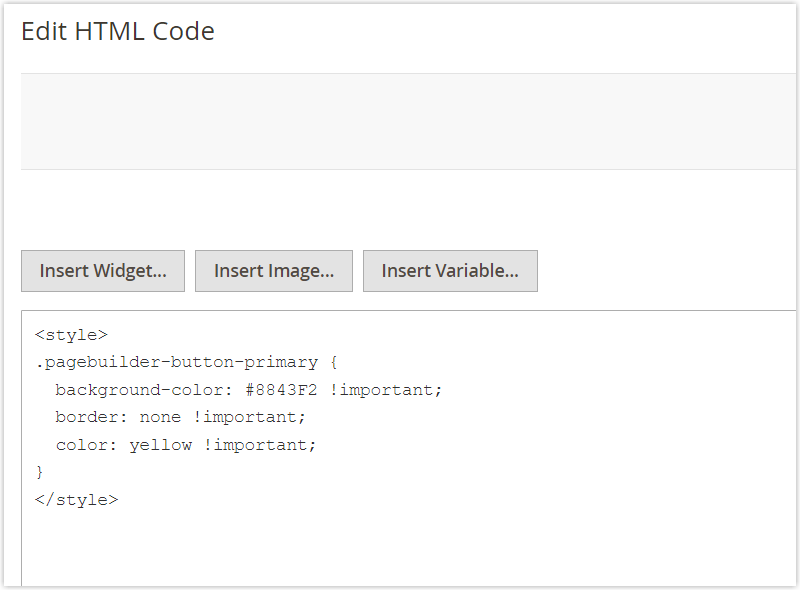
</style>#Step 6: Paste the newly-created codes into the HTML Code editor.
Click Save after closing the fullscreen. Let’s see how the button looks on the front end.
My recommendation is, you should go over this tutorial again to make sure you understand it. Then you’ll be ready to move on to the next section which might be slightly more challenging.
The fact is that these CSS rules have been applied to all of the buttons on this page. Therefore, they all have the same style.
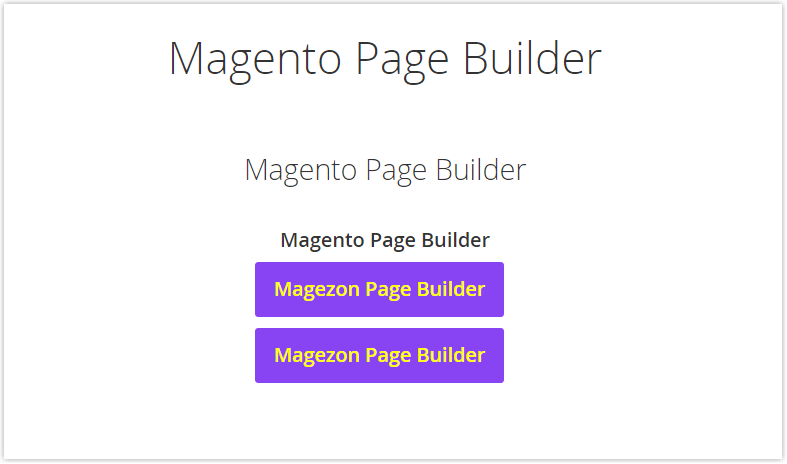
But what if you want the second button (beneath) on the same page to have a different style? In this case, you’ll need to make some minor changes to this button. So, where shall we start?
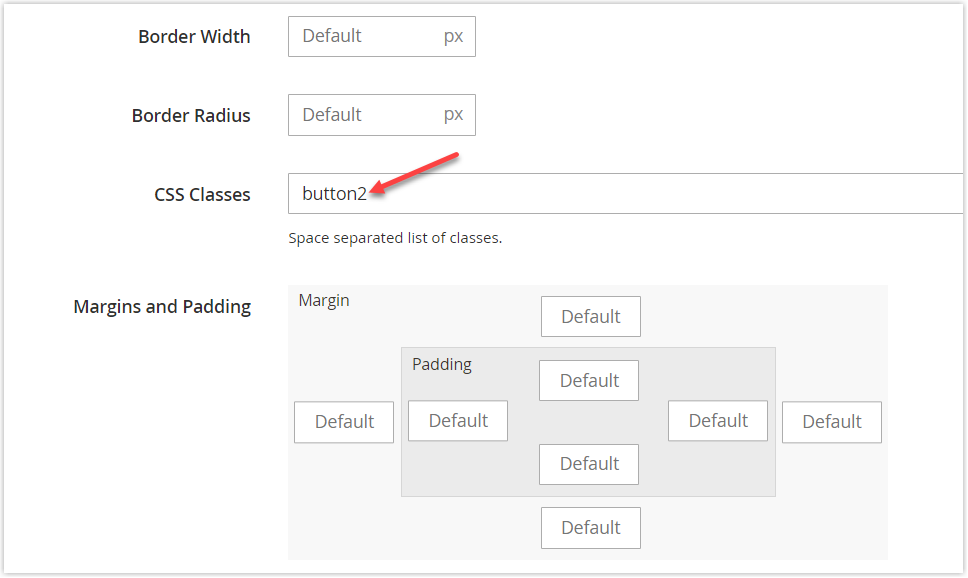
Each button has its own container which has its CSS Classes field. Remember?
#Step 1: To identify these two buttons, give either of them a name. In this case, I chose to name the second button “button2”.
#Step 2: Add “.button2” as the parent class before the initial second button’s class. I’ll change the color of the button background and text as well. For this button, we’ll use the CSS codes below:
.button2 .pagebuilder-button-primary {

  background-color: orange !important;

  border: none !important;

  color: white !important;

}
#Step 3: Then paste the above codes into the HTML Code editor.
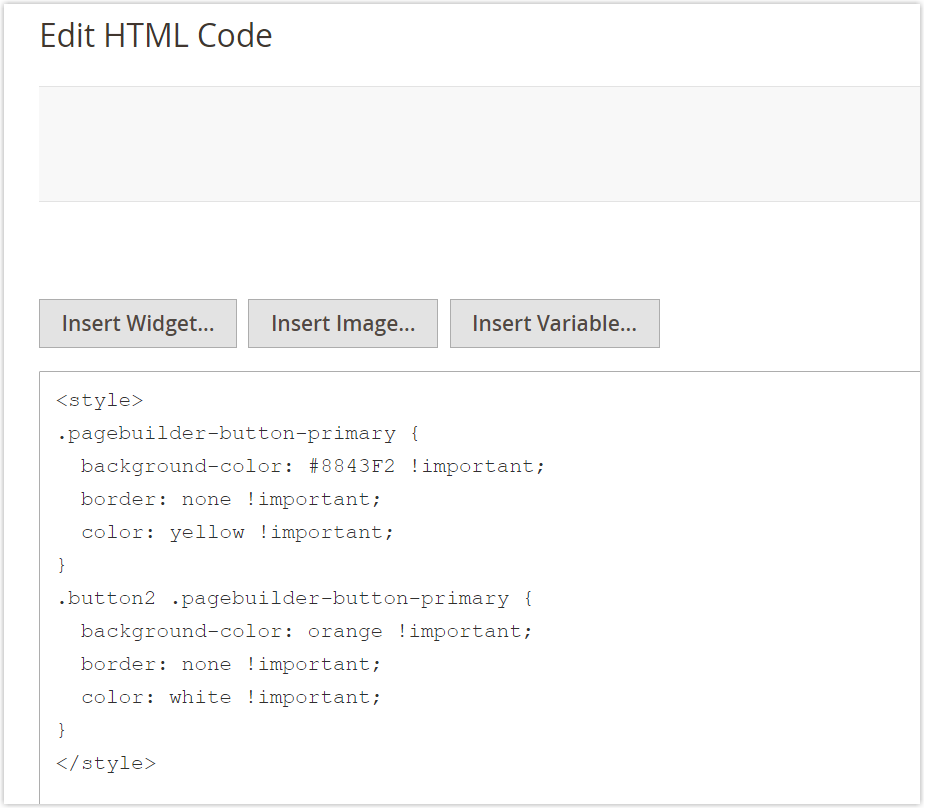
Note: It’s worth noting that you don’t need to create a separate <style> tag for each button. You simply need to group all the CSS codes of the buttons (or other elements in general) into ONLY ONE <style> tag.
#Step 4: After that, click Save. Exit the full-screen and hit Save to complete.
We’ll now check the result on the front end. Look at this.
Try FREE Magezon Page Builder demo today
Easily create beautiful, engaging Magento website in any style whenever you want without relying on developers or designers. Just by drag & drop.
2/ Style Heading With CSS
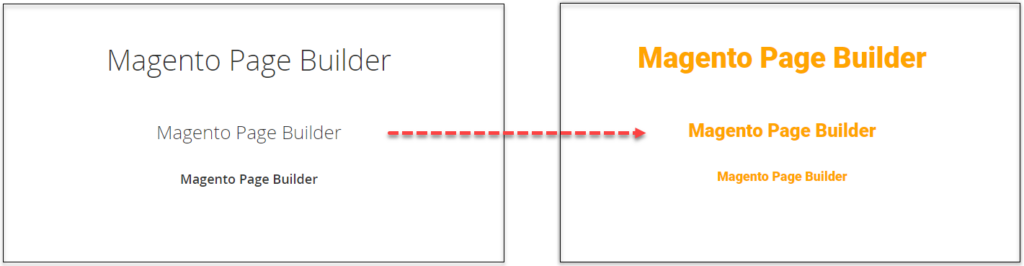
The example below demonstrates how to add CSS to Heading in Magento Page Builder. First of all, I’ll create three headings: heading 1, heading 2, heading 3 (See Image 1). Then I’ll change their font family and text color using CSS.
#Step 1: Select your desired Google font
- To find the font family you want, go to Google Fonts. You can either scroll down the page and pick one or type their name into the upper left search bar.
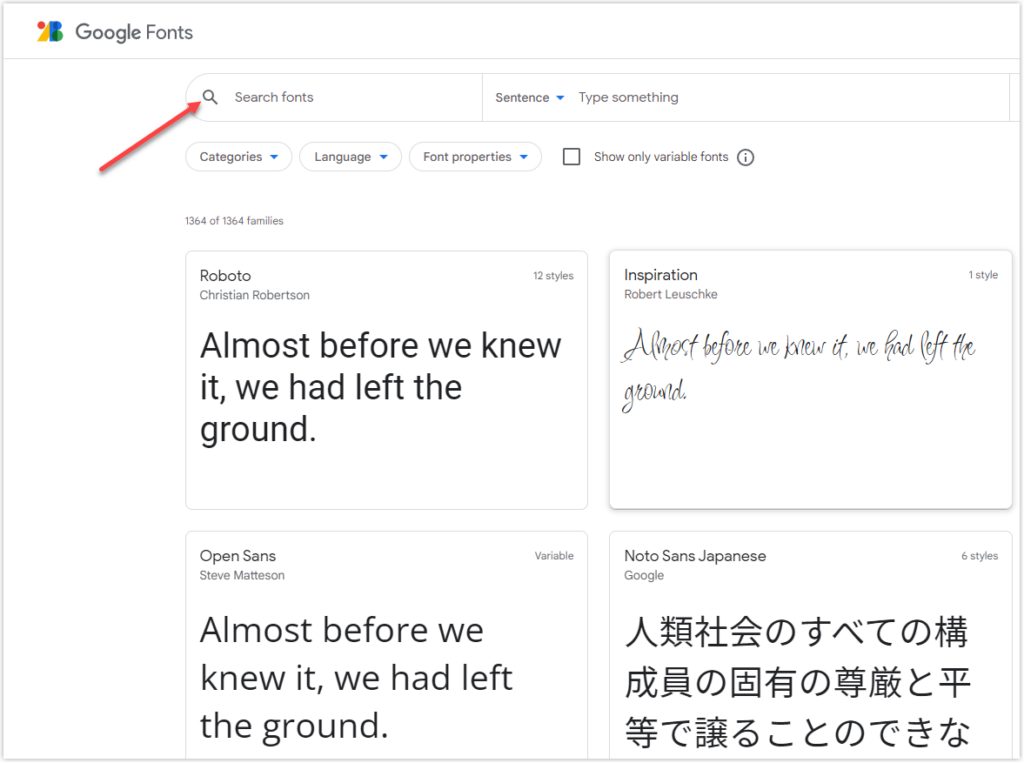
- In this example, I choose the Roboto font family. Click on its box and then you’ll be taken to the page with all Roboto fonts.

- I’ll choose the Medium 500 font. Click on Select this style.
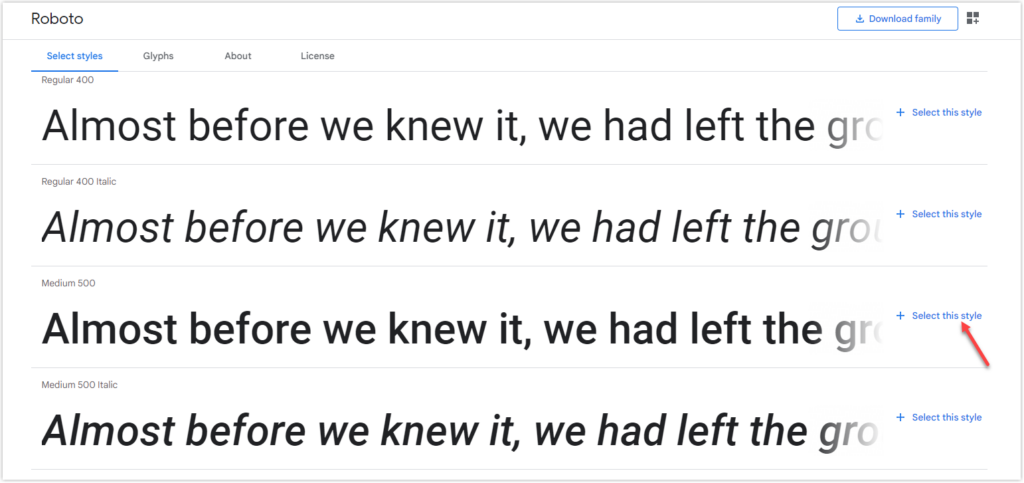
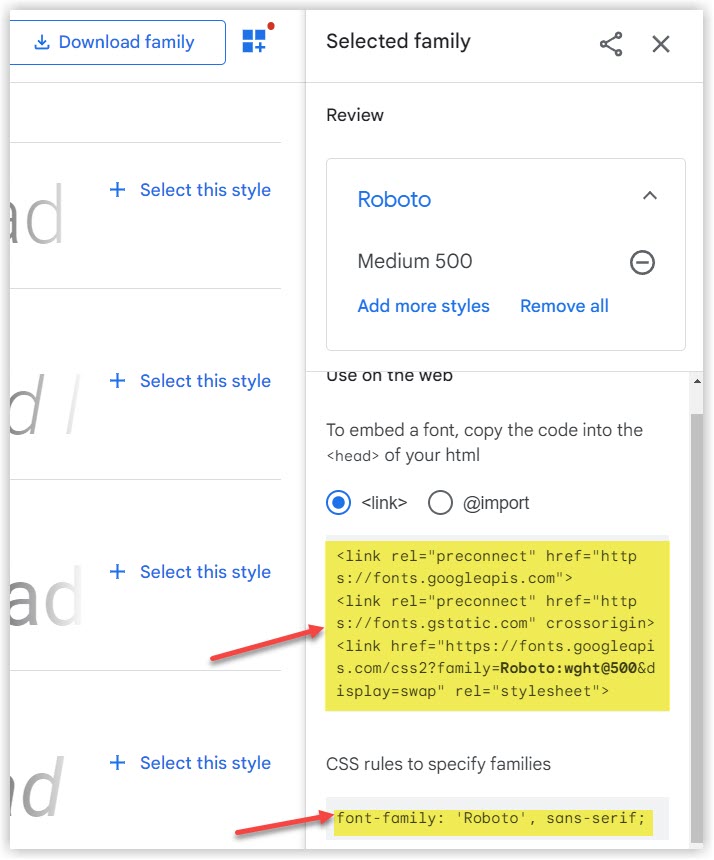
- Click on the window icon to see the font-family rules.
- Copy the generated code that is to be embedded in the
<head>section of the page and paste it temporarily into a text editor.- Embed Font code
- CSS Rule
I used CLASS to apply CSS to the button. In this example, I use TAG to add CSS to the heading. (heading tags)
h1 {font-family: ‘Roboto’, sans-serif; }
h2 {font-family: ‘Roboto’, sans-serif; }
h3 {font-family: ‘Roboto’, sans-serif; }
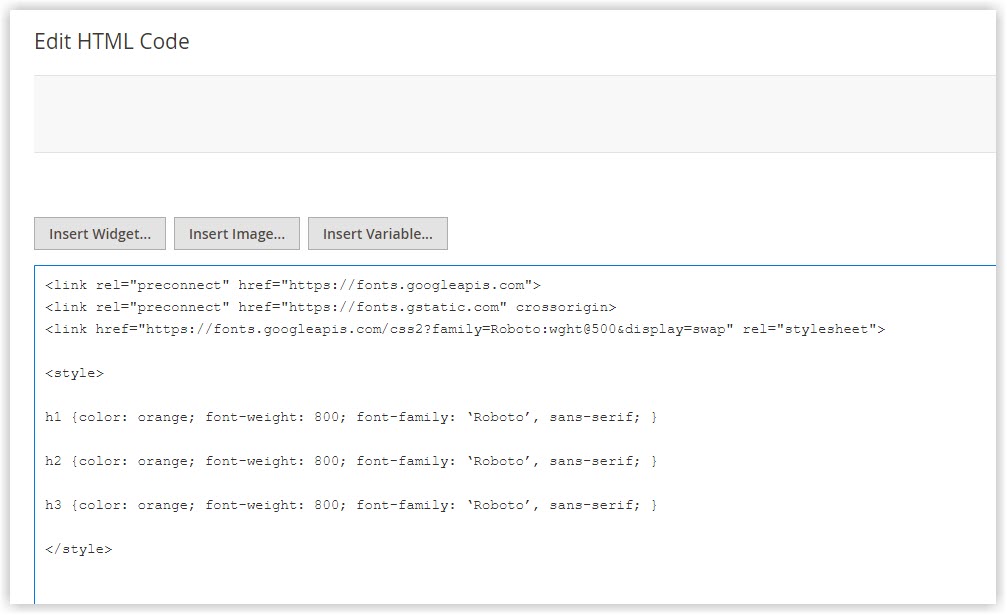
- Next, I want to change my heading text’s color to orange and set the font weight to 800. To do this, insert the proper declarations that you want to apply to the heading. Then, enclose these three heading classes in a <style> tag.

<link rel="preconnect" href="https://fonts.googleapis.com">
<link rel="preconnect" href="https://fonts.gstatic.com" crossorigin>
<link href="https://fonts.googleapis.com/css2?family=Roboto:wght@500&display=swap" rel="stylesheet">

<style>

h1 {color: orange; font-weight: 800; font-family: ‘Roboto’, sans-serif; }

h2 {color: orange; font-weight: 800; font-family: ‘Roboto’, sans-serif; }

h3 {color: orange; font-weight: 800; font-family: ‘Roboto’, sans-serif; }

</style>- Paste the above codes into the Magento Page Builder HTML Code editor.
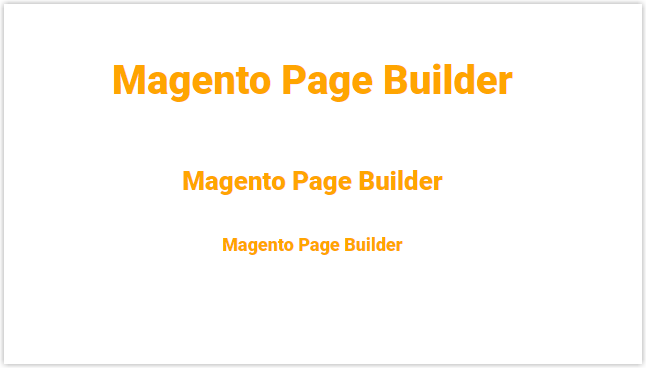
- Close the full screen and save the changes. On the front end, these headings look like this.
And that’s all. If you need further clarifications of CSS, feel free to reach us. We’re always here to help you.
Work With Magento Page Builder HTML Code Settings
After customizing the content types using HTML codes, you may want to:
- insert other special elements in the code, such as widgets.
- or, update some Advanced settings, such as margins and padding.
So, this section is for you.
Head back to the HTML Code settings. Hover over the HTML Code container toolbox. Click the gear icon on the toolbox handle to open the Edit HTML Code page.
Insert Special Elements
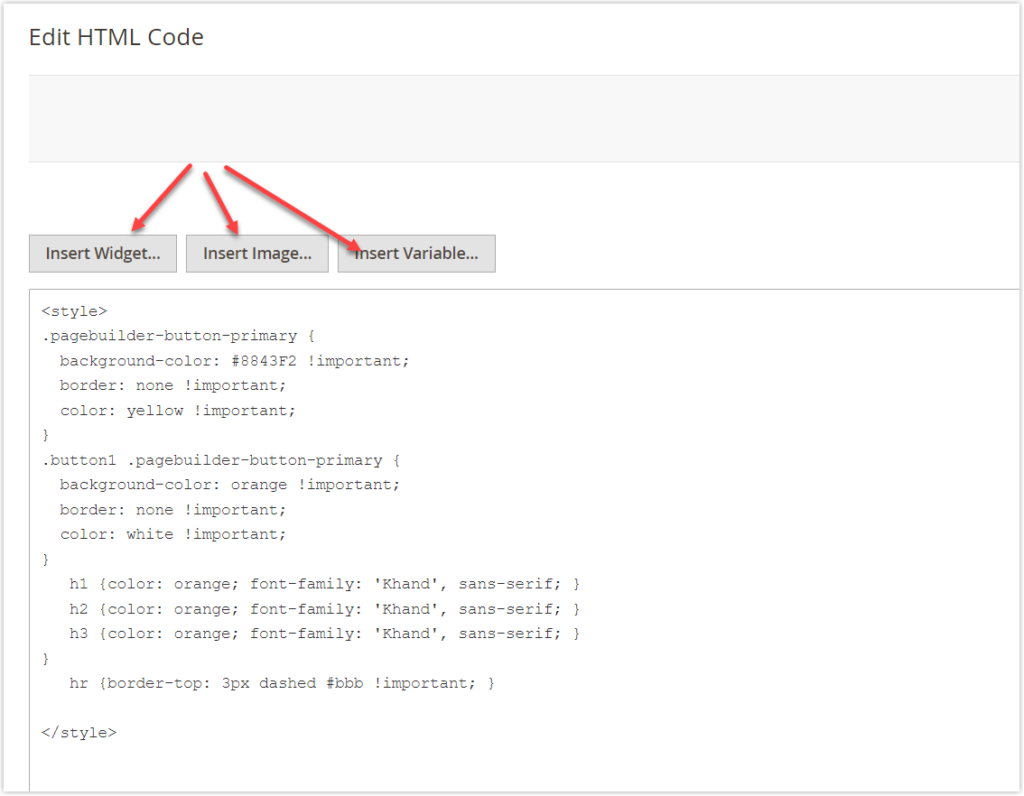
- When you land on the Edit HTML Code page, you’ll see an editor first. This editor supports HTML, CSS, and JavaScript codes, which means you can enter HTML, CSS, and JavaScript code and edit them in the editor
- Besides, you can insert special elements into the code in this editor. These elements are widgets, images, and variables.
Update Advanced Settings
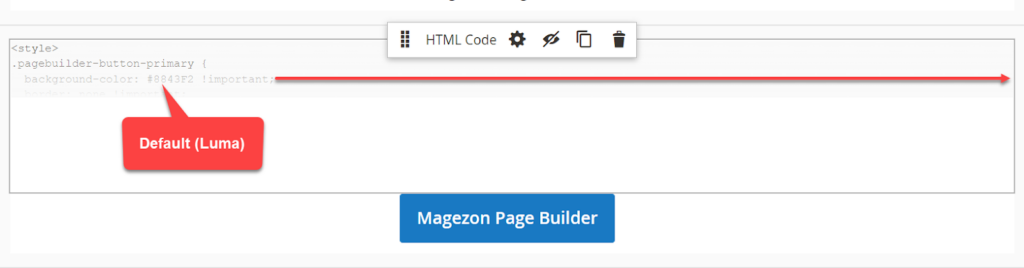
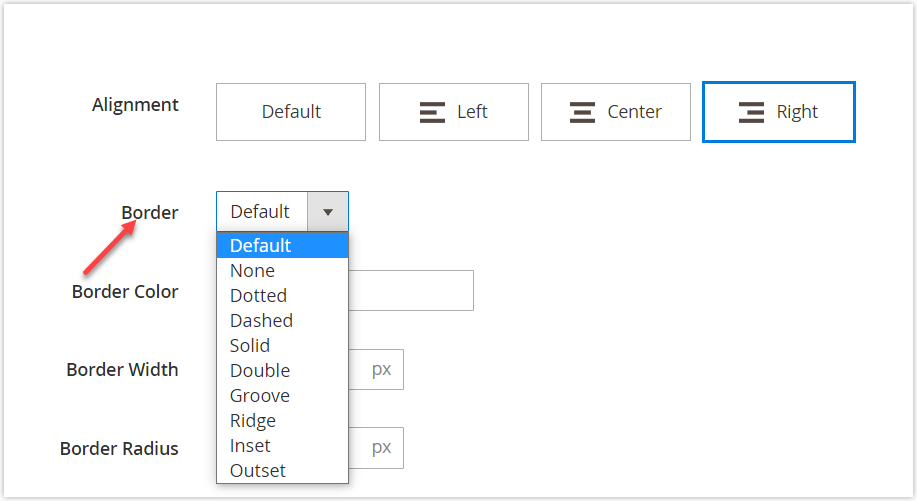
- Alignment: Align the content within the HTML Code container. There are 4 alignment options available.
+ Default: If you take this option, the default alignment setting determined by the current theme will be applied. In this example, we chose the Luma theme. So, if our choice is Default, the content will be aligned to the left border of the HTML Code container.
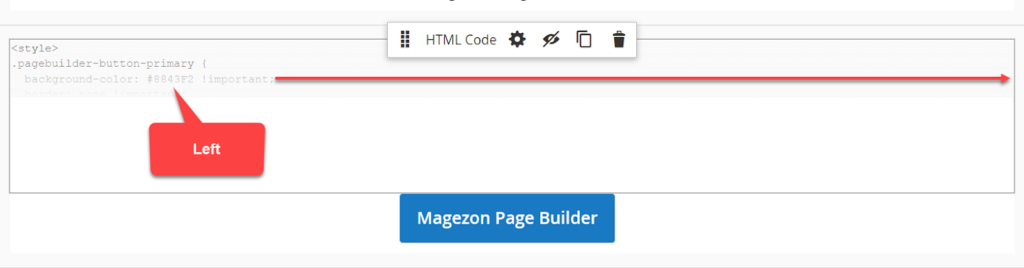
+ Left: Align the content to the left of the Magento Page Builder HTML Code container.
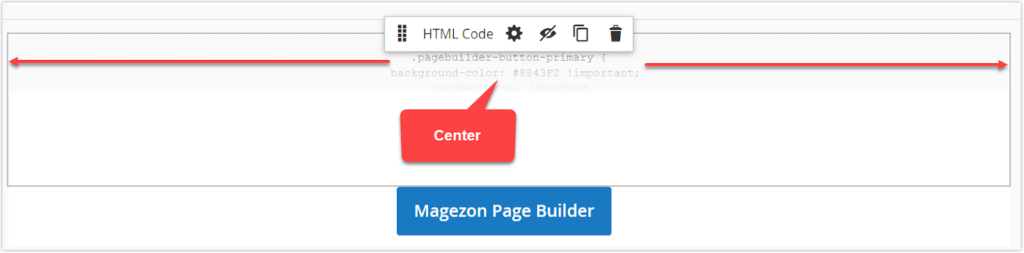
+ Center: Align the content to the center of the Magento Page Builder HTML Code container.
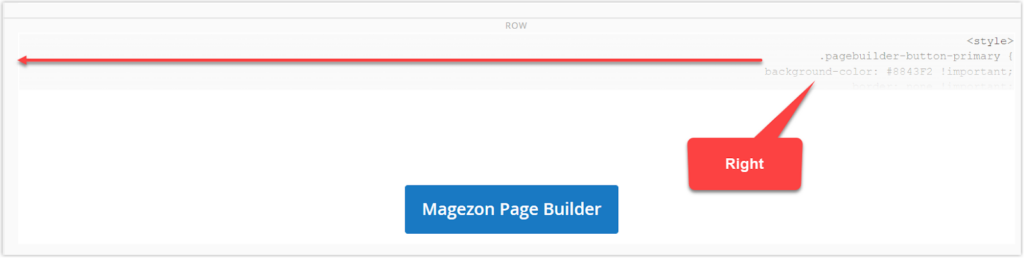
+ Right: Align the content to the right of the Magento Page Builder HTML Code container.
- Border: Select the border style for all sides of the HTML Code container.
To see what these borderlines look like, look at the image below. (Source: W3)
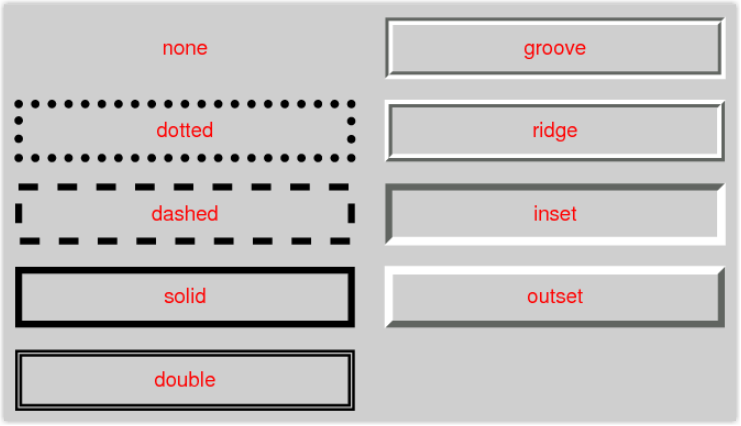
Moreover, we’ve given specific examples for each borderline in the Magento Page Builder Heading post. So I won’t go into detail.
In case you select a border style other than None, you can continue the Border Color and Border Width fields:
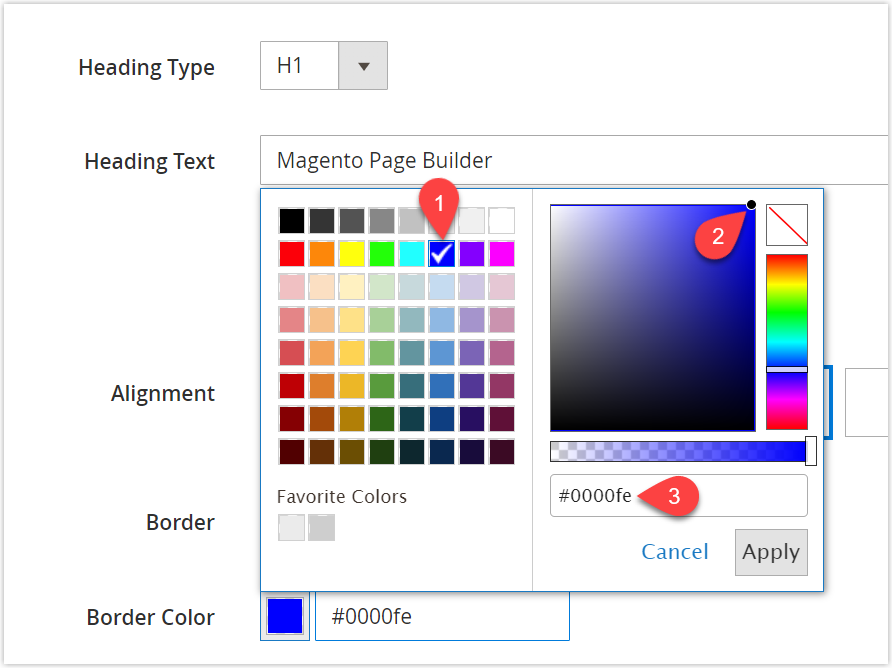
- Border Color: Choose the color for the HTML Code container’s border. To this end, you can choose a swatch from the panel (1), click and drag your cursor inside the color picker area (2), or type a legitimate color name or hexadecimal value (3).
- Border Width: Set the border line width of the Magento Page Builder HTML Code container. (Unit: px)
- Border Radius: Set the border radius of the Magento Page Builder HTML Code container.
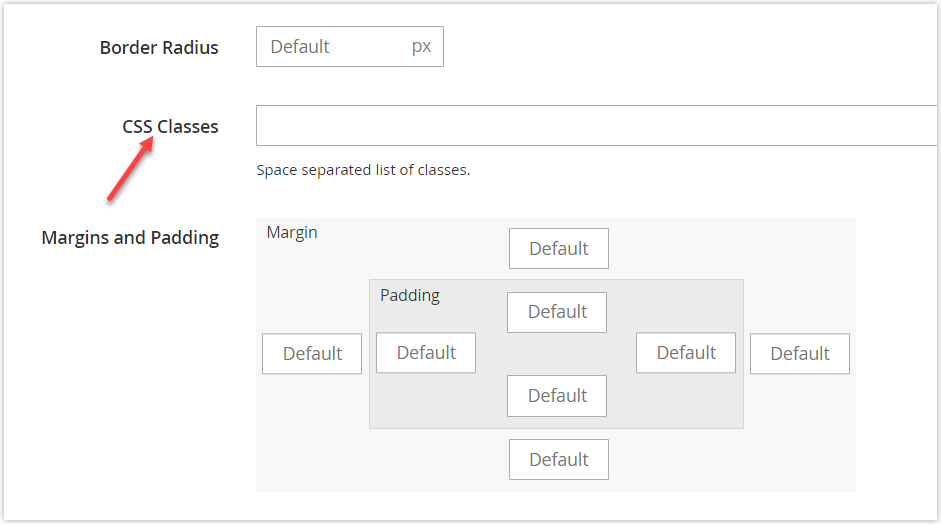
- CSS classes: This is optional. You can enter the names of CSS classes to apply to the HTML Code container. This is especially useful for distinguishing the same elements with different styles. (See the “Style Button with CSS ” for an example).
If you want more than one class, use a space to separate them.
- Margins and Padding: This allows you to create the space outside and inside of the HTML Code container.
+ Margins: The amount of blank space outside the edge of all sides of the HTML Code container. You have 4 options to select: Top, Right, Bottom, and Left.
+ Padding: The amount of blank space inside the edge of all sides of the HTML Code container. You have 4 options to select: Top, Right, Bottom, and Left.

A Page Builder Extension for Magento 2 With Better Functionality
If you’ve been following our series on Magento Page Builder content types, you know for sure we’ll be talking about Magezon Page Builder, our flagship product. Our purpose is to assist new store owners who are using Magento Page Builder to create their websites. We’d also like to promote our Magezon Page Builder to anyone looking for a more efficient way to create visually stunning web pages.
Magezon Page Builder has quite the same element, named HTML Raw which allows users to add all HTML, CSS, and JavaScript. The difference is, that the HTML Raw element comes with more advanced features. This page builder even does a better job when offering users elements to add JS and CSS separately. As a result, users find it easier to perform their work.
However, honestly, HTML Raw in our Magezon Page Builder is only suitable for those who have the code knowledge, or time to do the whole job themselves. But if you are not among them, what do you do? Magezon Page Builder also helps you out in this case. Because this extension boasts over 50 powerful elements to build any layout you can think of, and each has multiple styling options, your pages will still have an eye-catching design without touching any line of code. Visit Magezon Page Builder for Magento 2 to discover its out-of-box features.
Good news: This April, we’ll release Magezon Page Builder 3.0. This new version comes with various robust features that we believe will surpass your expectations. Check out New Page Builder Sneak Peek to see what’s new in Magezon Page Builder. |
That’s all about Magento Page Builder HTML Code
Magento Page Builder HTML Code can be the most challenging content type to master, especially for individuals without a technical background. Start small and practice it over and over again. By doing so, CSS, in particular, will become more familiar to you over time, and as a result, you’ll have greater control over your websites. If you have any questions, don’t hesitate to let us know.
Try FREE Magezon Page Builder demo today
Easily create beautiful, engaging Magento website in any style whenever you want without relying on developers or designers. Just by drag & drop.


