 Magezon Blog Help Merchants Build Comprehensive eCommerce Websites

One of the common questions that Magento beginners usually have is: “Where are images stored in Magento 2?”. The answer is Magento 2 media gallery. But more than a place to keep images, Magento 2 media gallery provides a breadth of features to help users efficiently organize their media files.
This article brings you the complete guide of Magento 2 media gallery.
| The default Magento Media Storage is basic and straightforward, isn’t it. Still, it restricts the uploaded file formats, has a poor image editing tools, and doesn’t support much in workflow optimization. This may delay the success of Magento store owners, especially ambitious ones. We know it, so we develop it. As a perfect blend of Apple-esque and Microsoft Office, our Magento 2 File Manager, enables you to build, edit, preview, and organize all of your assets within the Magento backend. Try once to see how powerful it is. |
Table of Content
- What is Magento 2 Media Gallery?
- How to Enable a New Magento 2 Media Gallery
- 2 Ways to Access Magento 2 Media Gallery
- New Magento 2 Media Gallery vs. Old Magento 2 Media Gallery
- Conclusion
What is Magento 2 Media Gallery?
Magento 2 Media Gallery is a collection of images and videos you’ve uploaded to your online store. It is a system with tools and functions to help you upload, edit, and organize your files within the server.
Magento 2.4 was a massive upgrade in 2020. Along with other new functionality, Magento also introduced the new Magento 2 media gallery. So, what’s new in this gallery? Should you change to the new one or stay with your old friend – the old media gallery? We’ll respond to all below.
| Related posts: Beginner‘s Guide to Magento Media Folder How to Upload Image in Magento 2 How to Add Top Link in Magento 2 Magento CMS: A Comprehensive Overview |
How to Enable a New Magento 2 Media Gallery
Magento 2.4 doesn’t replace the old media library. Instead, it keeps the old version and lets users choose between two. If you want to experience the new Magento 2 media library, enable it first by following the steps below.
Step 1: Navigate to Store > Settings > Configuration
Step 2: After the Configuration window appears, hit Advanced > System
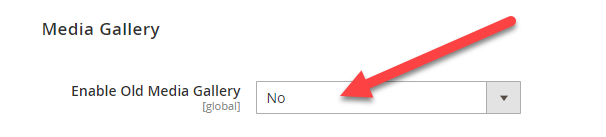
Step 3: In the Media Gallery area, choose No in Enable Old Media Gallery.
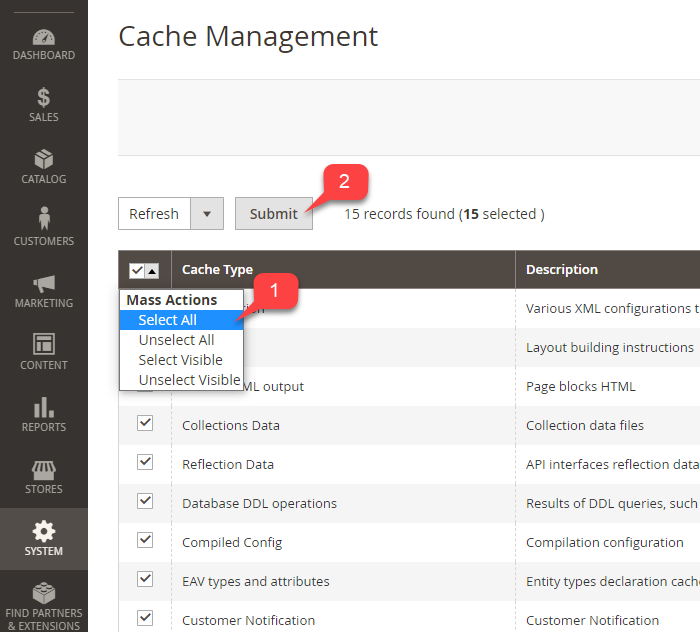
Step 4: On the Admin sidebar, click System > Tool > Cache Management to refresh the cache.
Now, the new Magento 2 media gallery is enabled, replacing the old one.

Optimize Your Magento Store With Powerful Extensions
Looking for fast, efficient and well-coded extensions to build or optimize your Magento stores for sales boosting? Then visit Magezon website and grab necessary add-ons for yours today!
2 Ways to Access Magento 2 Media Gallery
Unlike the old Magento 2 media gallery, the new one has two ways to access it.
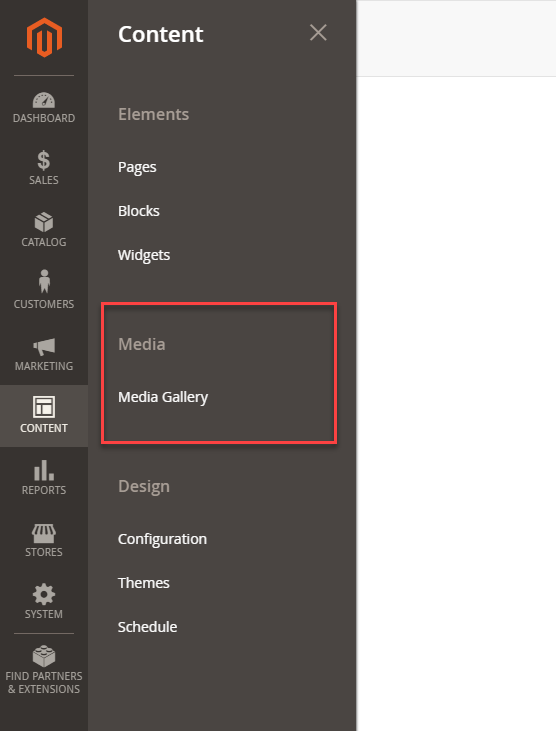
Method 1: Access directly from the Admin Sidebar.
On the Admin Sidebar, hit Content > Media > Media Gallery.
Method 2: Access from a CMS page
This way is similar to how you add an image to a CMS page because you have to access the media gallery before adding a photo.
Either way, you’ll see the Media gallery as below:

New Magento 2 Media Gallery vs. Old Magento 2 Media Gallery
There must be a reason why Magento still has both the old and the new media galleries in the latest Magento version. We believe this guide can’t be complete without introducing both of them to you.
That’s why in the next part of this article, we’ll draw a close comparison between the old and the new Magento 2 media gallery. Hope that you will have an in-depth overview and decide whether to move to the new one or not. Let’s check out the similarities first and differences later.
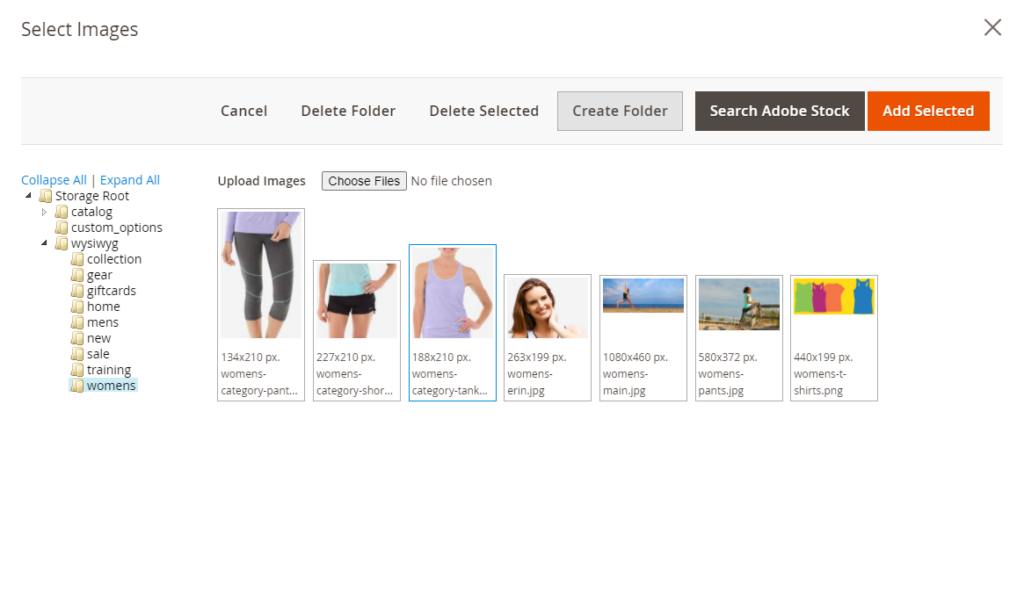
Similarities: New Magento 2 Media Gallery and Old Magento 2 Media Gallery
Let’s take a look at the old media gallery:
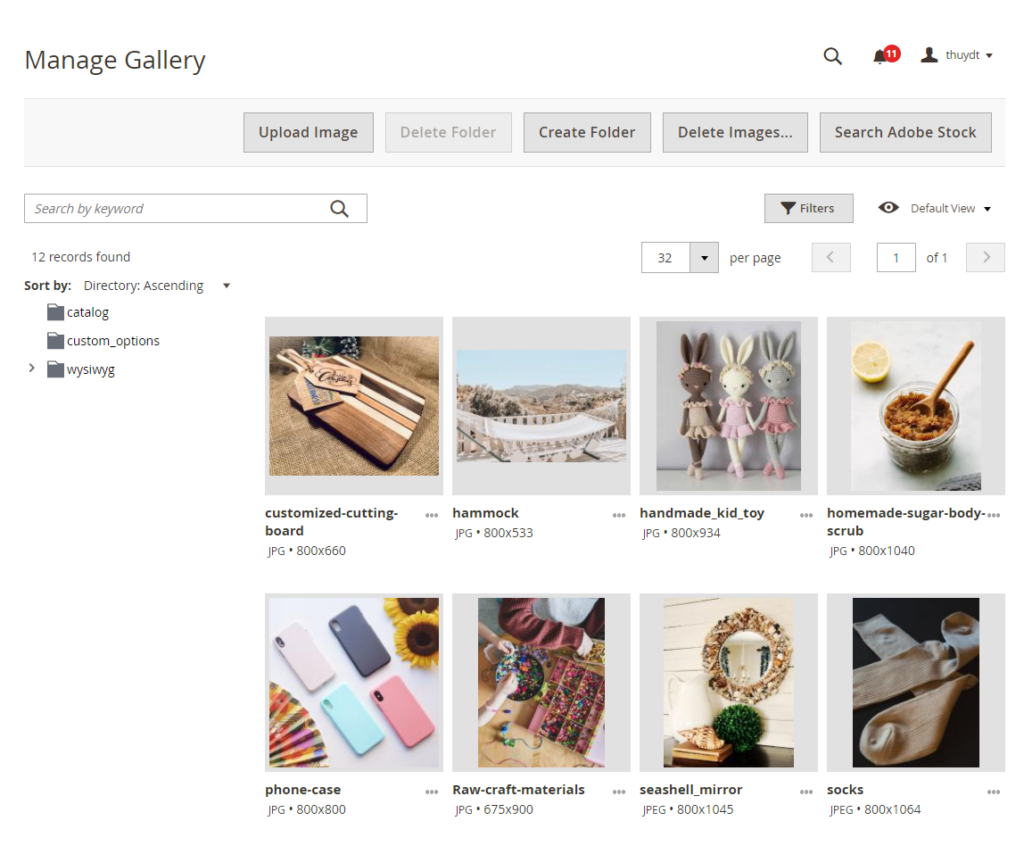
Here is the new Magento 2 media gallery.

Did you notice any changes?
If you’re already using the old media gallery, you’ll have no difficulties using the new one. The interface between the two versions has minimal variation. With that in mind, we break down both versions’ galleries into three main areas: the top bar, the directory tree, and the image stock.
1. The Top Bar
Both top bars provides essential media gallery functions, including:
- Add Selected Image
- Cancel
- Delete Folder
- Create Folder
- Search Adobe Stock
In the new media gallery, Upload Image function is moved from the middle to the top bar. Even though the position is changed, it still works the same as the previous version.
2. The Directory Tree
On the left side of the window is the directory tree. At the same time, the file hierarchy is also maintained with the descending structure. Once you hit the parent folder, all child folders will show up below it.
However, design-wise, the new Magento 2.4 media gallery has file icons tweaked into grey color and flat design. We think both of these tiny changes create a simple and clean vibe for the library. Besides, the Collapse All | Expand All function is also eliminated. That’s actually a good thing because that function seems quite redundant anyway.
3. The Image Area
The middle area is where all images within a folder are displayed. In both versions, photos are still listed with their information such as width & height, name, file type. However, the new media gallery provides some more functions to help you access image info easier. We’ll examine more about these functions in the next section.
Differences: New Magento 2 Media Gallery and Old Magento 2 Media Gallery
Besides the additional direct access from Admin Panel (Content > Media > Media Gallery), the latest Magento 2 media gallery has many updated features as follow:
- Search image
- Sort image by
- Powerful asset filter
- Show image details
- Edit image (by name, tags, etc)
- Delete image shortcut
- Image optimization
All of them help you categorize images effortlessly and, therefore, substantially enhance image management.
Here is a quick overview of the new features.
Search box, Sort, and Filter is the ultimate search engine in your gallery. Combining them in a smart way will boost the accuracy of your search results. You’ll appreciate this feature even more if you’re running an online store with thousands of photos. Meanwhile, the three-dot icon under each photo is also a new feature. It is like a shortcut that helps you view and edit photo info in one click. What’s more, assigning tags for photos is so far our favorite feature, as it helps organize photos by keywords.
Now, let us show you each feature in detail.
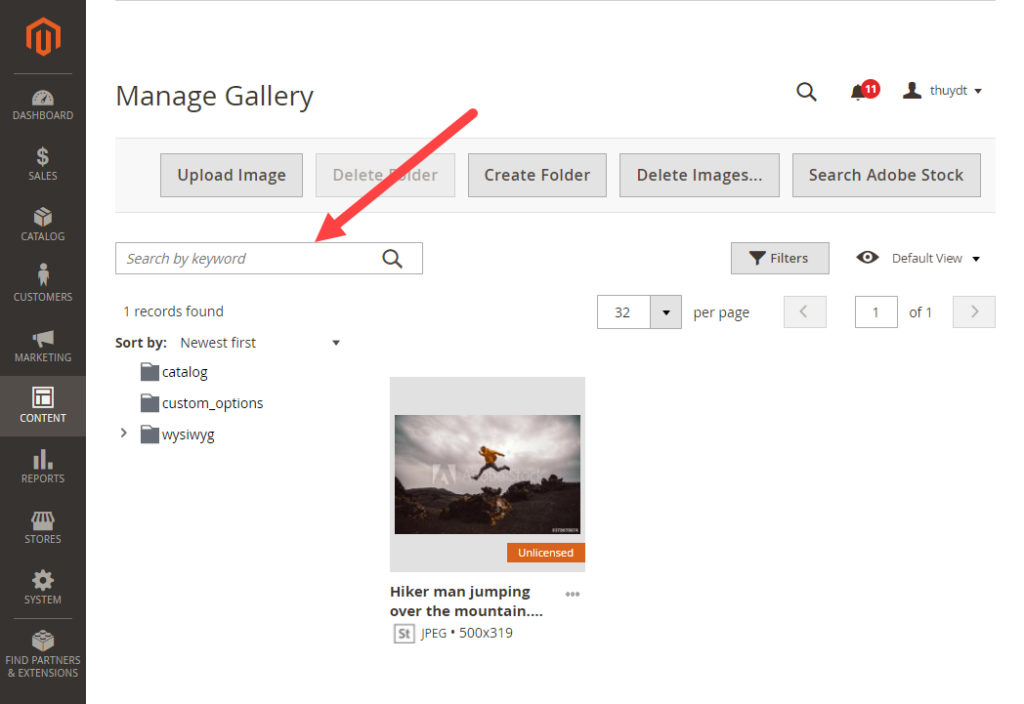
1. Search Image
The new Media gallery in Magento 2 provides you a search bar to help you search any image using a keyword.
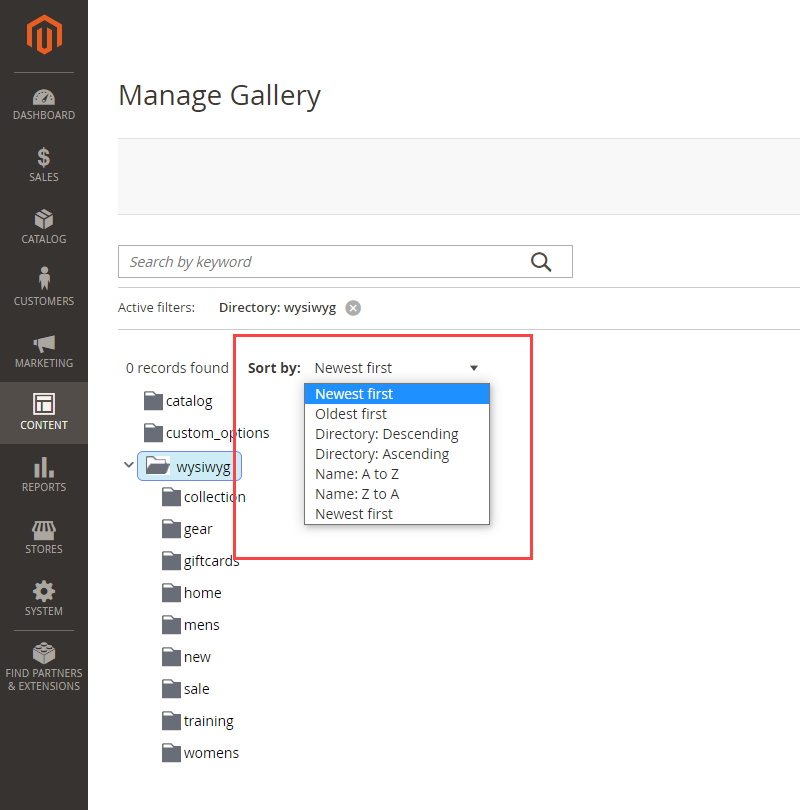
2. Sort by
Sort by is a new function that you’ll like in Magento 2.4. It helps you organize your images by multi-options such as:
- Newest first
- Oldest first
- Directory: Descending
- Directory: Ascending
- Name: A to Z
- Name: Z to A
3. Powerful Asset Filter
The filter in Magento 2.4 media gallery is one of the most powerful features in this update.
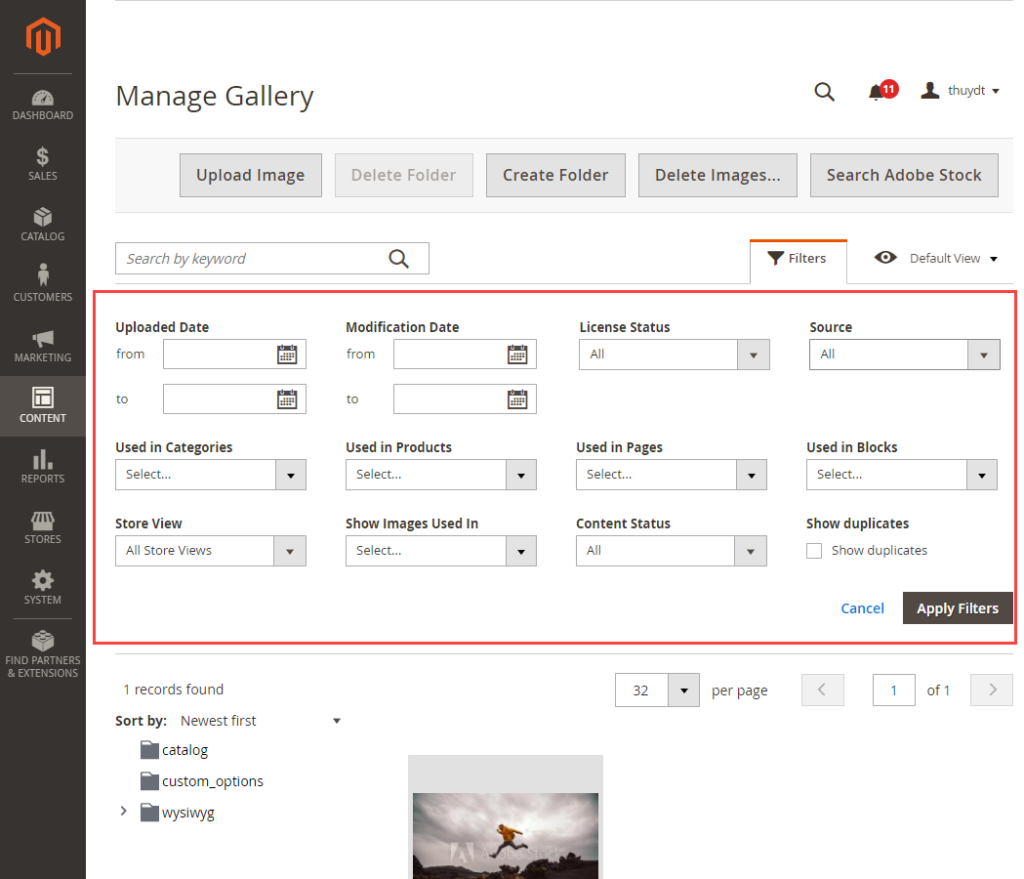
With this filter, you can find any image according to your input data.
You can filter images by many data, including:
- Updated Date: insert a date range to find out the images uploaded in a certain period
- Modification Date: insert a date range to select images modified in a particular time
- License Status: filter for All images, Licensed or Unlicensed images
- Source: find images from All source, Uploaded Locally or from Adobe Stock
- Used in Categories: find pictures by a particular Category name
- Used in Products: insert Product name or SKU to find images that belong to a product
- Used in Pages: insert Page Title to see pictures from a page
- Used in Blocks: check photos according to Block Title
- Store View: see images based on a particular store view
- Show Images Used in: choose options such as Pages, Categories, Block, Products, or Not used anywhere
- Content Status: select Enabled or Disabled status
- Show duplicates: see duplicate assets
4. Show Image Details
In the old Magento 2 media gallery, image details are displayed right under the image with image dimensions, name, and file type. But due to the limited characters, you don’t always see the name and the file type, especially when the image has a long name.
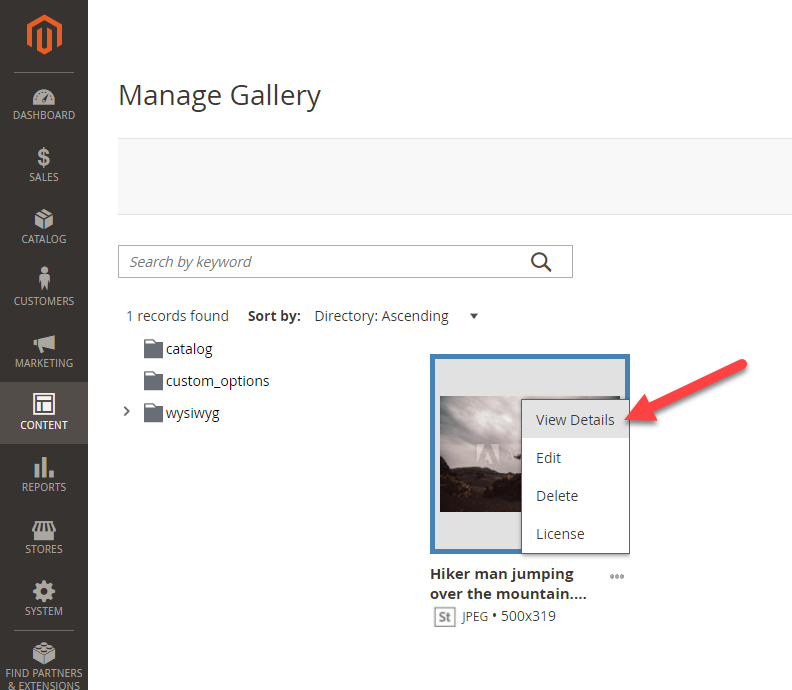
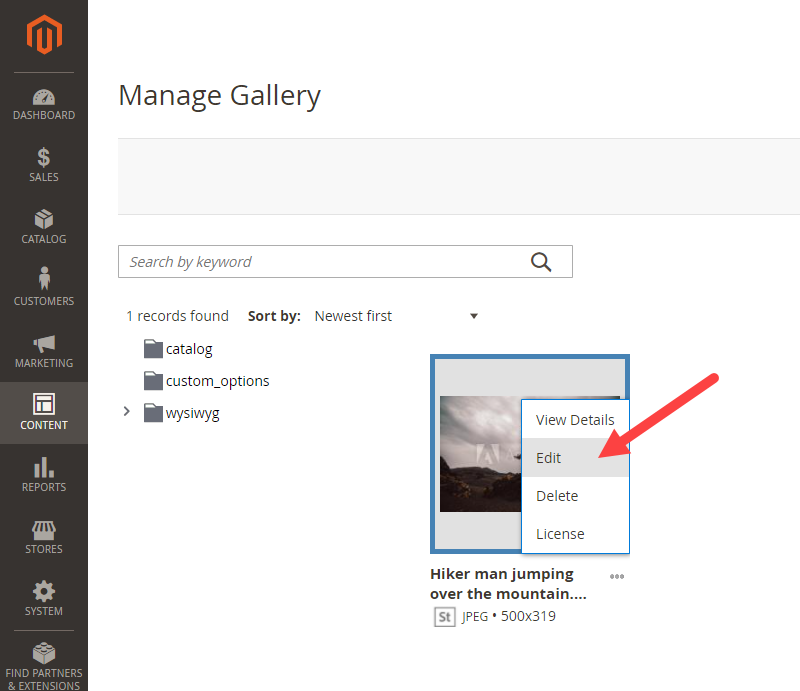
This flaw is now fixed thanks to the new media gallery. It allows you to check full image details. Once you open the library, hit the three-dot icon on the downright corner of an image. From there, you can navigate to View details, Edit, Delete, or License.

After click View Details, an Image Details window will appear, showing multiple pieces of information about a specific image.
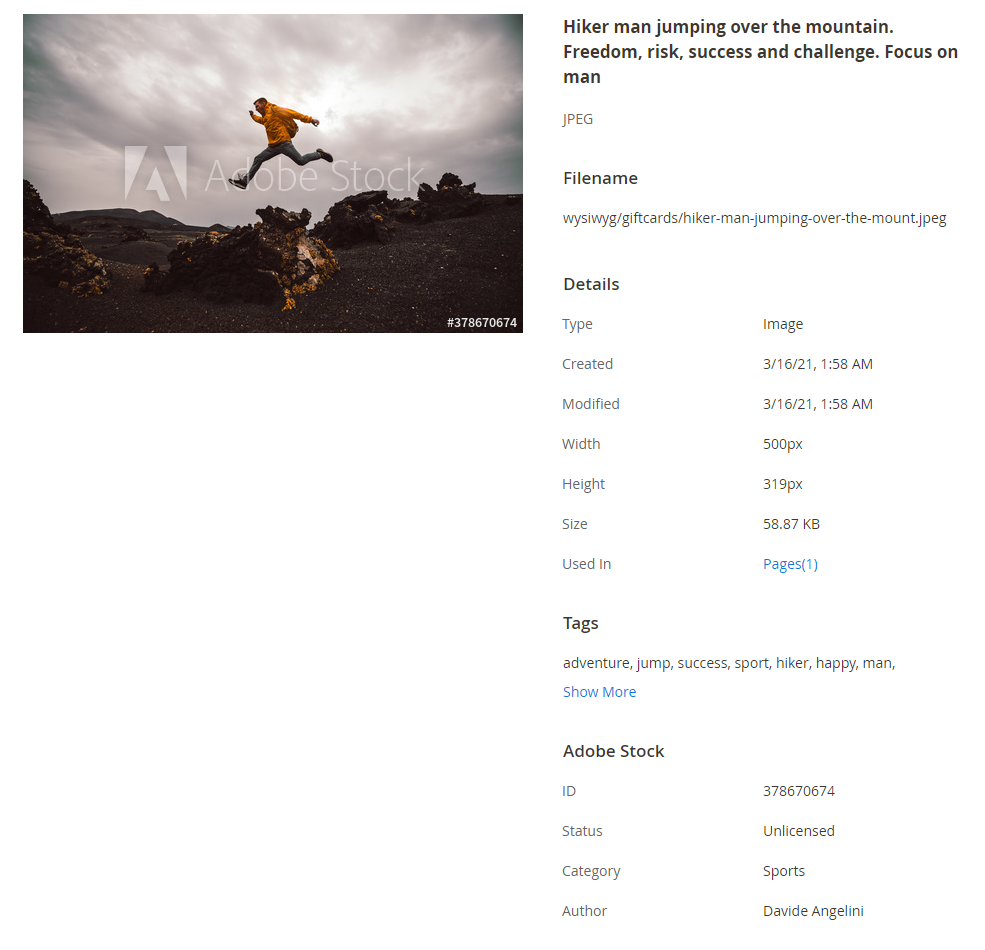
As you can see, we can quickly check:
- Image
- Filename
- File type
- Details: Type, Created Date, Modified Date, Width, Height, Size, Used In.
Note that you will see links to where the image is displayed in the Used In section. If the image is currently not used in any pages/categories, products, or blocks, the Used In area will not show up.
- Tags: tags help you manage assets better. If you’re not using a tag system for your images, you’re missing an invaluable organizational tool. In the next section, we will provide more details about managing asset tags.
- Adobe Stock: display image information from Adobe Stock such as ID, Status, Category, and Author.
5. Edit Details
Edit Details is an excellent option in Magento 2.4 media gallery. It helps you modify image details instantly from the library with Title, Description, and Tag options. By utilizing these options, you will be able to save a massive amount of time managing images.
→ There are two ways you can access the Edit Details area.
#Way1: The first way is to find the photo you want to edit. Next, hit the three-dot icon under the photo. Then, click View Details.
After the Image Details window pops out, hit Edit Details on the upper right corner.
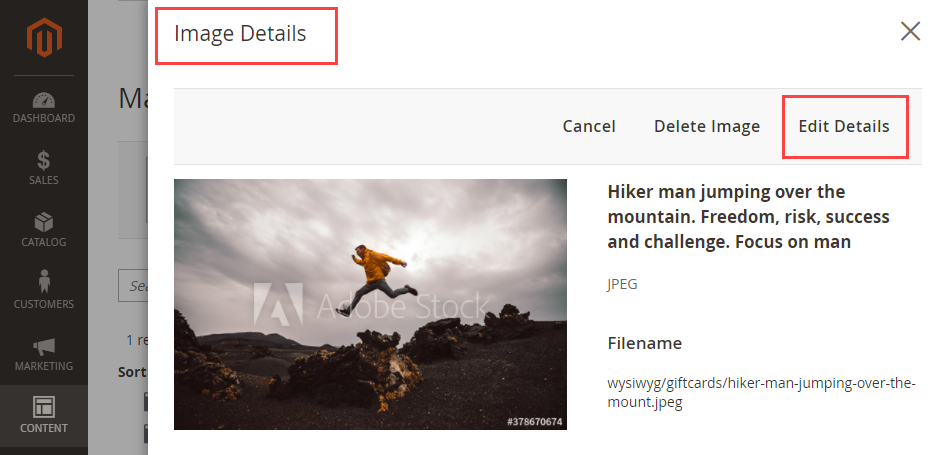
#Way2: The second way is to click the three dots under the photo you want to edit, then hit Edit Details.
Both ways will navigate you to an Edit Details window with several fields like below:
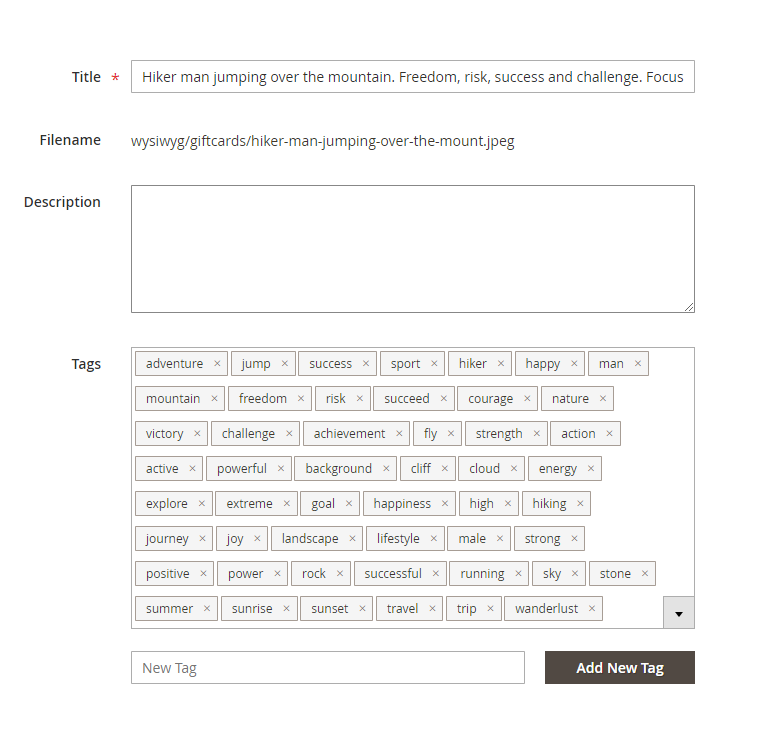
- Title: change image title
- Filename: Filename + name path of the photo
- Description: (optional) add description for your image
- Tags: Add new tags or delete tags for each image. Plus, you can add unlimited keywords for each photo. We have found tags’ best practices for you. Tags are supposed to help organize images, not the other way around. So, use them smartly!
Don’t forget to click Save before closing the Edit Details window.
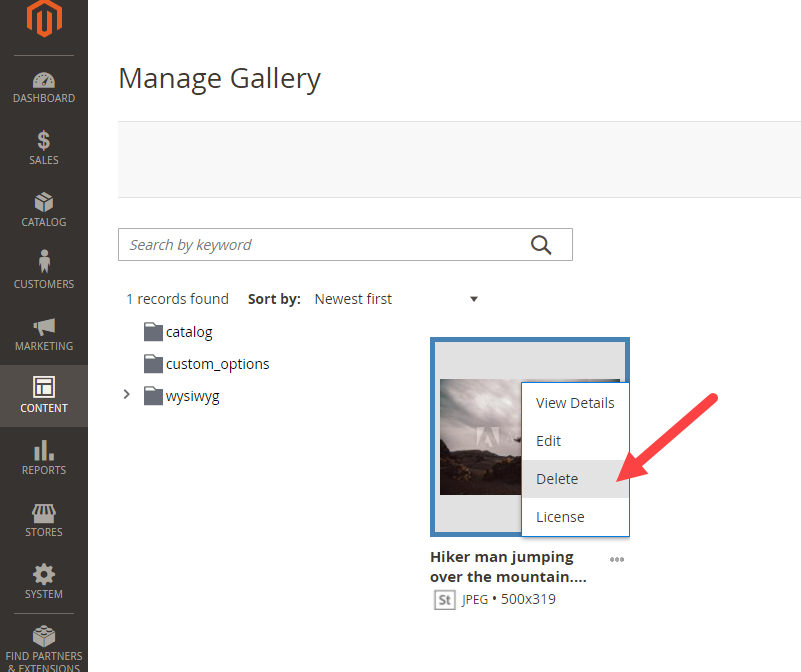
6. Delete Image
Click the three dots below an image > Delete to delete an image.
The new Magento 2 media gallery allows you to delete images in bulk quickly, which we haven’t seen in the old one.
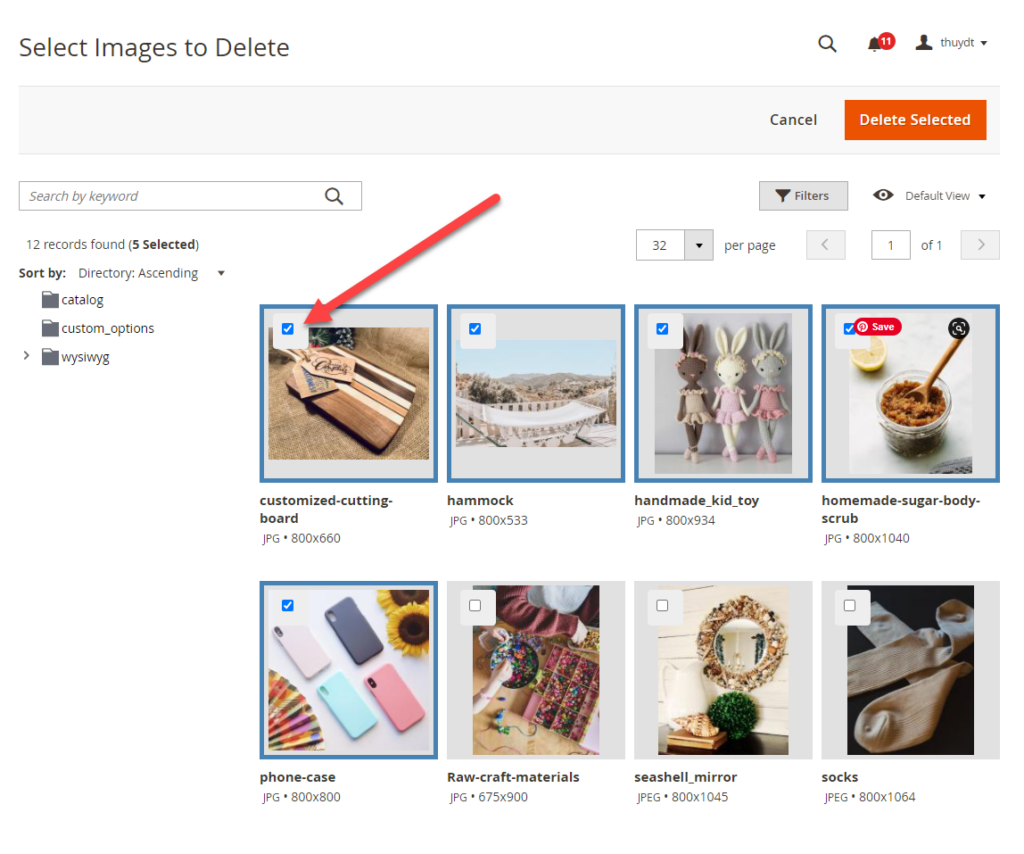
To delete images in bulk, hit the Delete Images button on the top bar.
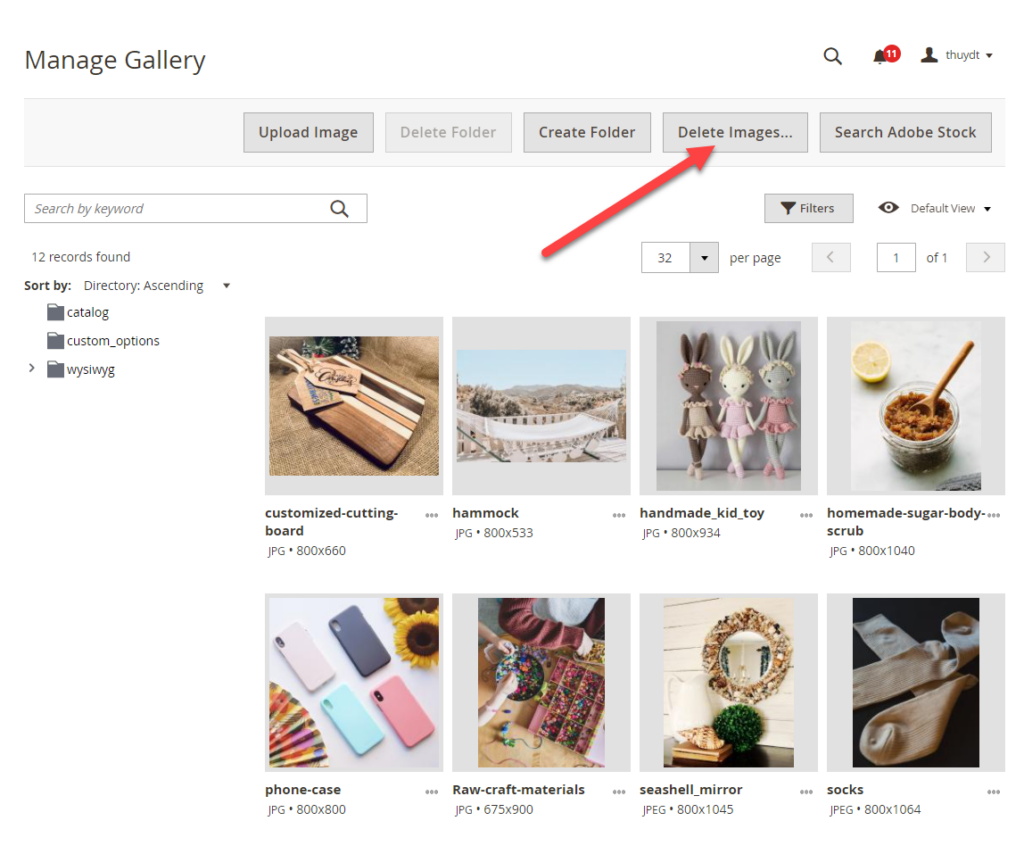
Then, choose the photos you want to delete. Finally, hit Delete Images one more time to complete.
7. Images Upload Configuration
Image is a crucial part of any website SEO and performance. Optimizing images helps enhance your website speed, boost SEO, and create a better user experience. But how to optimize images in Magento 2? There are countless ways. One of them is by using Images Upload Configuration.
Images Upload Configuration in the Magento 2 media gallery helps you optimize bulk photos real quick. This feature allows you to set the maximum width and height of any image displayed on your site. From there, you can fully control the full image size with only several steps.
→ Three steps to set up Images Upload Configuration:
Step 1: Go to Store > Settings > Configuration
Step 2: Move to Advanced tab, hit System
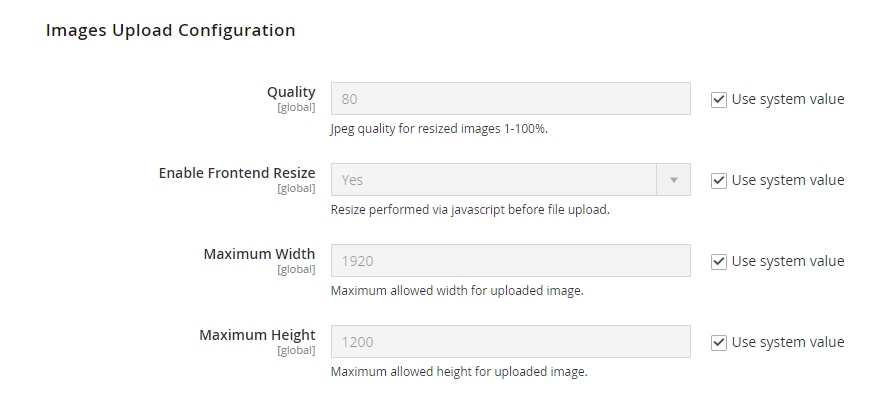
Step 3: Expand Image Upload Configuration tab
- Quality: Insert your desired quality image (1-100%). The default quality for JPEG resized images is 80%.
- Enable Frontend Resize: Choose Yes (default value) to resize performed via javascript before file upload.
- Maximum Width: insert maximum width (px) for uploaded image
- Maximum Height: select maximum height (px) for uploaded image.
Click Save Config to finish.
Once the setting is complete, your Magento store will display the optimized version of your image instead of the original one.
Keep in mind that each time you change the maximum width and height in Images upload configuration, the maximum size of all the previously optimized images will also change as a result.
Conclusion
Overall, the Magento 2 media gallery is a powerful tool to organize media files. Let’s wait and see what’s new in the Magento future updates. Now, we’ll love to see in the comments what you think about both versions, and if you’re planning to use the new one or not. Don’t forget that we produce new Magento 2 Tutorials blogs every week. Follow us today!
Magezon provides diverse fast, efficient extensions that help you optimize your website and gain sales. Visit our website below if you’re looking for solutions to level up your e-stores.
Optimize Your Magento Store With Powerful Extensions
Looking for fast, efficient and well-coded extensions to build or optimize your Magento stores for sales boosting? Then visit Magezon website and grab necessary add-ons for yours today!

