 Magezon Blog Help Merchants Build Comprehensive eCommerce Websites

If you are a marketer, it is important to have your online store running with the most up-to-date technology. Magento 2 is one of the top popular eCommerce platforms on the market today. It has many benefits that will help you increase your conversion rates and overall traffic.
It has many features that make it easy to build and maintain your website, but there are some aspects of the system that can be challenging. One such area is setting up 301 redirects in Magento 2. Read this blog post for tips on how to create a 301 redirect so that they work properly without any hiccups or inconsistencies.
Table of contents
- Basic knowledge about 301 redirects
- Why should you set up a Magento 2 301 redirect?
- When to apply a Magento 2 301 redirect
- Types of redirects for e-commerce websites
- How to apply 301 redirects to your Magento store
- 301 Redirect Strategy Mistakes to Avoid
- 1. Setting up a 302 redirect between your domain versions.
- 2. Changing the backlinks of a 301 redirect domain to another version of your site.
- 3. Using a 302 redirect when migrating content.
- 4. Certain pages use a 301 redirect
- 5. The content you create isn’t helpful
- 6. It is over-redirect
- 7. Redirect a different page from the target page.
- Final Thoughts
Basic knowledge about 301 redirects
A 301 redirect is a type of status code that tells the browser to go from one URL to another. The main purpose is so the user will not see an error message, and they will be able to find your content with ease. In addition, if you use this, it makes your site more organized and easier for users and search engines to navigate.
A 301 redirect helps users find exactly what they want without getting lost because there’s no longer an error message telling them where everything is; now, everything is all collected in one place. It is also easier for search engines as well since now we have fewer URLs and more content, and the keywords we’re targeting are now more concentrated on one page.
Here’s an example: Let’s say your business has three pages, “Contact,” “Portfolio,” and “More.” You would like them all on one page so people can easily access everything we have to offer instead of having multiple pages, which could cause confusion for some users who don’t know that those three pages exist or how to get there.
So if you apply Magento 301 redirects, when someone goes into our site, they’ll see “Home,” which is the main page; under that would be three other links labeled “Contact,” “Portfolio,” and “More.”
To capture the basic knowledge about Magento 301 redirects before learning more about 301 redirect techniques, please read 301 Redirects for SEO: The Basic Know-how.
Why should you set up a Magento 2 301 redirect?
- For user interface and user experience (UI/UX)
Whenever a user visits your store, you want them to have the best possible experience throughout their entire customer journey. Therefore, the website’s layout features need to be easy to find and use so that accessing key information about the product becomes simple.
Even when errors are made or returns are required, there needs to be an easy way for users to get back on track quickly. For these reasons, using Magento 2 301 redirects is important if you wish to maintain a professional level of UI/UX within your eCommerce site.
- For SEO

In the redirects and SEO aspects, it is essential to implement a Magento 2 301 redirect from the old URL that has been indexed to the new URL after you have changed your URLs.
If you change URLs then it might happen that search engines or users are not able to find your fresh content anymore. A Magento 301 redirect tells search engine bots and browsers on which URL they can find your latest content, so they do not determine the old URL redirects as a dead link. It is good practice to set up these redirects in case of bigger SEO changes like moving or deleting pages or categories on your website.
When to apply a Magento 2 301 redirect
There are several different reasons why you may want to use Magento 2 301 redirects in your store. Let’s go over some of the most common use cases:

- You want to change your domain name
Magento allows you to redirect visitors from one address to another with a 301 HTTP header. By doing this, you ensure that search engines will know about the new URL and treat it as a direct update of the old one.
- You’re using different URLs for your store in different languages
Let’s say that instead of myshop.com you decide to use myshop-es.com as the Spanish version of your website. In this case, you’ll need to set up a Magento 301 redirect from ‘myshop-es’ pointing back onto ‘myshop’.
- You need to change locations
Magento allows you to do this by setting up simple 301 redirects, in much the same way as changing domain names or having different language URLs.
Types of redirects for e-commerce websites
There are several types of redirects, each with different reasons and implications. It is important to know the differences between them because it will affect how your website works and whether or not you can still track traffic and clicks on your site.
Different types of redirects for e-commerce websites
There are three main types of redirects: 301 – Permanent, 302 – Temporary, and Meta Refresh.
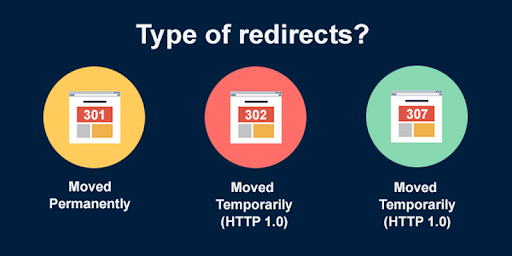
A 301 permanent redirect means that whatever users or search engines follow this redirect will be sent to another page on your site permanently until it is changed or removed.
This is good for Magento 2 SEO guide purposes because you want Search Engines to go directly from the old URL to a new one, rather than back and forth if they should ever re-visit that other resource. A permanent redirect tells search engines that the content has moved permanently (hence 301).
A “Temporary” (302) Redirect means that whatever users or search engines follow this redirect will be sent to another page temporarily before returning back to your website. This can cause redirect problems with how your website looks on Google’s results pages. It also won’t indicate to search engines whether or not the redirect is temporary or permanent, which isn’t helpful to your SEO at all.
A “Meta Refresh” Redirect means that whatever users or search engines follow this redirect will be sent to another page on your site. Still, unlike a 302 redirect, this method is done using meta refresh code within the site’s HTML and not with a server.
What is the difference between 301 and 302 redirect in Magento?
A 301 redirect is a permanent redirect. This means that whatever the URL of the page was, it will always forward to the new URL set as a result of your 301 redirects. Any search engine ranking benefits (such as link juice) gained on Google by having links pointing to your old URLs will continue to flow up to your current pages.
In contrast, a 302 temporary redirect does not send those signals from those old URLs. If you go with a 302, for example instead of a 301, your traffic dropped immediately without being notified about it or simply not redirected according to the ‘old URL’ (the old and outdated page on your website). That is because past visitors bookmarked or linked directly to your original page.
How to apply 301 redirects to your Magento store
- Magento 2 URL Rewrites
In this guide, we’ll be using the URL Rewrite tool in the Magento platform. This tool can be used to create rewrites for products, categories, CMS pages, and customs rewrites.
To create Magento 2 URL Rewrites using 301 redirects, follow these steps:
Step 1: Log in to your Magento 2 Admin Panel.
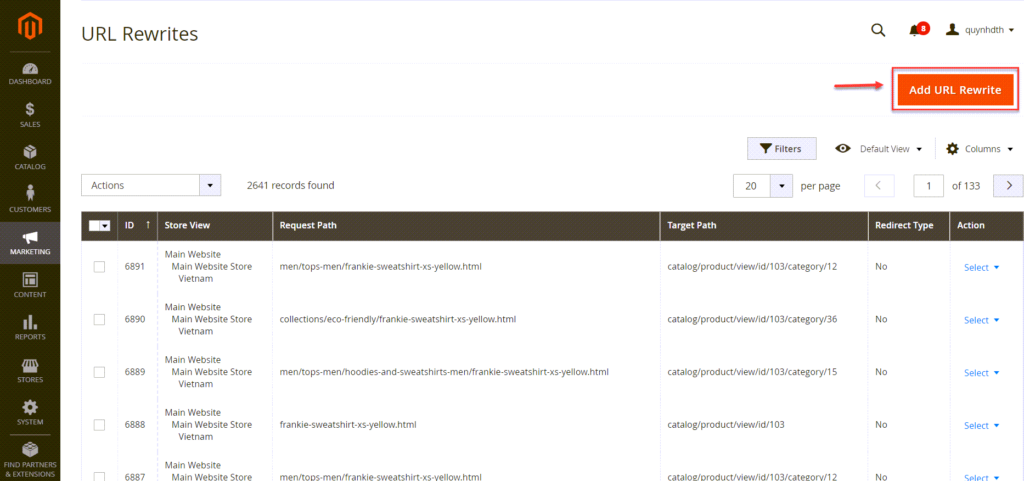
Step 2: In the Admin sidebar, navigate to Marketing > SEO & Search > URL Rewrites.
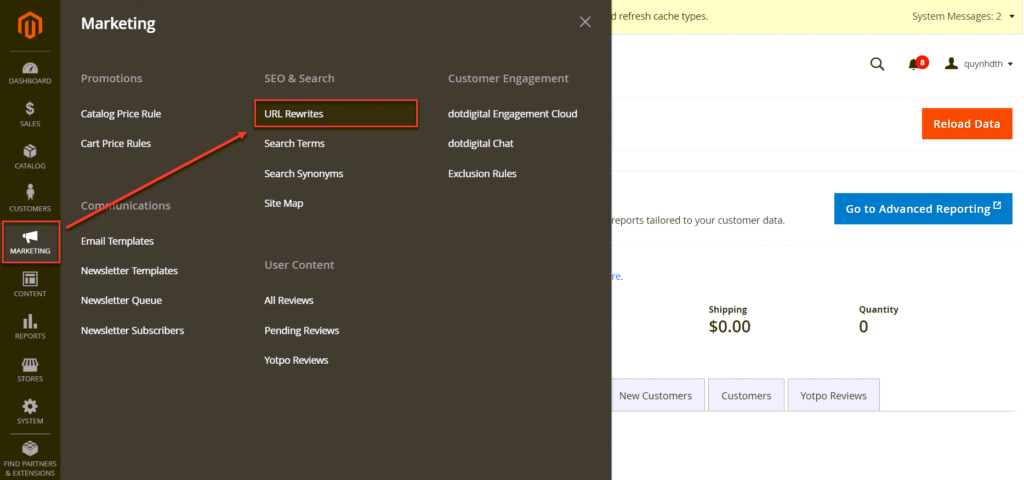
Step 3: Select Add URL Rewrite.
Step 4: Set Create URL Rewrite to Custom / For Category / For Product / For CMS page. This depends on your will.
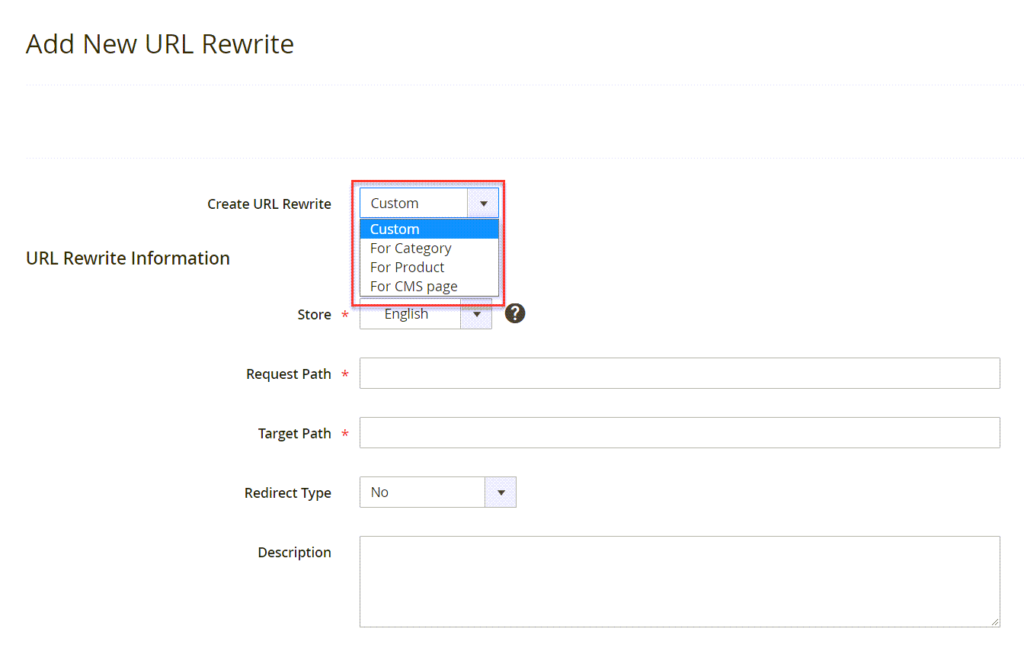
Step 5: Under URL Rewrite Information, you may custom some information about the Magento URL rewrite management:
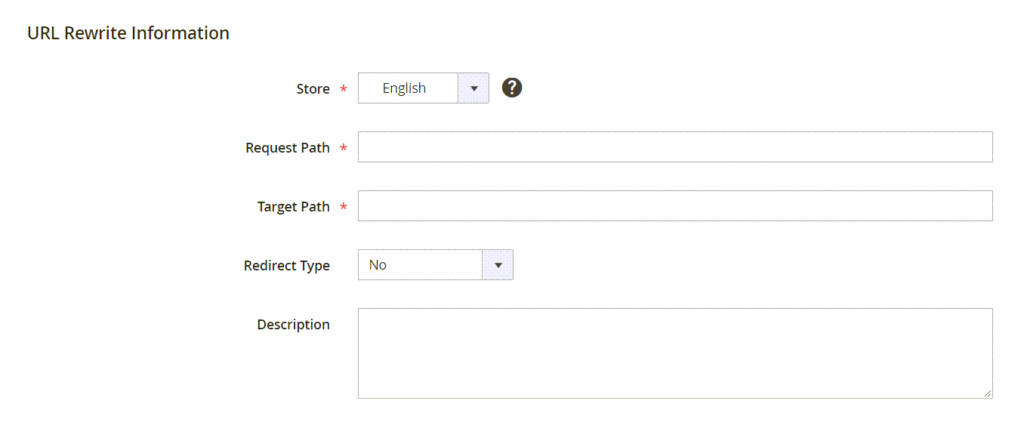
- Store – If you have more than one store view, select the store view where you want the URL Rewrite to be added.
- Request Path – Enter the URL key and path—if applicable—of the product, category, or CMS page that is to be redirected.
Note: The Request Path must be unique. If you have used the same Request Path for a redirect before, you will encounter an error when trying to save the redirect. You must delete the previous redirect before creating a new one.
- Target Path – Enter the URL of the destination. If the target is on another website, insert the fully qualified URL.
- Redirect Type – Set to Permanent (301).
- Description – Write a brief description, maybe of why the link needs to be redirected.
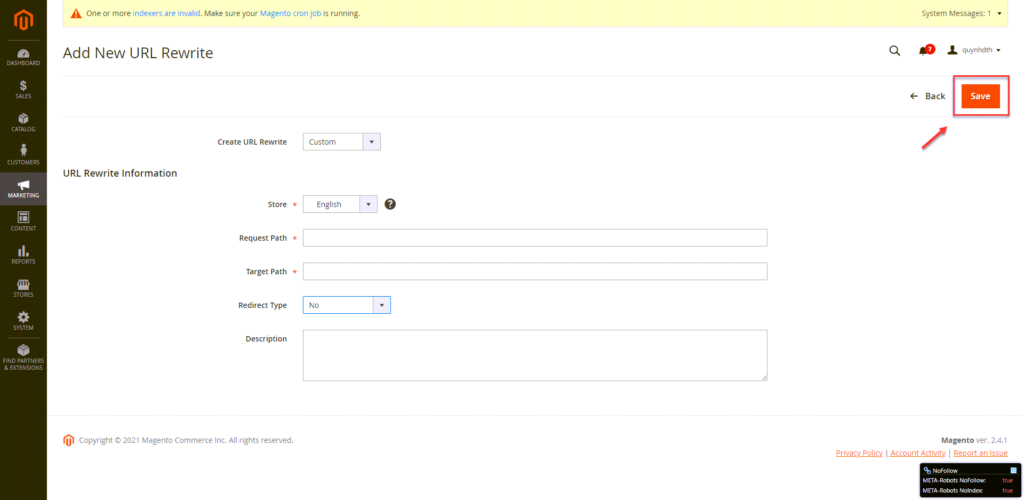
Step 6: When finished, click Save.
- Automatic Product Redirect
Step 1: Log into your Magento Admin dashboard and navigate to System > Configuration > Catalog > Product Redirect > Automatic Product Redirect.
Step 2: From the action drop-down, select “Create Product Redirect“, it will take you to the “Add New Redirection” page.
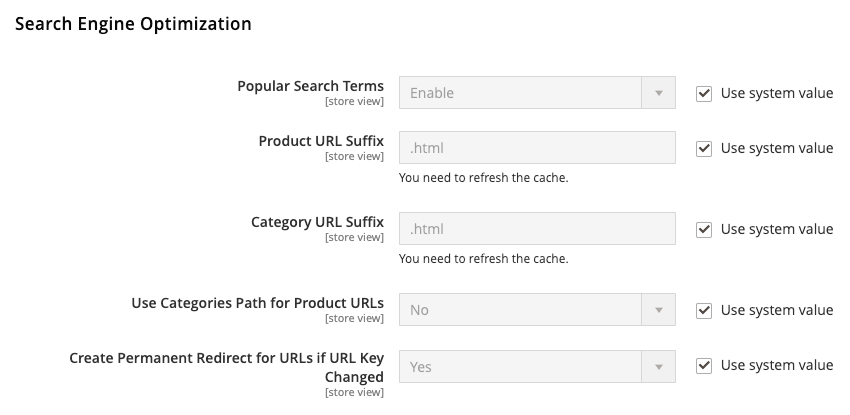
Step 3: Next, you’ll need to fill out the “Add New Redirection” page as follows:
- Popular Search Terms
- Product URL Suffix
- Category URL Suffix
- Use Categories Path for Product URLs
- Create Permanent Redirect for URLs if URL Key Changed
- Magento 2 301 Redirect And Robot Txt Disallow
To set up the robotx.txt file in Magento 2, do the following:
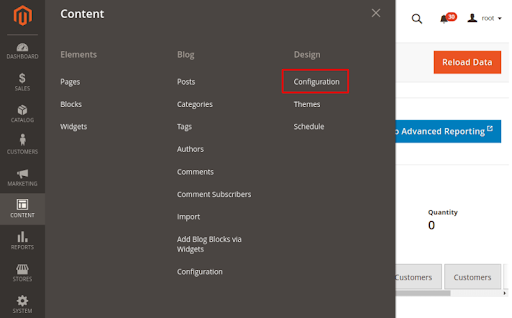
Step 1: Select Content > Design > Configuration from the drop-down menu.
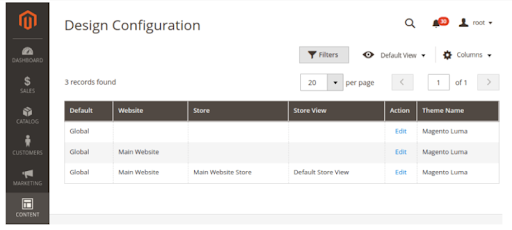
Step 2: Select the Store for which you wish to change the default robots.txt file.
Step 3: Navigate to the Search Engine Robots section.
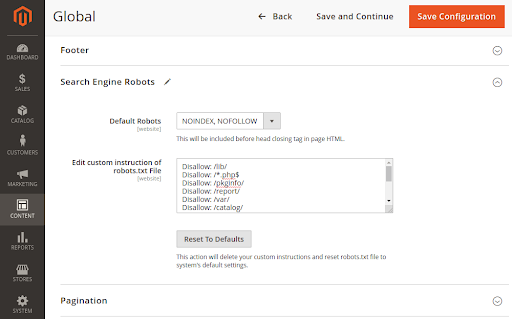
Step 4: Select the Default Robots you wish to activate on your website.
There are numerous alternatives available to you. First, let’s have a look at what each default robot choice stands for:
- Use the INDEX, FOLLOW command if you want web crawlers to index a page and follow the links on that page.
- Use the NOINDEX, FOLLOW syntax if you want web crawlers to index a page but not follow links on that page.
- Use INDEX, NOFOLLOW if you want to index a page but web crawlers will not follow the links on that page.
- Use NOINDEX and NOFOLLOW if you don’t want web crawlers to index a page or follow the links on that page.
Step 5: In the robot.txt Section Custom Edit Instructions, put the custom search engine instructions you wish to evaluate your website accordingly.
Step 6: Click the Default Reset option if you wish to remove all of your custom instructions and return to default.
Step 7: Don’t forget to Save Configuration once you specify the default robots.

301 Redirect Strategy Mistakes to Avoid
301 redirects are a great way for SEO and website owners to ensure visitors return URLs they entered into search engines. The 301 redirect allows the website owner to move the old URL to a new URL and then point that up in search engines which can boost their rankings.
However, there are some common mistakes that site owners often make when setting up 301 redirects that can spell disaster for your website’s ranking.
1. Setting up a 302 redirect between your domain versions.

Many webmasters use a 302 redirect when they want to direct from an old domain to a new domain. However, this is not a good idea since it’s a temporary change. The search engines will only update their index once you stop directing with the 302 redirects or if you completely 301 redirect to your preferred version of your website.
2. Changing the backlinks of a 301 redirect domain to another version of your site.

If you have been using a 301 redirect strategy from an old domain to a new domain, it is not advisable to change the links on that old version because it will mess up all of your attempts at building link authority and clean up bad backlinks.
There are some exceptions to this rule, but you shouldn’t be terribly concerned with cleaning up more than 3-4 links on any given page. So, if you have over 100 links on a page of the old website, leave them, or Google may think they are unnatural links or spammy links which could result in poor rankings for all pages redirected.
3. Using a 302 redirect when migrating content.

Migrating or changing your web pages can be a tricky process – if you’re providing the search engines with a temporary change, this is fine as long as the new URLs are completed before the changes start to be indexed.
However, if you’re constantly changing content on your site by moving from one version to another, it’s probably worth considering a permanent solution such as a 301 redirect strategy.
4. Certain pages use a 301 redirect
Never use 301 redirects for these types of pages: login/logout, user profile edit page, search results pages, 404 error page. The reason is that when Google crawls your website and sees that there are 301 redirects to these pages, they then understand that you really don’t want them to index this page or follow its link juice around.
So if you need to send users to different versions of the search results page depending on what page they’re coming from, just use the canonical URL tag instead.
5. The content you create isn’t helpful
If you decide to set up a 301 redirect, you have to be careful in your “rewrite” so that the search engines can understand what is being redirected to. You should avoid using irrelevant keywords when setting up new URLs. This is because it would only confuse Google about what your content is really about, and it will also not be efficient or effective for your business objective.
6. It is over-redirect

If you frequently redirect pages to other pages on the same website, then it can be perceived as a form of cloaking and may result in your site being banned from the search results.
A good example is that if you have different contact page URLs, avoid forcing users to visit all of them or none at all by 301 redirecting everyone to the home page. This will result in frustration for your visitors since they’ll end up at different locations when they click links.
For SEO purposes, however, it’s okay to keep multiple links for specific content or use anchor text links along with natural link-building strategies.
7. Redirect a different page from the target page.
It’s brief with the right structure and record-keeping, but make sure you redirect to the right sites. For example, a person seeking your homepage should not be sent to your store page.
Maintaining this seamless transition will help SEO to be precise and will make your website more joyful.
If you are thinking about reviewing every content of a migration site or just renovating a few old web pages, Magento 301 redirects assistance. You will not take a dive when you are preparing this new stage, and website users will continue to discover the useful material they are seeking for. Think about adding this new stage to your project.
Final Thoughts
In a nutshell, we’ve shown you how to do a 301 redirect. The Magento 301 redirect setup techniques we’ve discussed should give you a solid foundation to build on as you try and optimize your Magento store. We know that the process can be frustrating, but it doesn’t have to be!
With any questions about the techniques, please leave a comment below. You may also find it helpful to check out our other blog posts for more information on optimizing your e-commerce site. Thanks so much for reading this post – if you found it informative, don’t forget to share this 301 redirect tutorial!
Follow us on Facebook, Twitter, Instagram, and LinkedIn to be informed about the latest news and information about Magento and Magento extensions.

Optimize Your Magento Store With Powerful Extensions
Looking for fast, efficient and well-coded extensions to build or optimize your Magento stores for sales boosting? Then visit Magezon website and grab necessary add-ons for yours today!
