 Magezon Blog Help Merchants Build Comprehensive eCommerce Websites


Magento has a robust functionality called Page Builder. The Commerce Edition (Version 2.3.1) has featured this functionality since 2018. Meanwhile, until August 2021, Page Builder has been available in Magento Open Source (Version 2.4.3).
With Page Builder, Magento store owners can generally build simple pages with a user-friendly drag-and-drop editor, which is a perfect replacement for the traditional WYSIWYG editor. Users who have the slightest idea about codes can create their web pages on their own. Moreover, Page Builder helps users maximize their efficiency in designing their web pages.
Here are the desirable features Magento 2 Page Builder owns.
- Design custom page using sets of advanced content tools
- Set full-page layouts for CMS pages, products, and categories
- Automatically update every change from the backend in the real-time
- Easily change the position of content types using a user-friendly drag-and-drop editor

Try FREE Magezon Page Builder!
Easily create beautiful, engaging Magento websites in any style whenever you want without relying on developers or designers. Just by drag & drop.
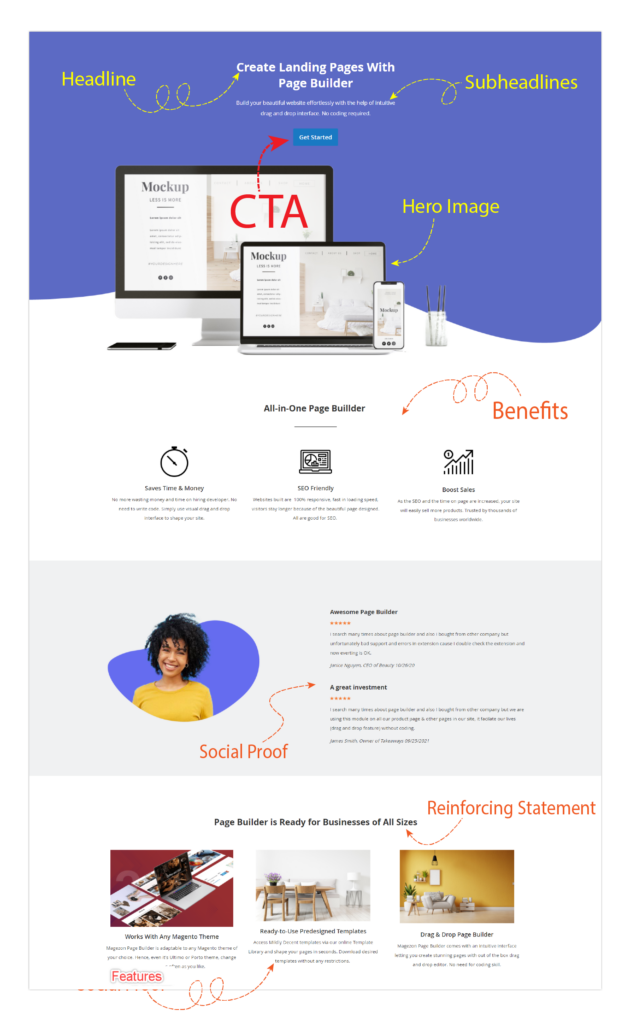
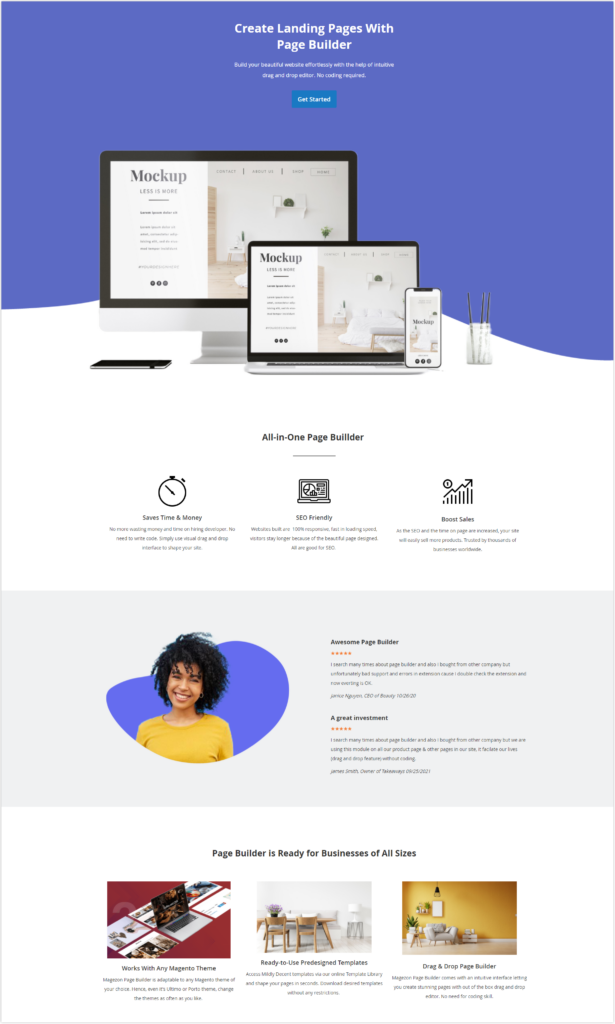
I will walk you through step by step how to create a simple Magento 2 landing page using Page Builder, particularly a sales landing page. First and foremost, I want to show you the landing page I have built, along with the fundamentals of an ideal landing page.
My advice is you should first refer to A Beginner’s Guide to Website Landing Page to learn the basics of a landing page. Then, you can move ahead.
Table of contents
Configure before you start
First, make sure the Admin Session Lifetime is long enough so that you won’t be interrupted from creating a Magento 2 landing page by the session timing out.
- On the Admin sidebar, go to Stores → Configuration.
- In the left panel, scroll down to Advanced. Then, select Admin.
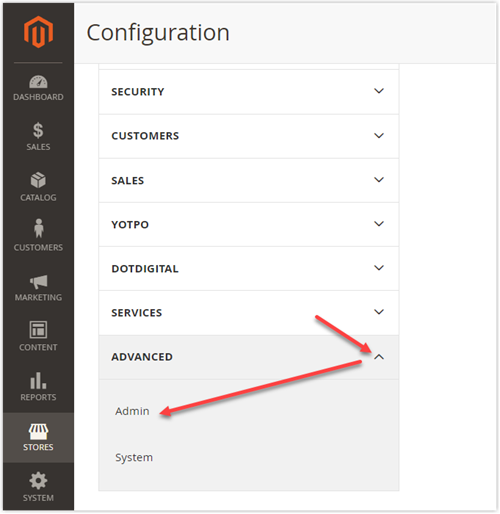
- You will be landing on the page where to configure the Admin Session Timeout. By default, the number entered is 3153600, equivalent to one year.
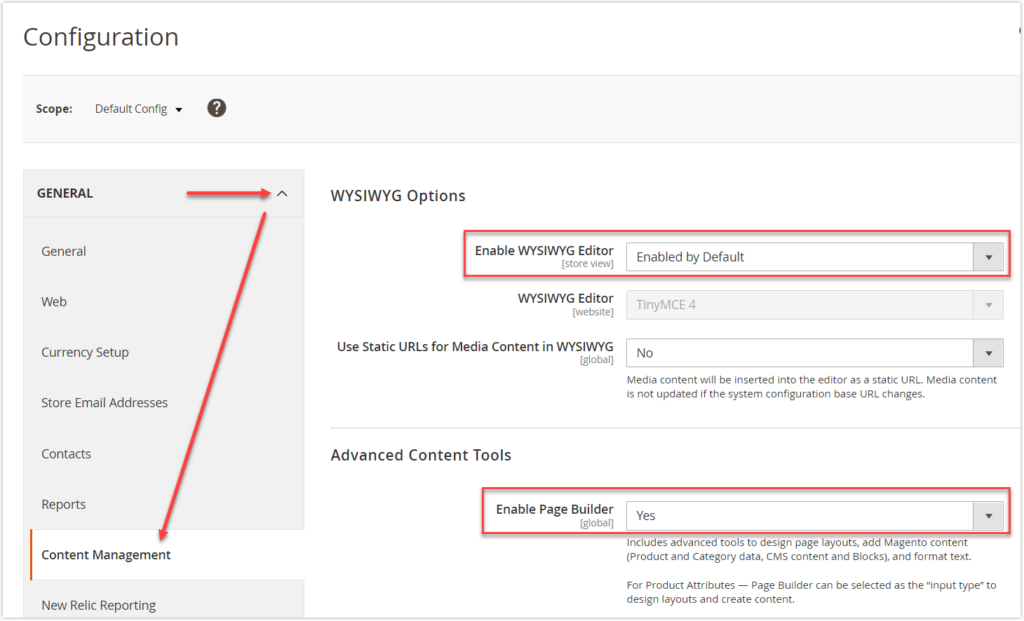
Second, ensure that you have already:
- Enable WYSIWYG Editor in the WYSIWYG Option configuration.
- Enable Page Builder in the Advanced Content Tools configuration
To configure these two options above:
Create Magento 2 Landing Page Using Magento 2 Page Builder
1. Warm-up
Step 1: Log into your Magento admin. Next, you will be landing on the admin workspace.
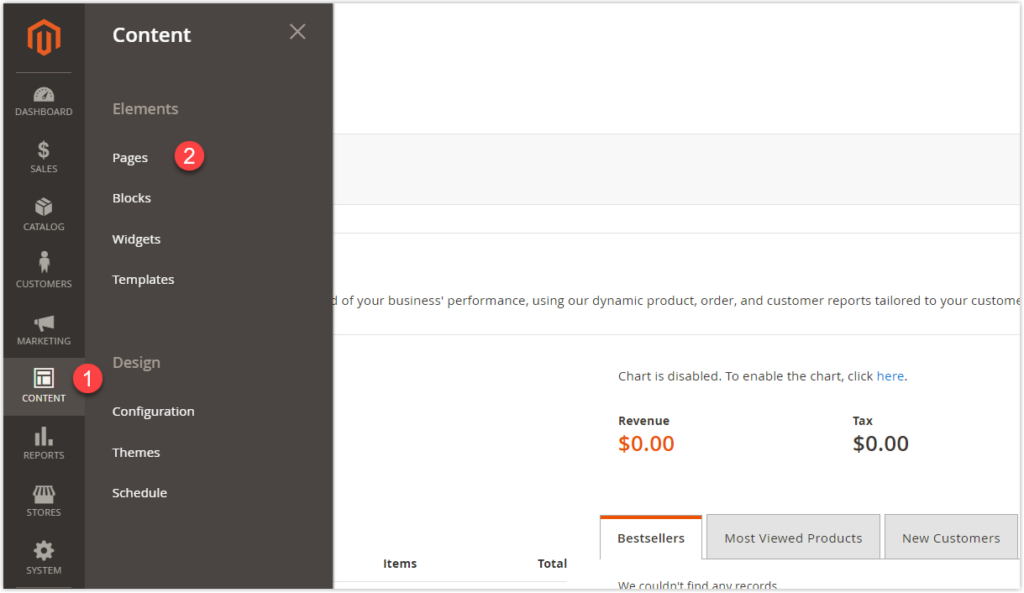
Step 2: From the admin sidebar, navigate to Content → Element → Pages.
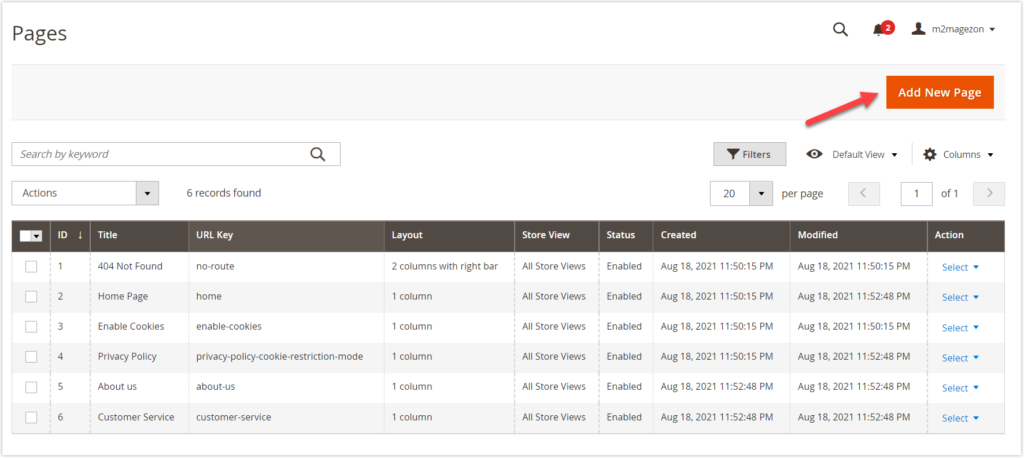
Step 3: To create a new page, click the Add New Page button.
Step 4: You will be redirected to the creation page. In this step, you need to:
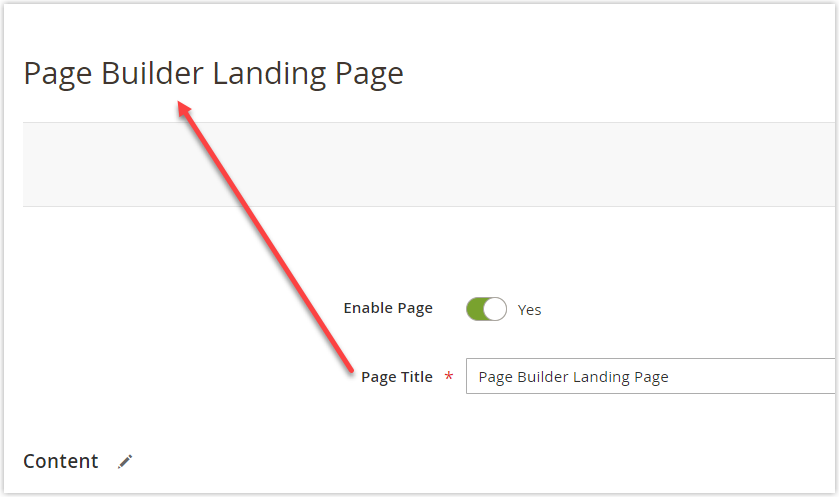
- The page is yet to be unfinished, so we have not published this Magento 2 landing page—Toggle Enable Page to No.
- Enter the name of the page. In this case, we enter “Page Builder landing page” in the Page Title field.
- After you click Save, the name of the creation page is named after the page title.
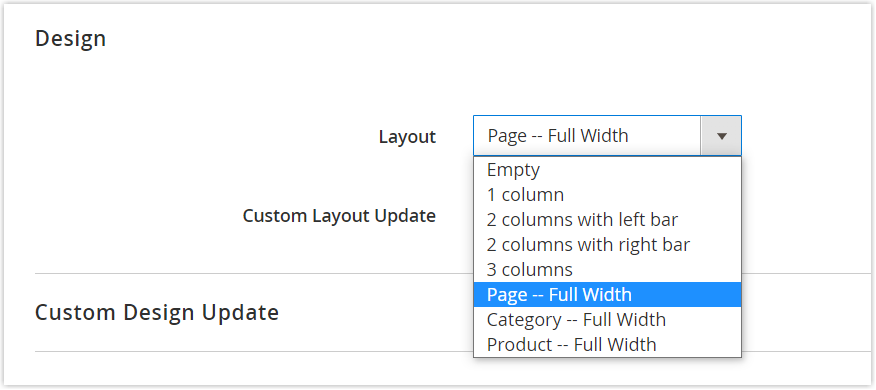
Step 5: Scroll down to the Design section and expand it. There are five standard layout options. Additionally, Page Builder offers full-width layouts for pages, products, and categories. By default, the layout is set to Page – Full Width which allows us to extend the entire width of the browser screen. In this case, I keep the Layout setting unchanged.
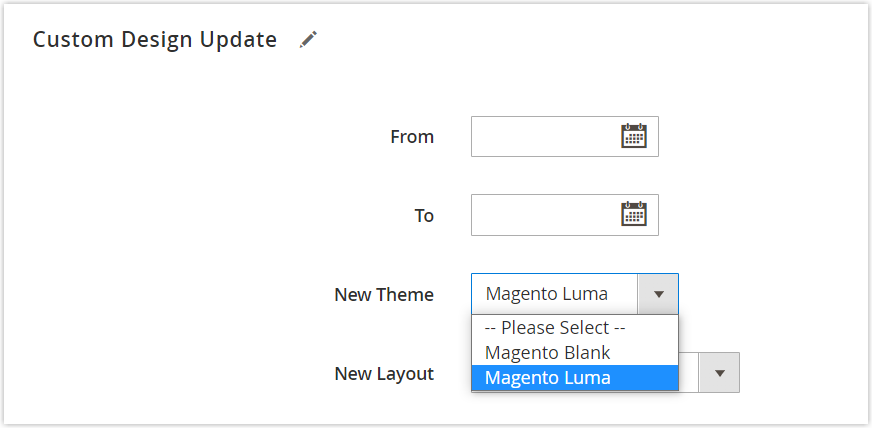
Step 6: Select the theme for the current page if necessary. Besides, you can set a valid time for the chosen theme. Beyond this period, the page will appear with the initial theme.
Step 7: In the upper-right corner of the workspace, hit Save.
Try FREE Magezon Page Builder!
Easily create beautiful, engaging Magento websites in any style whenever you want without relying on developers or designers. Just by drag & drop.
2. Get to the Point
Scroll down to the Content section, then expand it. You can see:
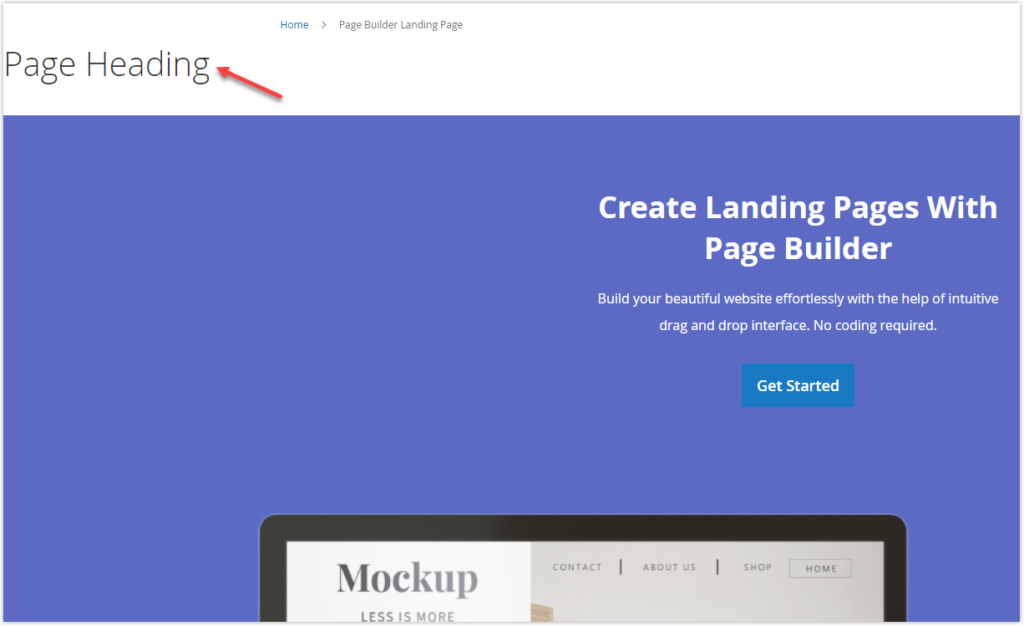
- Content Heading: By default, its format is a heading level 1 (H1), depending on the theme. This is how it looks on the front:
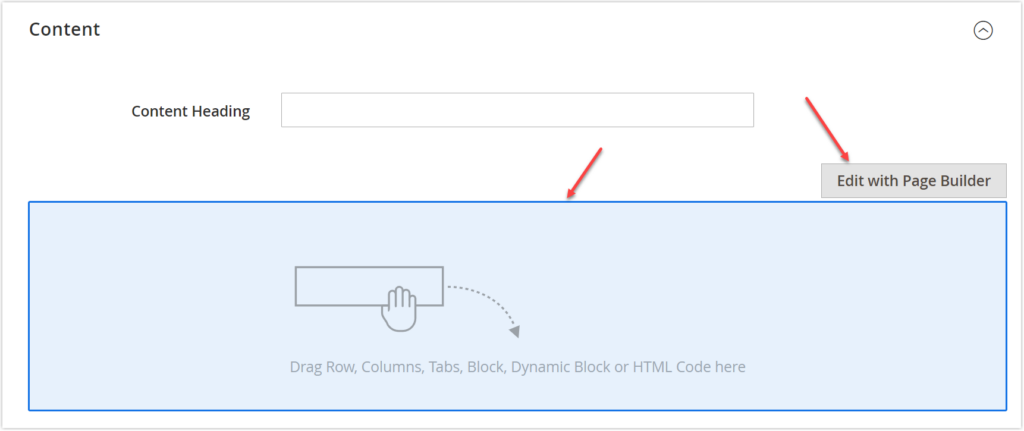
- Page Builder preview with an empty row
To start using Magento 2 Page Builder, you can click on Edit with Page Builder like below. Or, click on the Page Builder preview space, surrounded by the light blue background.
We are landing on the Magento Page Builder workspace. There are two main sections to work with.
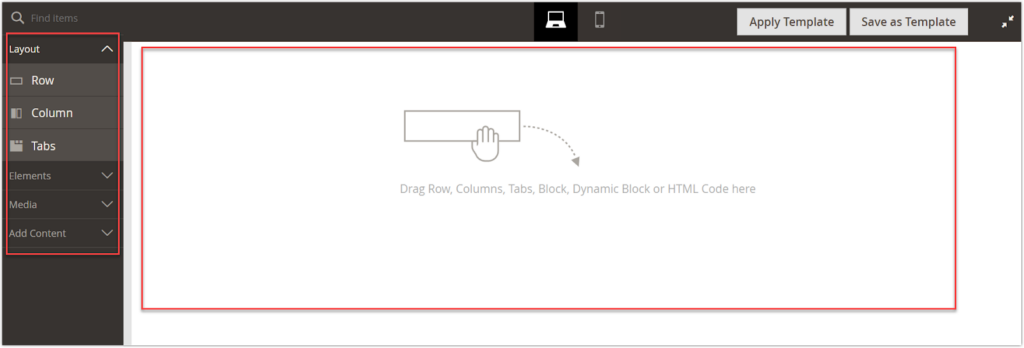
The left panel includes content tools that you will use while creating the page.
- Layout (Row, Column, Tabs)
- Elements (Text, Heading, Buttons, Divider, HTML code)
- Media (Image, Video, Banner, Slider, Map)
- Content (Block, Product)
The right empty area is where you perform actions.
Next, I will instruct you on each part as below.
Part 1
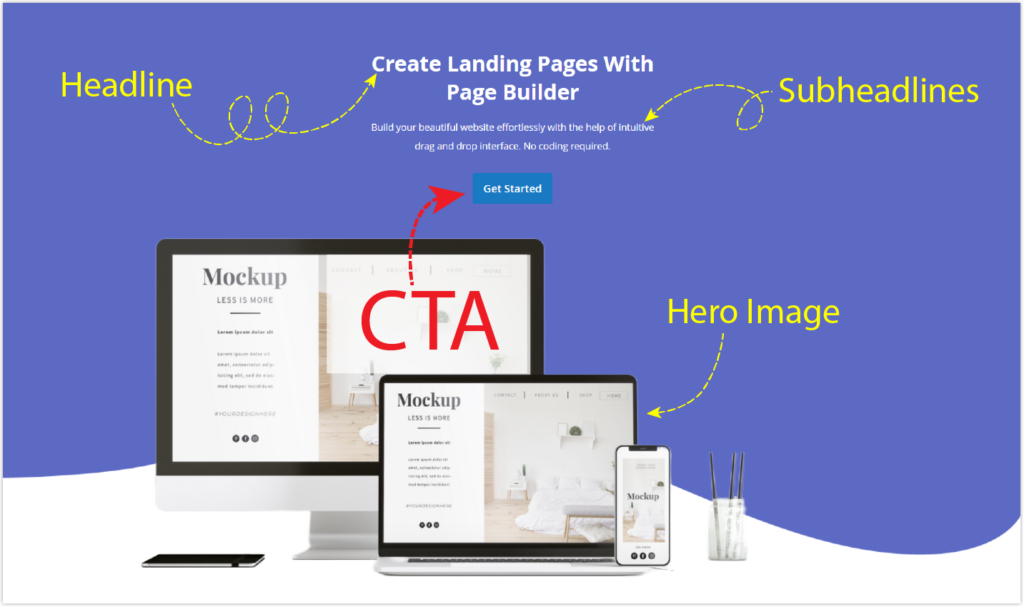
Step 1: Drag the Row content type from the left panel and drop it to the right workspace until the red guideline appears. Note that you can use Column or Tabs content type instead of Row.
Step 2: To make the toolbox appear, hover over the row. Then, select the row setting (Gear icon).
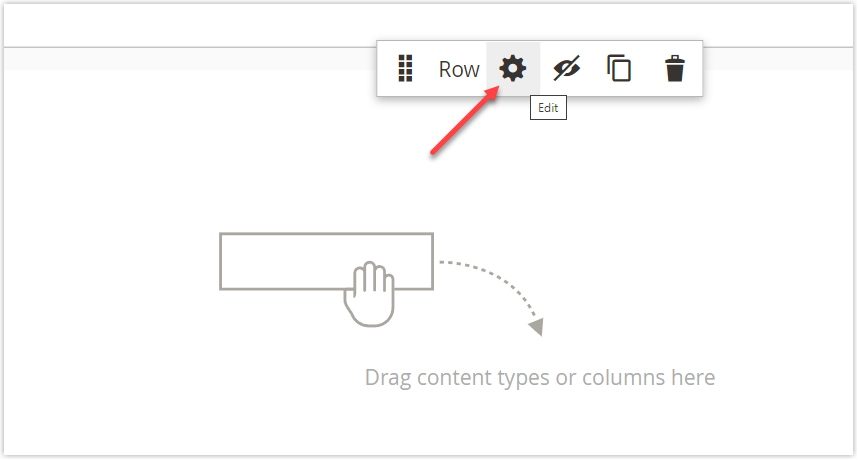
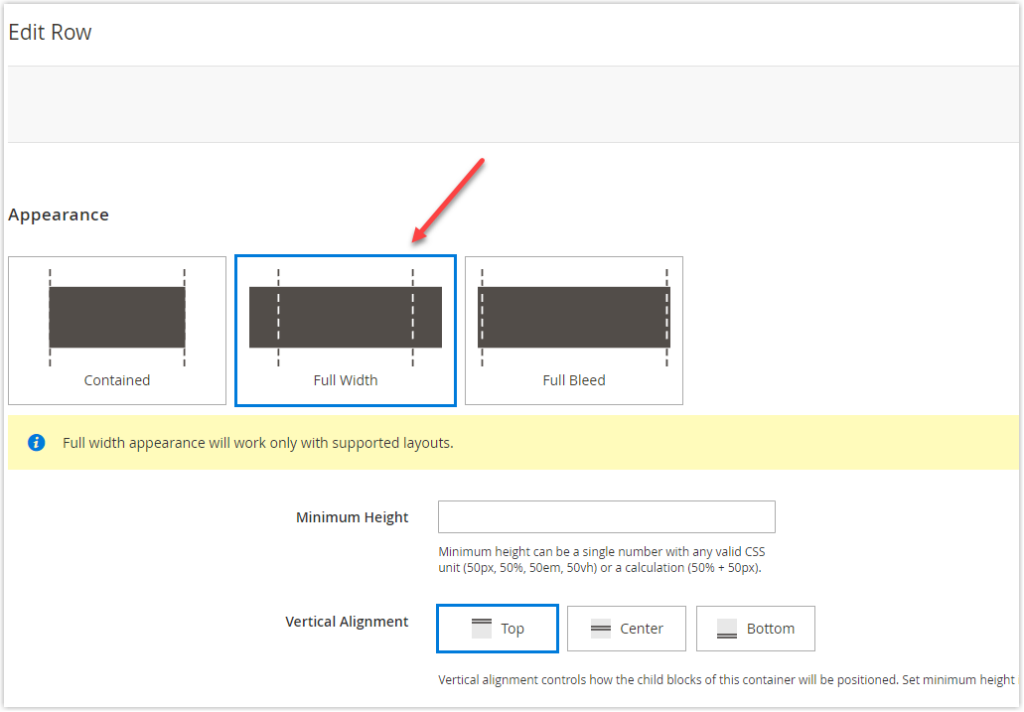
Step 3: A popup containing all setting options for a row appears.
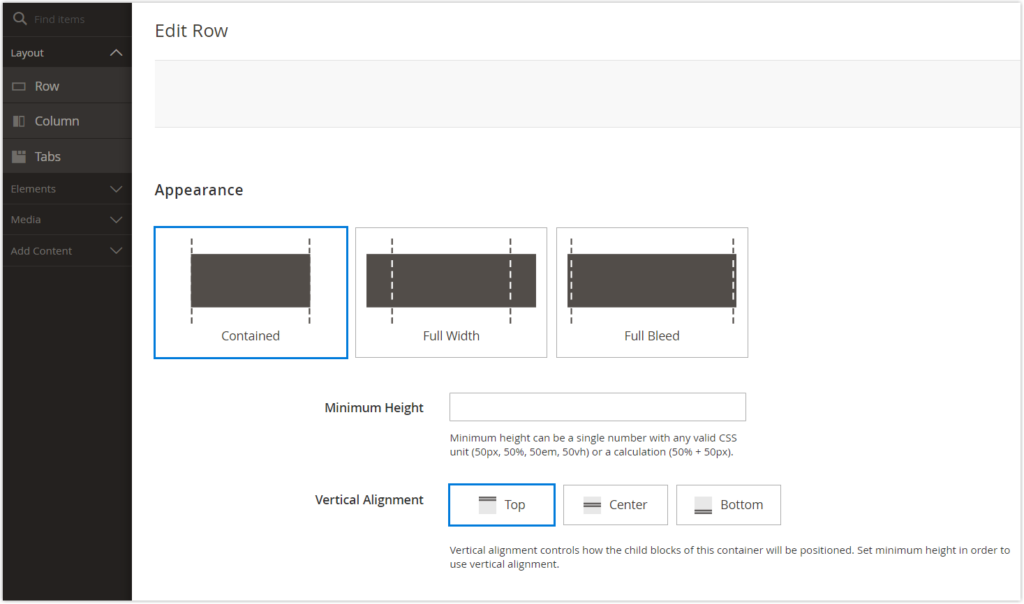
Step 4: I want this row and its content to extend to the entire width of the browser window, so under the Appearance, I choose Full-Bleed.

Click Save to save the setting.
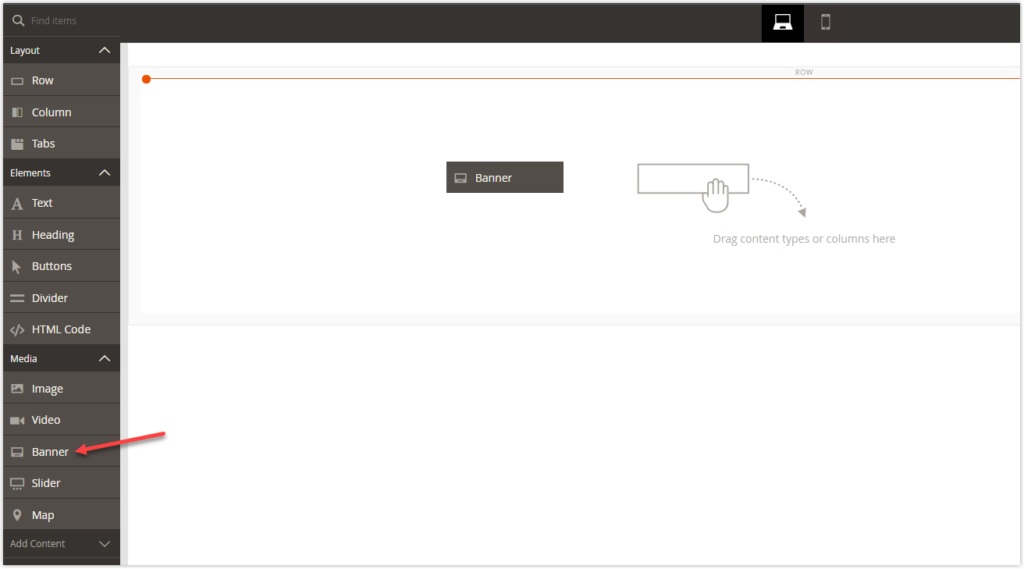
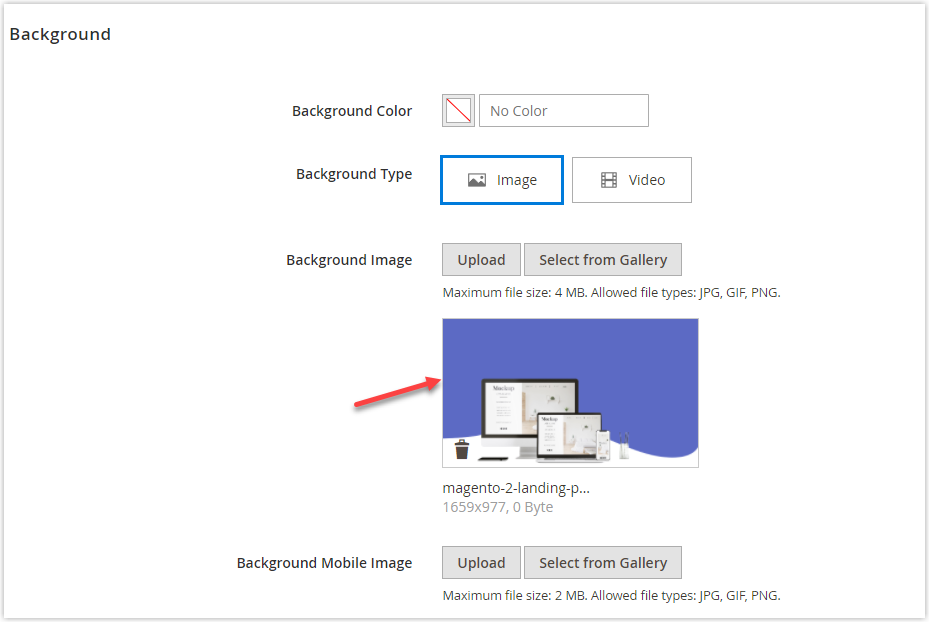
Step 5: I will add the Banner content type to the row. In the left panel, expand Media. Then, drag the Banner and drop it to the right workspace.
Step 6: Hover the Banner container to show its toolbox.
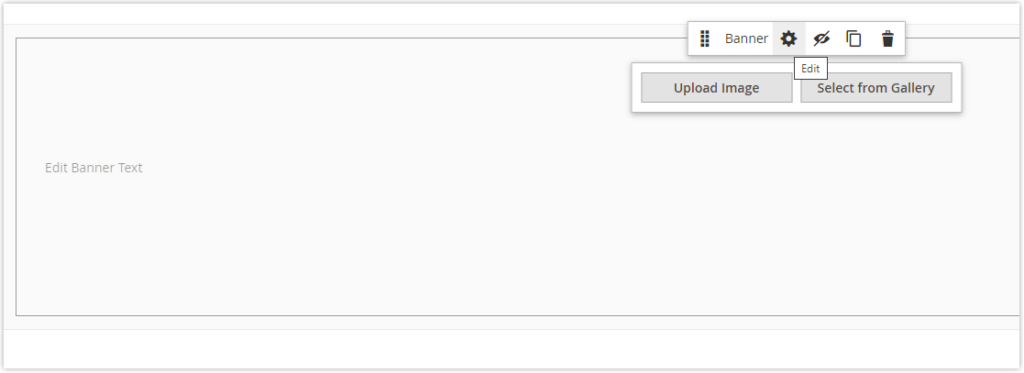
Step 7: Click the Setting icon, and we will be redirected to the popup of the banner’s settings.
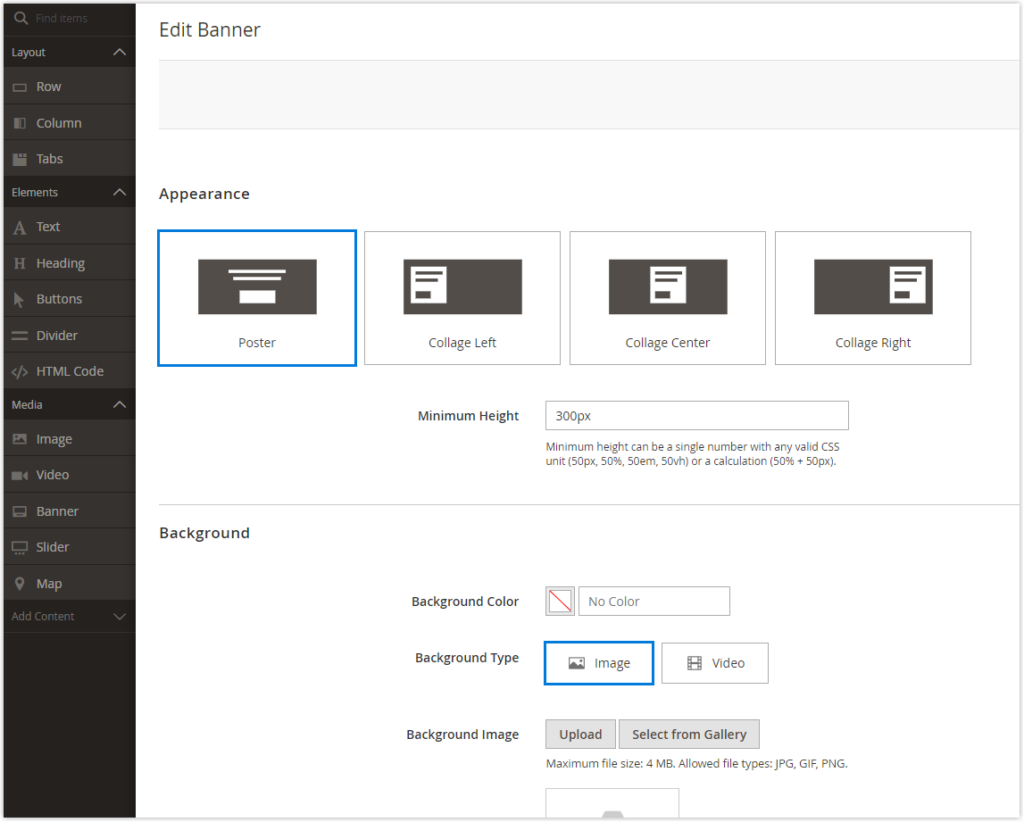
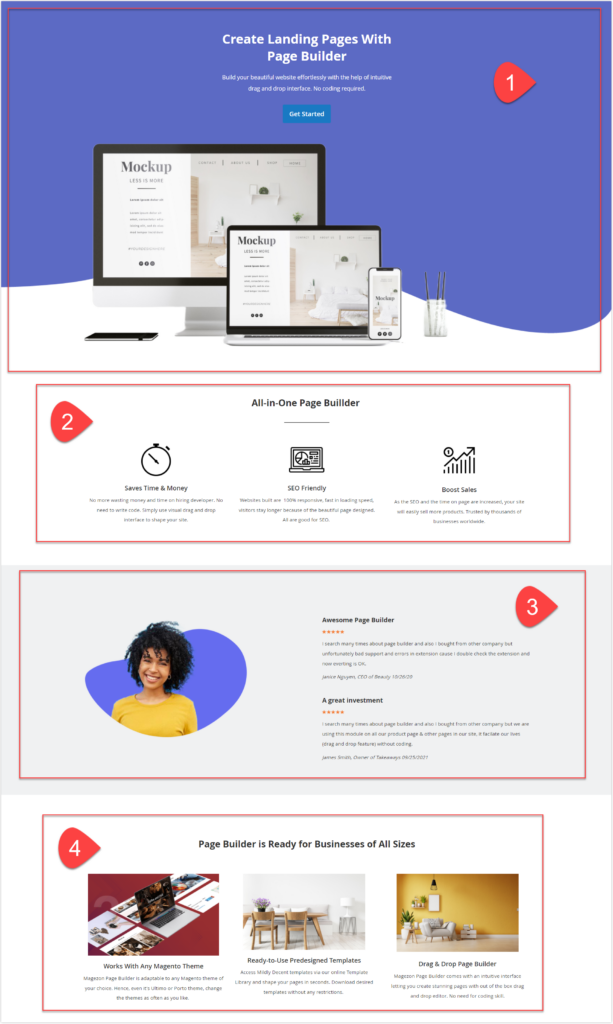
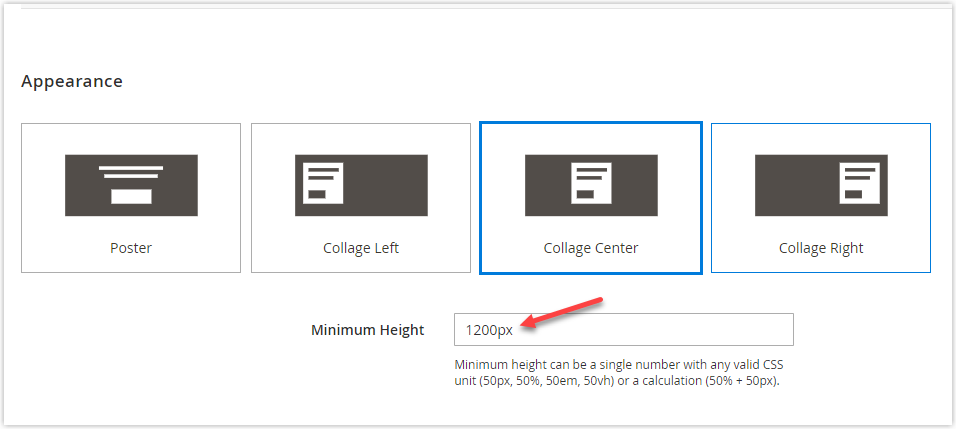
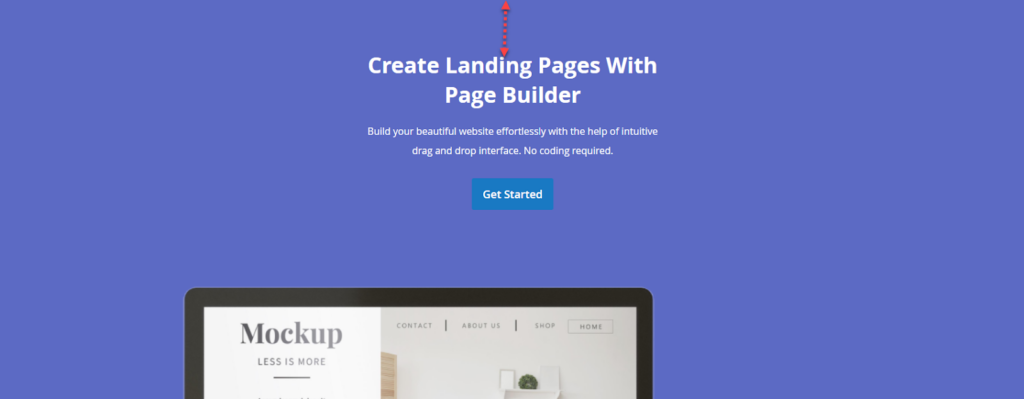
Step 8: Under Appearance, choose Collage Center. This option aligns the content to the middle of the banner. The content here includes Headline, Subheadline, and a CTA button.
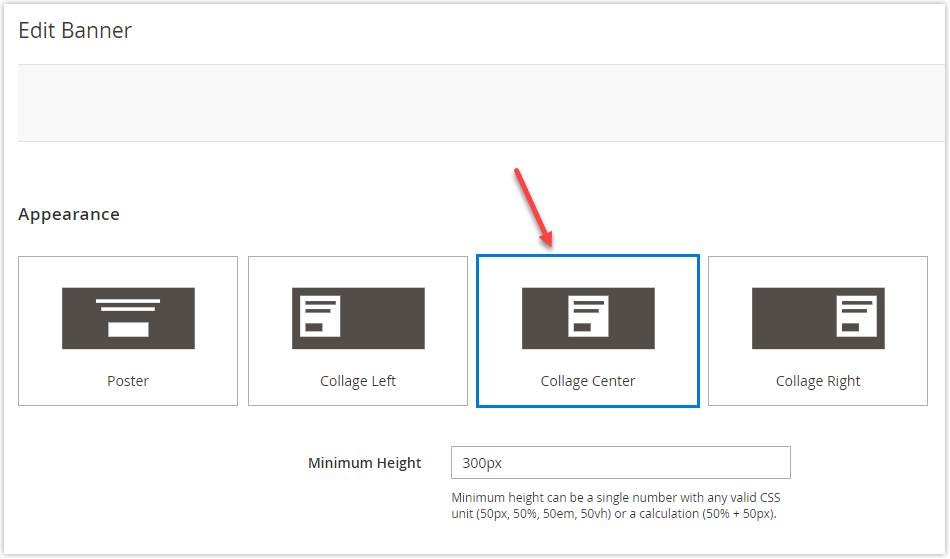
Step 9: By default, the Minimum Height is set to 300px. I will change it to 1200px so that the row can show the whole hero image prepared in advance.
- When the minimum height is set to 300px:
- When the minimum height is set to 1200px:
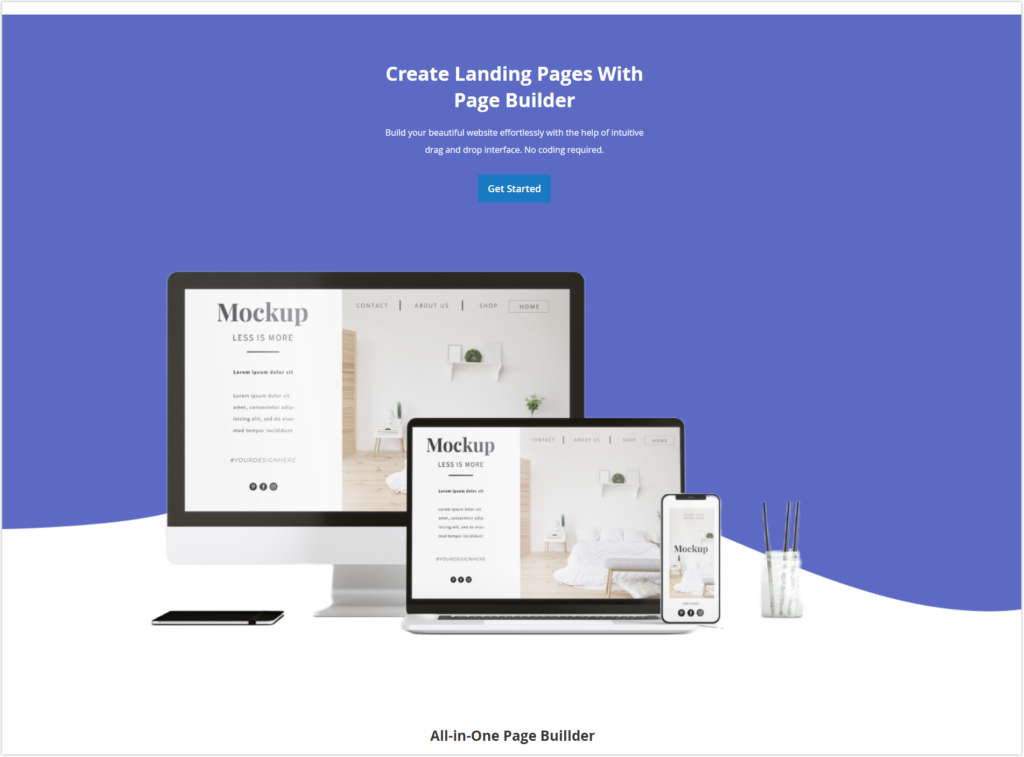
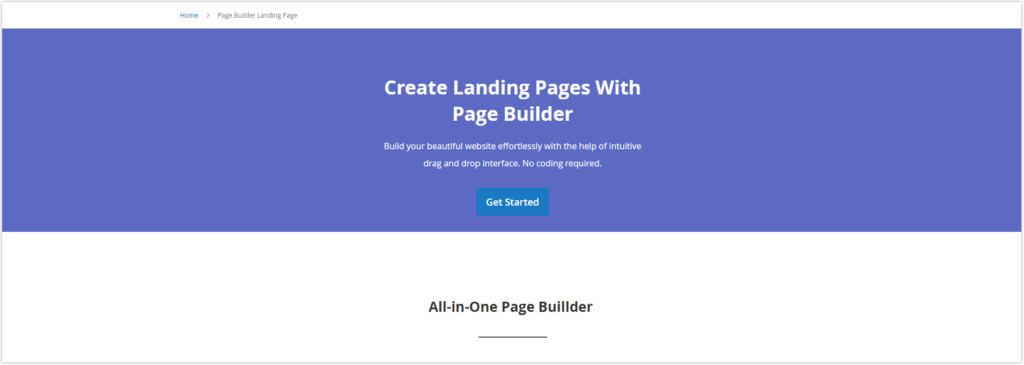
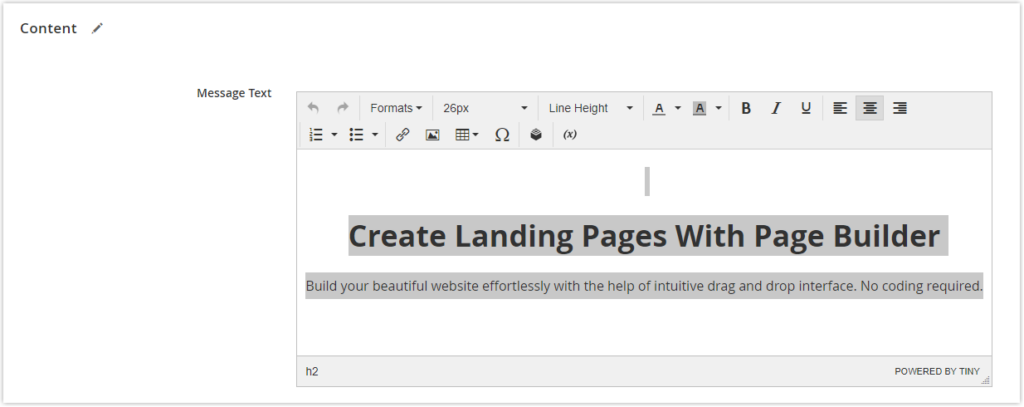
Step 10: Scroll down to the Content section. At the Message Text, enter the following text with two lines:
“Create Landing Pages With Page Builder
Build your beautiful website effortlessly with the help of an intuitive drag-and-drop editor. No coding required.”
Select the first line of text:
- Choose Heading 2 under Formats
- Increase the font size to 36px
- Make the text bold
- Change the text color to White
Select the second line of text:
- Choose Paragraph under Formats
- Set the font size to 16px
- Set the line height to 28px
- Change the text color to White
Step 11: Continue with the Content section. Now we will customize some settings for the button.
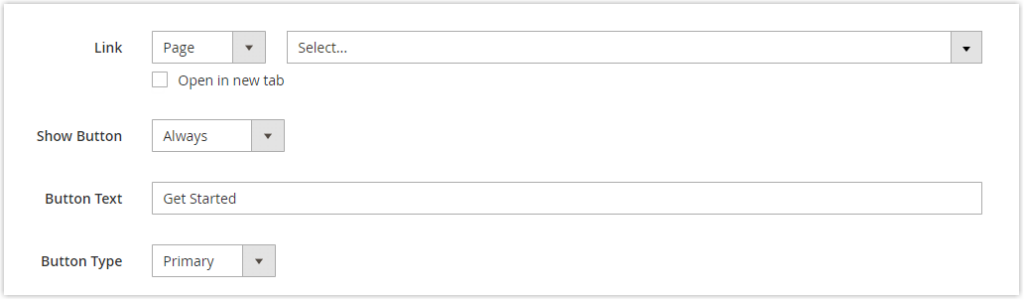
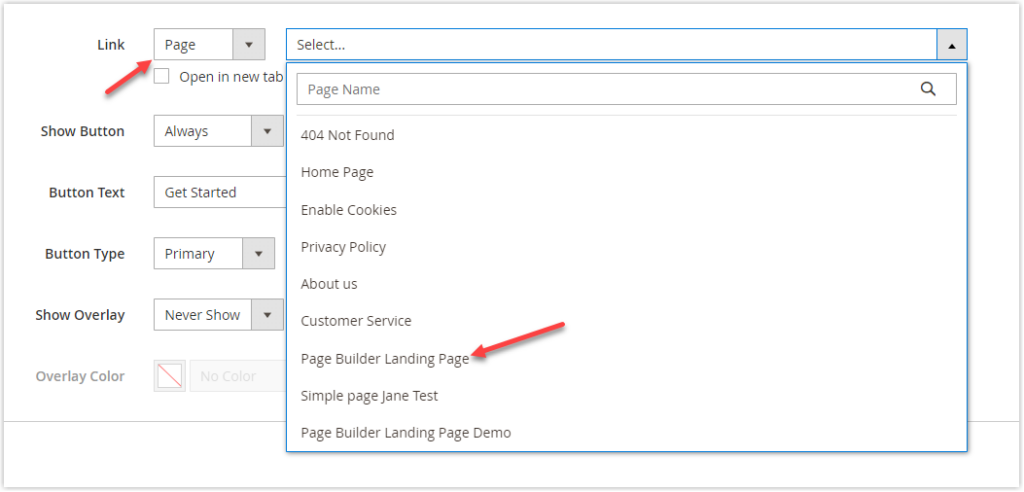
- In the Link field, choose Page. Then select the page to which users will be directed when clicking the button. Choose the page named “Page Builder Landing Page” in this case.
Below the field is a checkbox that enables the page to open in a new tab if you tick it. We suggest you tick this checkbox to enhance the user experience on your page.
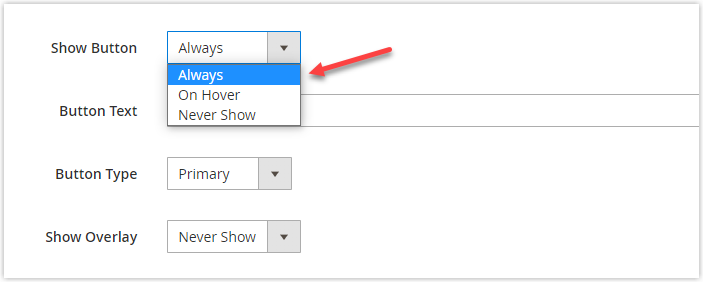
- In the Show Button field, choose Always to let the button display on the banner.
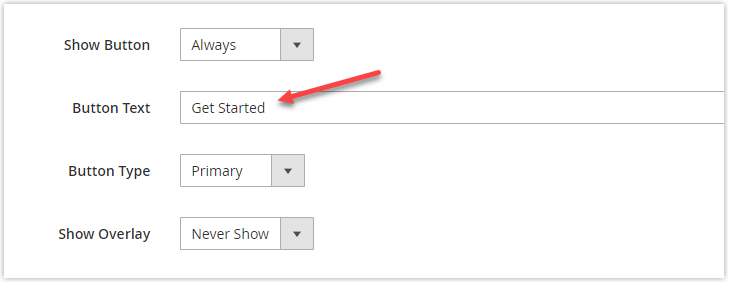
- In the Button Text field, enter “Get Started”. Keep the old setting of Button Type.
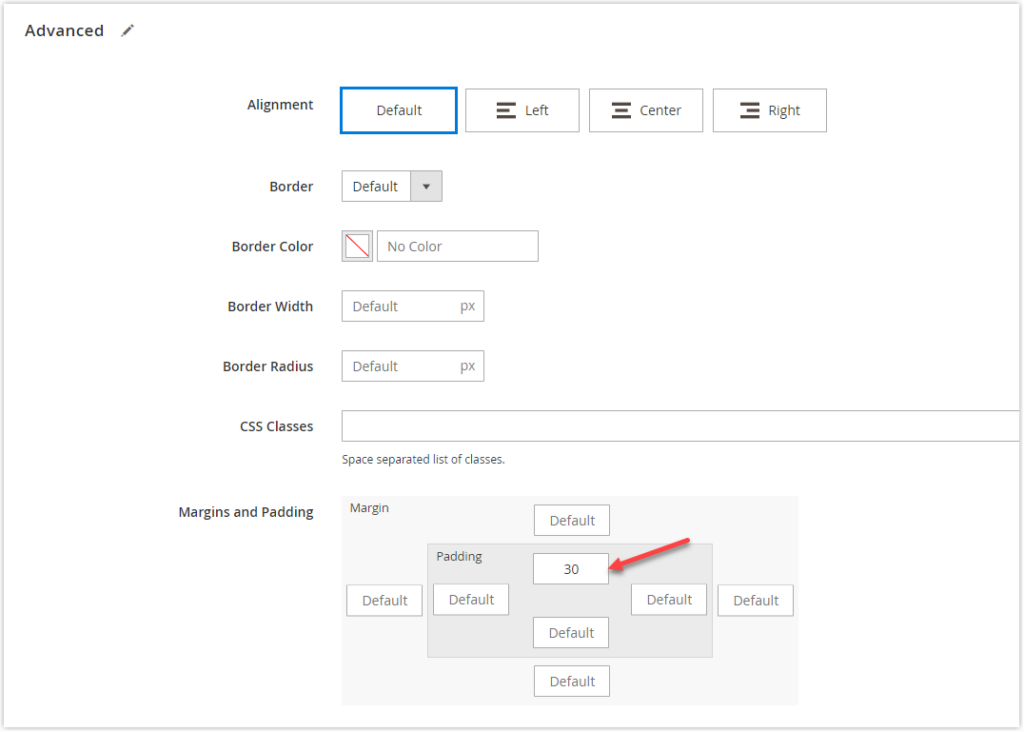
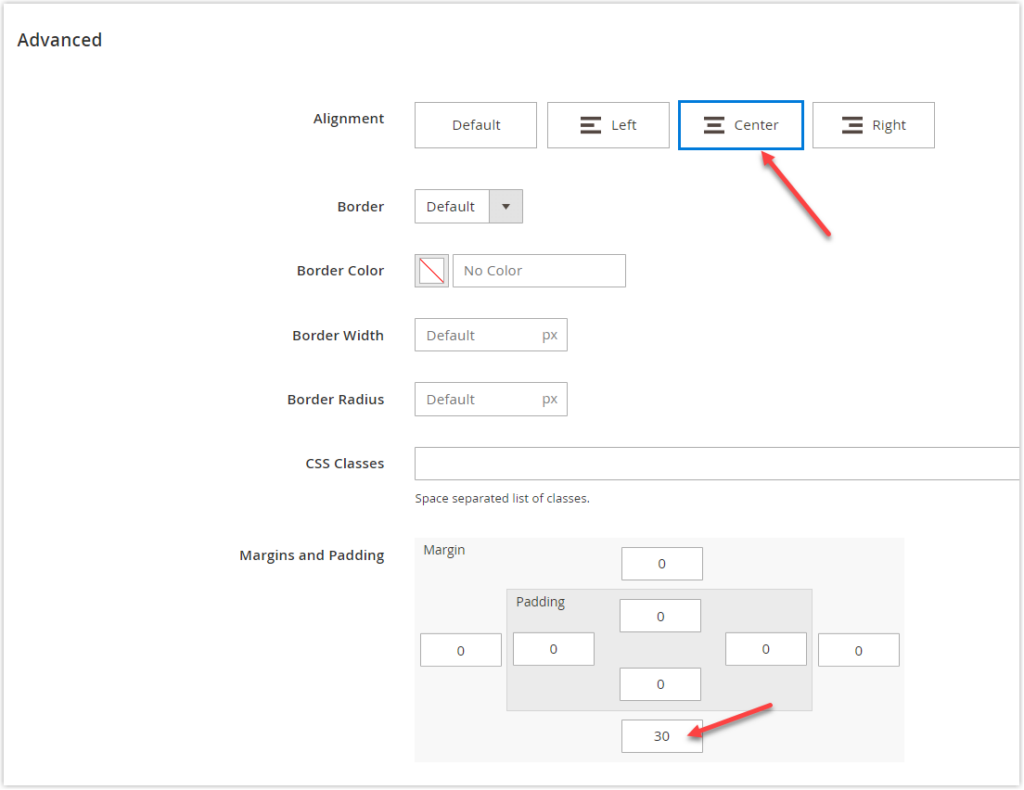
Step 12: Scroll down to the Advanced section and expand it. In the Margin and Padding field, set the top padding to 30px to create a “breathing room” between the top of the banner and the content inside it.
On the front, it looks like this:
After finishing, click Save in the right corner. Now, let’s check how it looks on the front end.
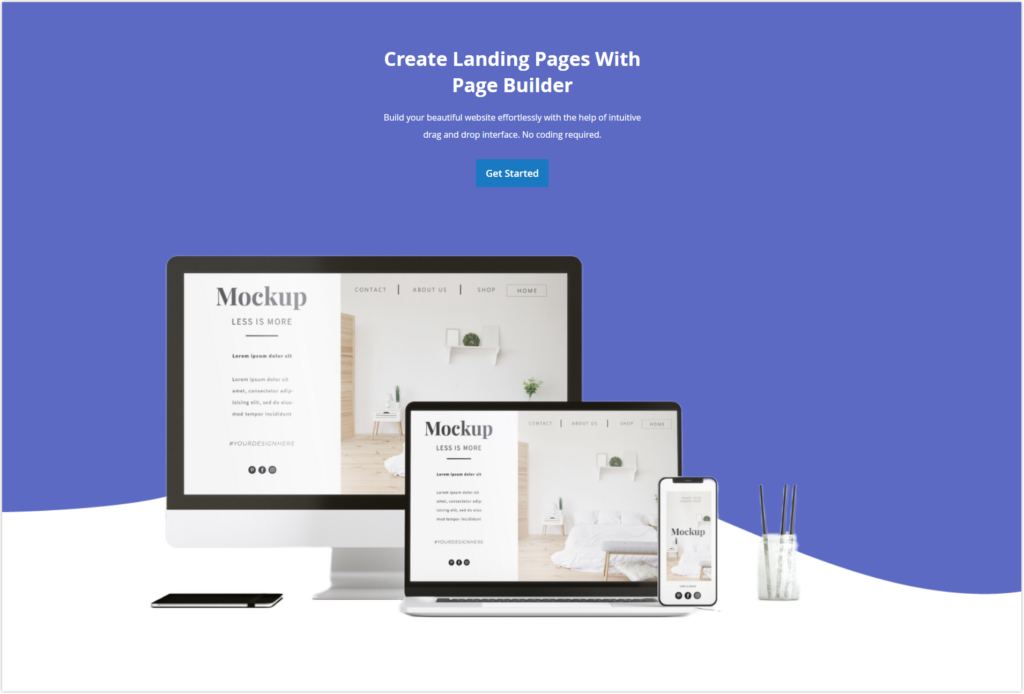
It looks pretty good, right? It may be better if Page Builder enables changing the button color. If you know some CSS, you can customize its button how you want. Read the blog about Magento Page Builder HTML Codes to know how.
Part 2
Step 1: Add a row right below.
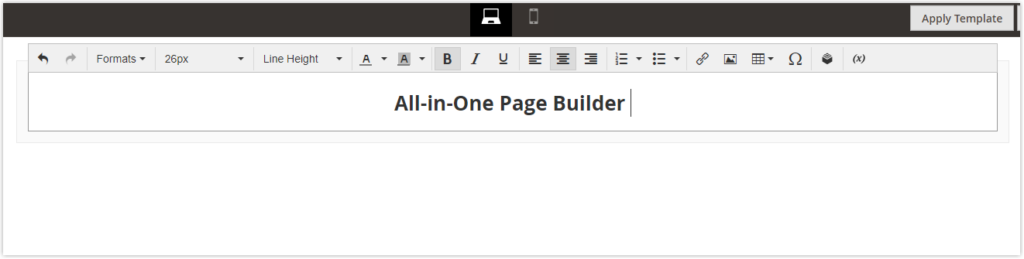
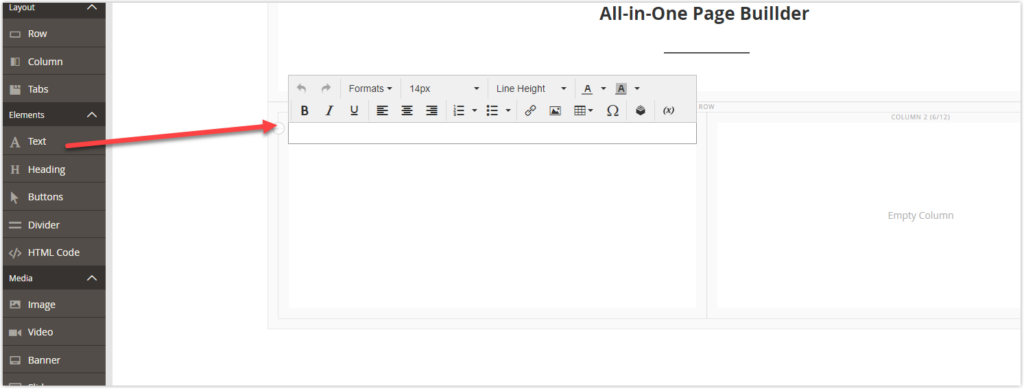
Step 2: Drag the Text content type and drop it in the row til the red guideline appears.
Step 3: The editor toolbar appears above the text box. You can enter and format directly from the stage as in the image below (Inline editing). Or, choose Settings in the banner toolbox as chose I guided in the last part.
I choose the former way. Follow the steps below:
- Under Formats, select Heading 2
- Center the text with center alignment
Step 4: Add Divider right below the text. Click its setting icon to configure some settings of Divider. Here are the following settings we implemented:
- Set Line Color to #535353
- Increase Line Thickness to 2px
- Decrease Line Width to 10%
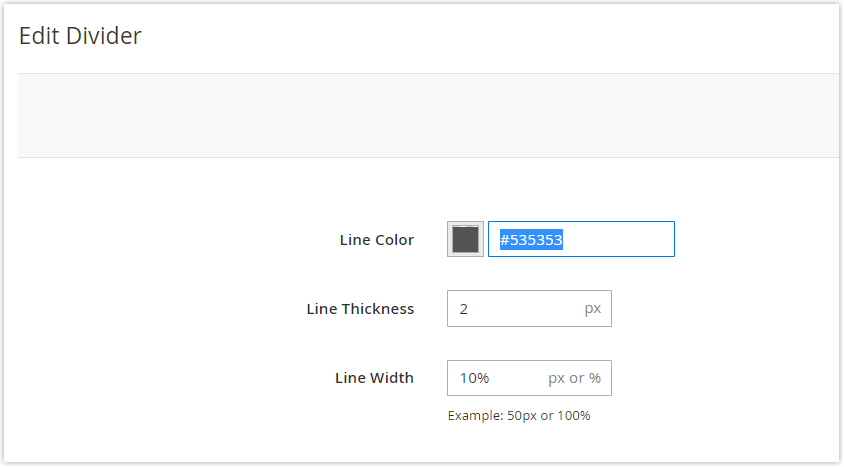
- Under Advanced, align the line to the middle. And set the bottom margin to 30px.
- After completing, click Save.
Try FREE Magezon Page Builder!
Easily create beautiful, engaging Magento websites in any style whenever you want without relying on developers or designers. Just by drag & drop.
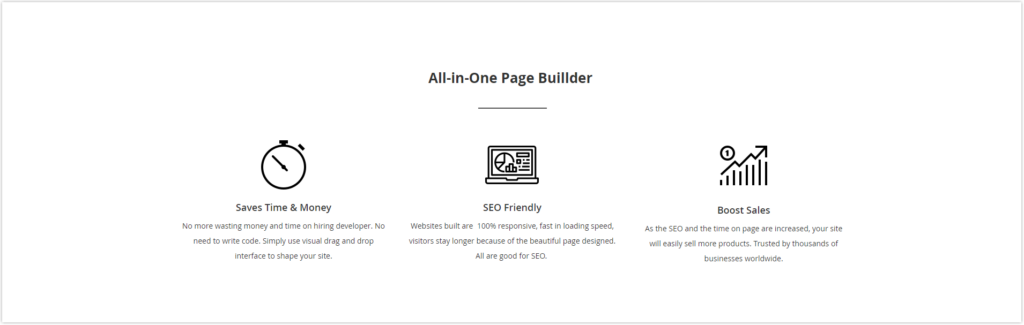
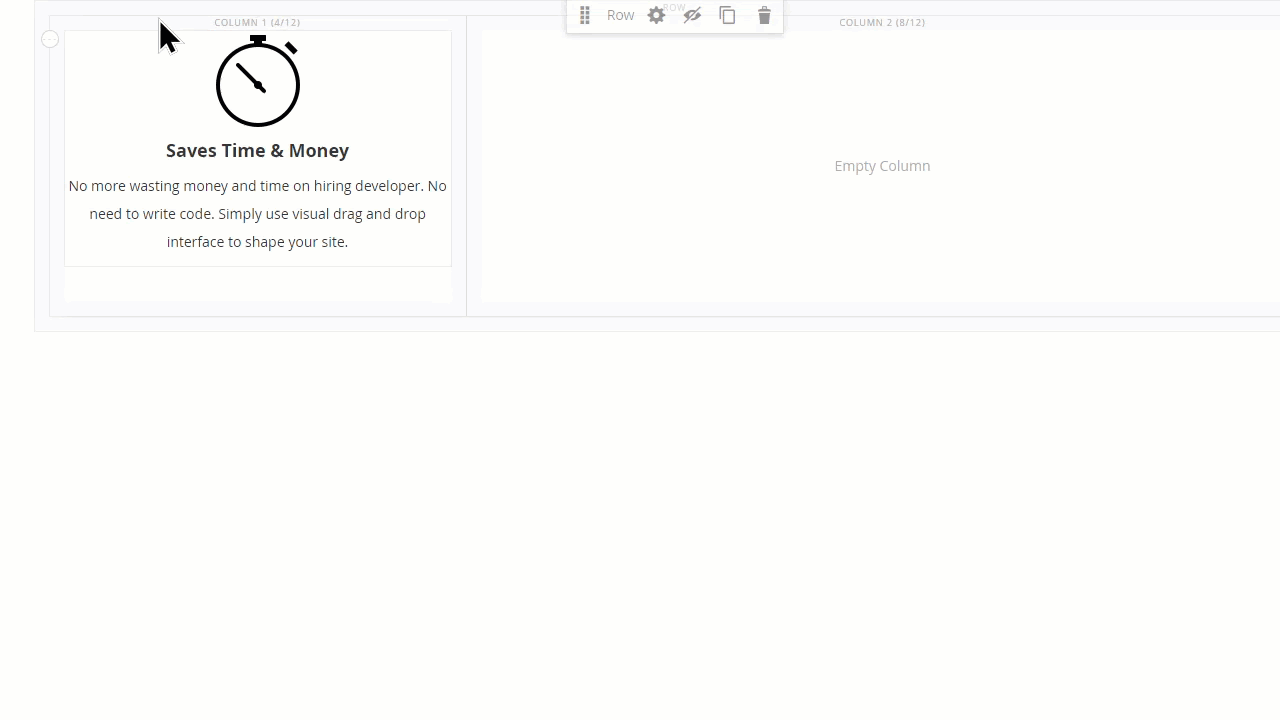
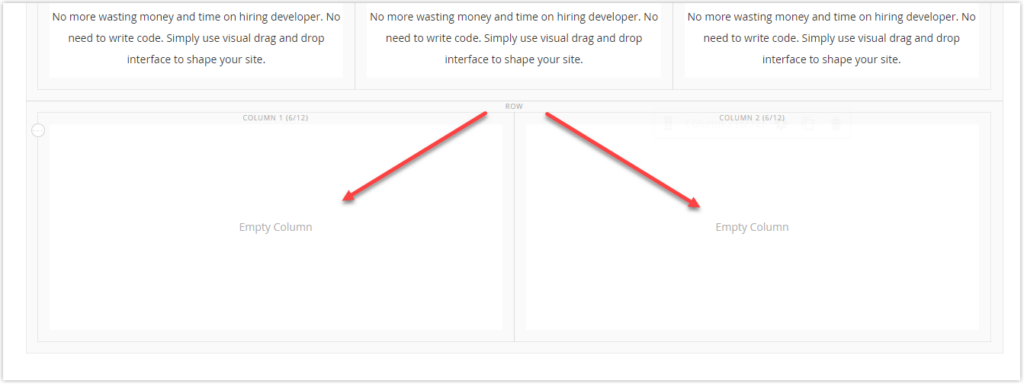
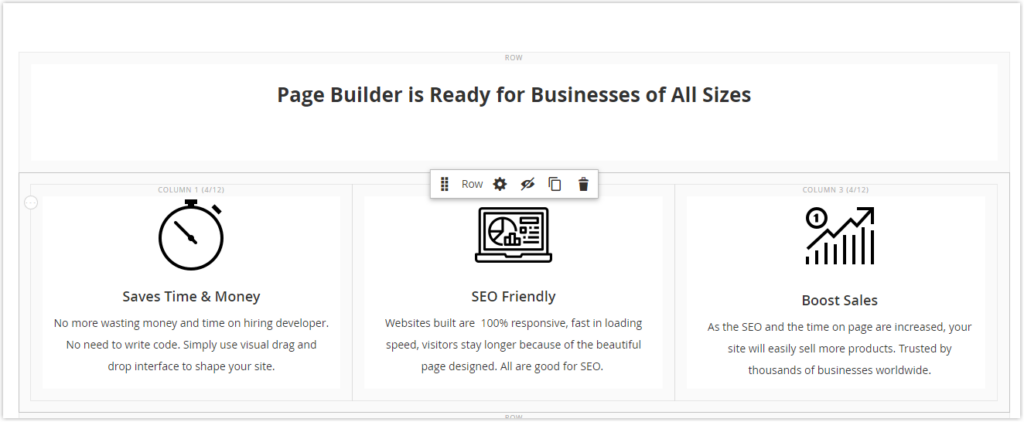
Step 5: We will create three columns in a separate row. Drag the Row and drop it right below the divider. Then, add a Column placeholder to the row.
Note that the grid of a row comprises 12 equal sections by default. So, if you want three equal columns, each column has four equal sections.
To help you understand better, I will outline the main steps. First, I add the content to the first column and customize it until it looks best. Next, to save time designing, I duplicate this column into 2 copies and then adjust it to having three equal columns. Last, I change the content inside of each duplicate column.
Add Text element to the column:
- Insert the image by clicking the image icon in the text editor.

- Add the lines of text and format them as below:
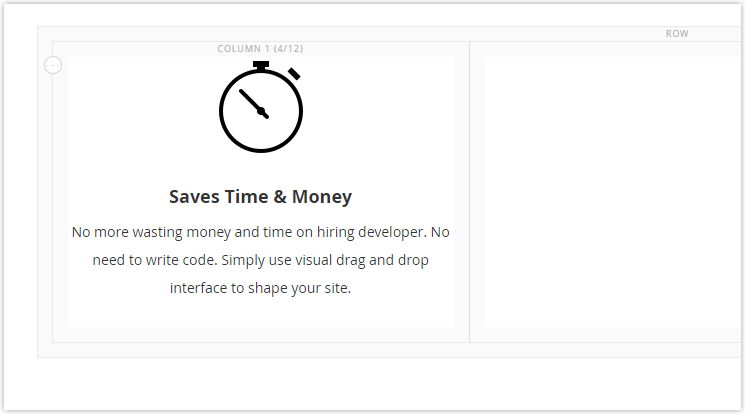
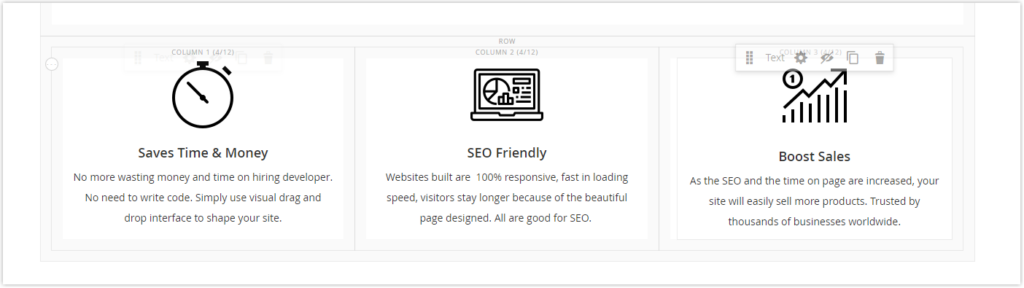
“Saves Time & Money” (Font size: 18px, Bold).
“No more wasting money and time on hiring developers. No need to write code. Simply use a visual drag and drop editor to shape your site.” (Font size: 14px, line height: 28px)”
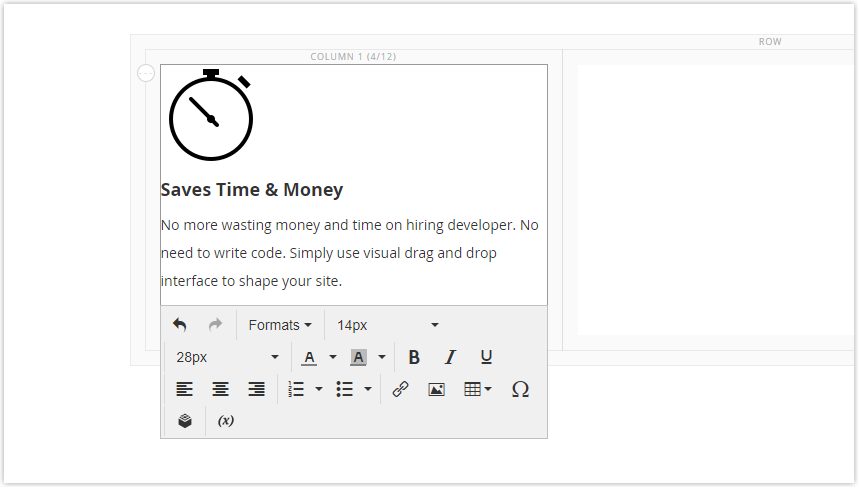
- Align the entire content to the center.
- It’s time to duplicate the column to two more and later adjust their width in equal measure.
- Next, you only need to modify the content inside each duplicate column:
Part 3
Step 1: Add Row.
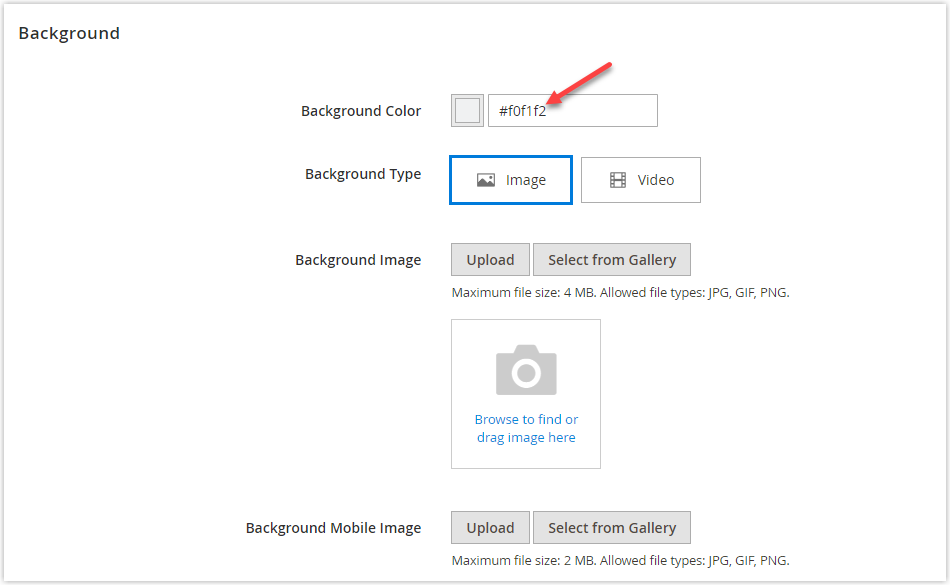
- Under Appearance, we choose Full Width which enables the row/the row’s background color /the row’s background image to take up the entire width of the browser window while its content inside is limited in a container.
- Under Background, set Background Color to #f0f1f2.
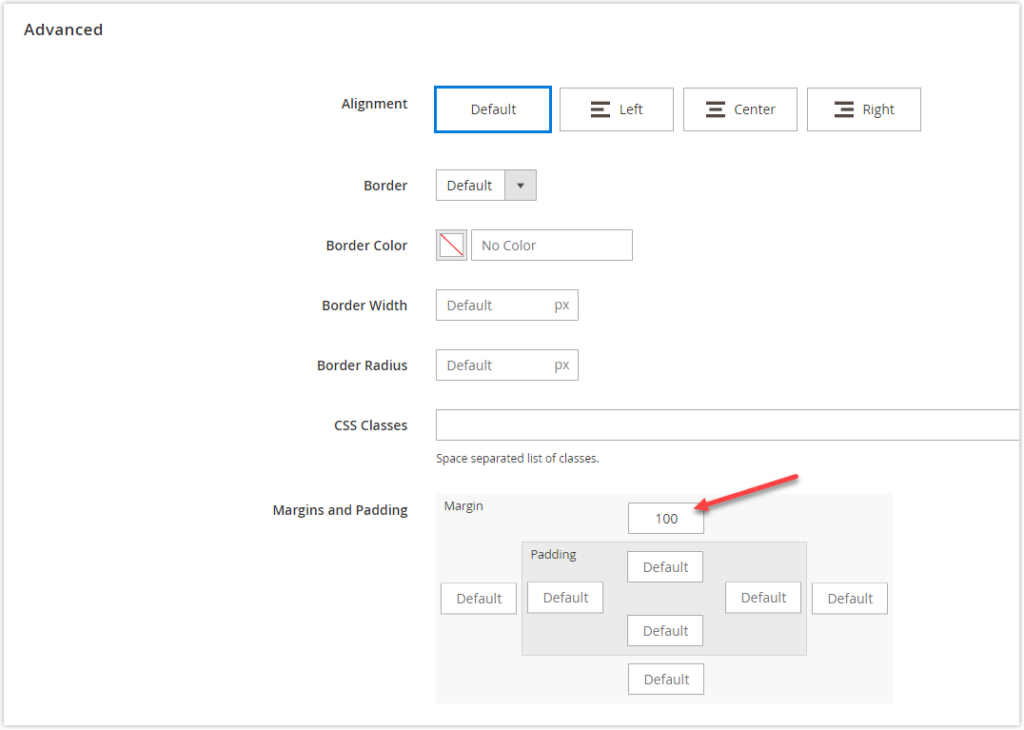
- Under Advanced, set the top margin to 100px to create a space between this row and above.
Step 2: Add a Column to the row.
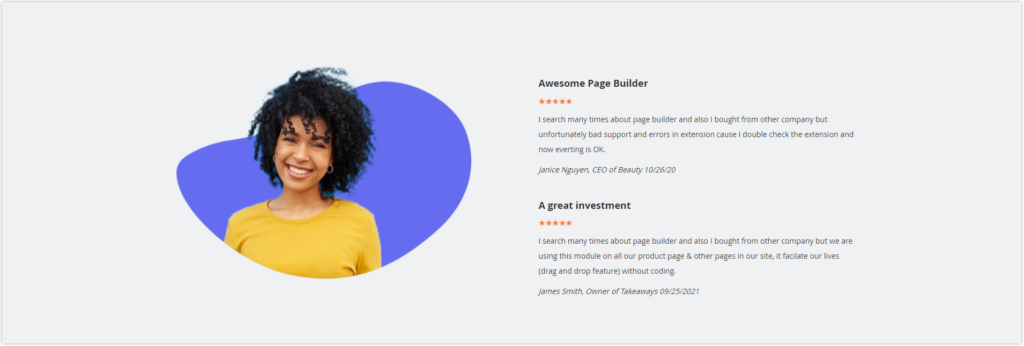
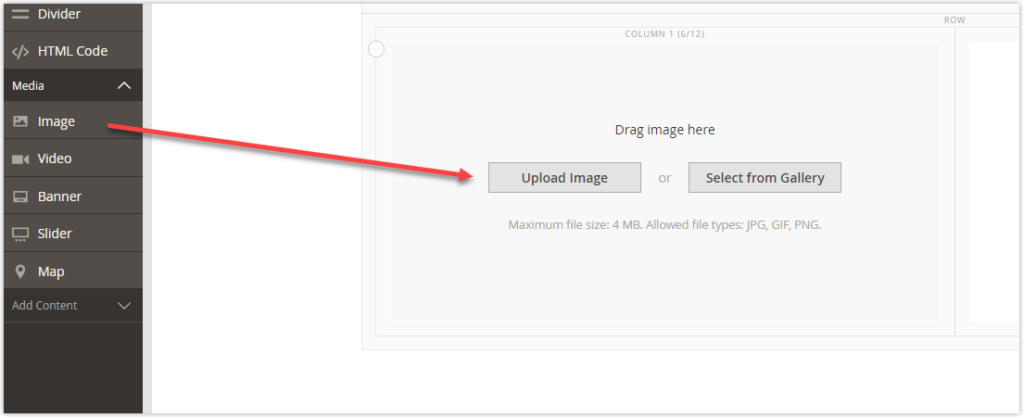
- For the first column, add an Image from Media. Then, upload the image by clicking the Upload Image button.
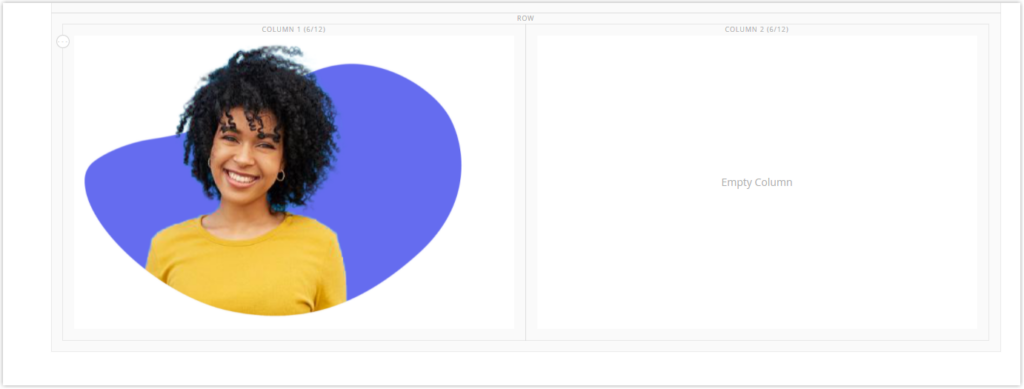
- For the second column, add a Text element.
Add some pieces of content with the formats below:
- “Awesome Page Builder” (Font Size – 18px, Bold)
- Image Five-Rating Star (Upload the image + add “5-star rating” as the image description + adjust the image height to 10px)
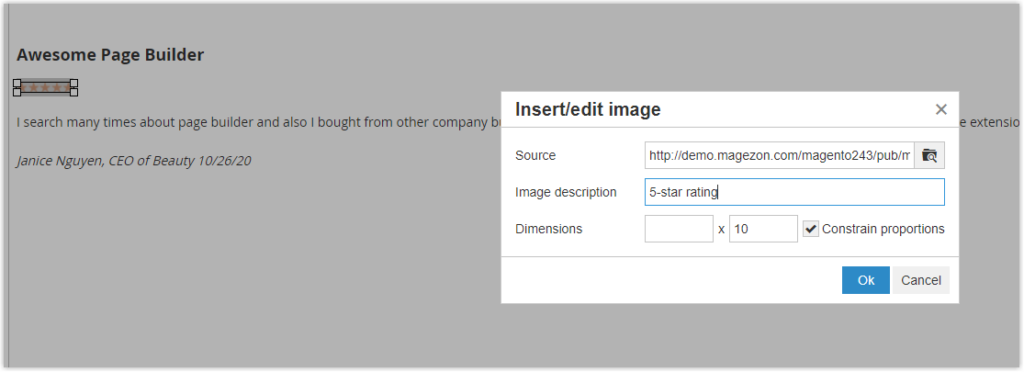
- “I searched many times about page builders and bought from other companies, but unfortunately, bad support and errors in the extension caused me to double-check the extension and now everything is OK.” (Font Size – 14px, Line height – 28px)
- “Janice Nguyen, CEO of Beauty 10/26/20” (Font size – 14px, Line height – 28px, Italic)
Do the same with the following text block. Here is what the backend result should be:
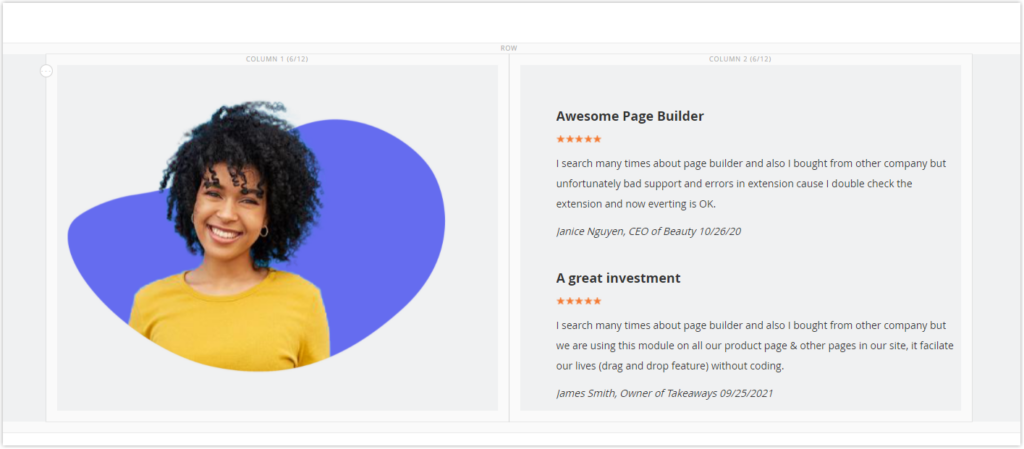
Now I want to increase the height of these two columns to make them look spacious.
Head back to their settings. Set Minimum Height to 650px for both columns. Also, to center the child blocks of this container vertically, set Vertical Alignment to Center.

And the final result in the backend:

Part 4
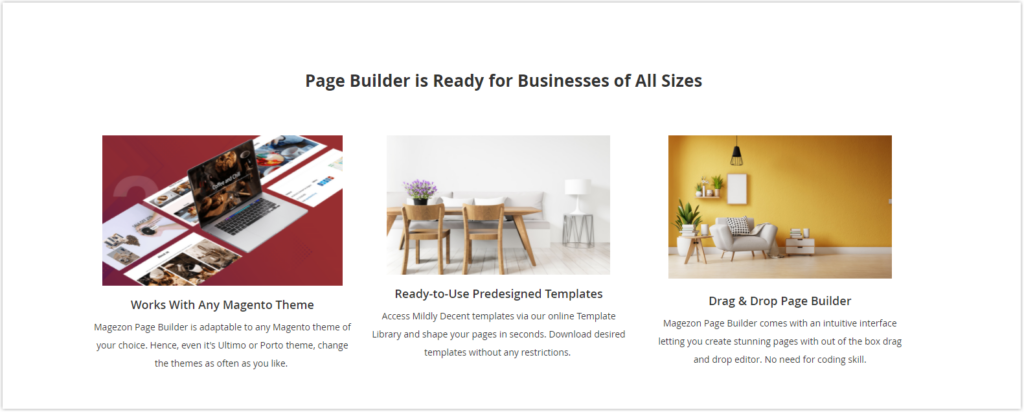
Step 1: You can add the row and its content from scratch. I will duplicate the first row in Part 2, drag and drop it right below, and change the text. Here is the result.

Step 2: Continue to duplicate row 2 of Part 2 (Three columns in a row). Then, drag and drop it right below the title.
Step 3: Modify the content inside each column.
- Upload the image
- Add and format the text inside:
- Title: Font size: 18px, Bold
- Paragraph: Font size – 14px, Line height – 14px
- Align the entire content to the center
Do the same with the other two columns.
Step 4: Set 20px to the right margin of the first column. Also, enter 20px in the left margin of the third column. As a result, there are more spaces between these three columns.
Now that we’ve created a landing page with Magento 2 Page Builder. Check the page once again to make sure it looks best.
Highly Recommended Magento 2 Page Builder Extension from Magezon
It can’t be denied that Magento Page Builder is a big innovation for merchants who are running their stores in the Magento Open Source. However, to be honest, merchants could only build very simple Magento 2 landing pages using basic options such as Text, Images, Video, Slider, Links, etc. So, how can they create a fully-functional website with eye-catching effects? There are several answers to this question. For example, they can learn CSS to customize the page or ask for help from an external Magento old hand. However, these methods cost online merchants quite a lot of time and effort to complete a single page.
If you want much more than a simple page without spending too much time building pages or asking for others’ help, you can consider Magento 2 Page Builder from Magezon. This Page Builder empowers you to create web pages in a much easier and more effective way using its drag-and-drop editor. As a result, even an average Jane or Joe who has little experience with coding can have all control over how their sites work and look. Besides, this real game-changer saves enormous time in building an eye-catching Magento 2 landing page and helps merchants enjoy the whole creation process.
| GREAT NEWS: To meet the increasing demand for a superior Page Builder, we have been developing a completely new version of Page Builders. Not simply providing enhancements or bug fixes, our team has rebuilt Page Builder using a new language – React Javascript. In this new version, Page Builder will cover many advanced features relating to Builder, Design Options, and Workflow, aiming at helping merchants maximize efficiency in creating their Magento 2 landing pages in particular and their websites in general. Follow the Page Builder Sneak Peek to keep yourself updated with the latest information about this product. In 2022, the new version of Magezon Page Builder is expected to be released, promising to take your website and your sales to the next level. So be patient and wait for the superior product. |
It’s Time to Create Your Own
Hopefully, this article in Magento 2 Page Builder tutorial series helps you create an eye-catching Magento 2 landing page using Magento 2 Page Builder. Once you’ve finished your page, don’t forget to share it with us. We’re looking forward to your design. Also, if you have any difficulty creating your page, feel free to reach us.
Try FREE Magezon Page Builder!
Easily create beautiful, engaging Magento websites in any style whenever you want without relying on developers or designers. Just by drag & drop.


