 Magezon Blog Help Merchants Build Comprehensive eCommerce Websites

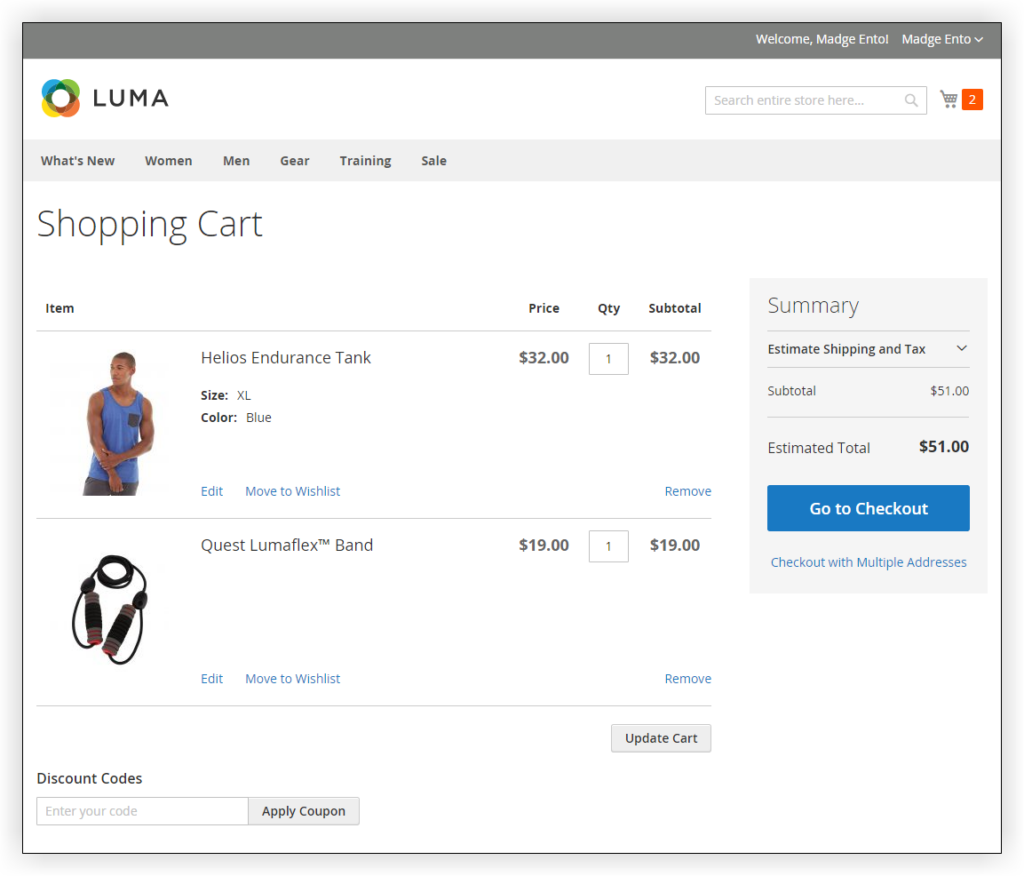
Just like in brick-and-mortar shops, a shopping cart is a must-have in any internet-based store. An online cart displays all the items a shopper has picked on a single page and allows them to review those products before checkout.
Online shopping carts are surely familiar with ecommerce sellers. Still, do they actually realize why a well-managed shopping cart is so essential? Well, online carts are pretty much like a conventional cart, but with more functionalities. Online shopping carts are where the product details are stored. They are gateways for order, catalog, and customer relationship management (CRM). Besides that, they display product data, categories, and website information to users.
Fully understanding the capabilities of a Magento shopping cart lets merchants avail them to satisfy their customers with a great shopping experience, thereby taking their profits to the next level. And configuring a cart for your online store is the first step of all.
As the title states, this article is meant for Magento merchants who are looking for a guide to setting up a shopping cart on this platform.
Table of contents
Configuring Magento Shopping Cart
Configuring the Magento shopping cart means determining functions such as Mini Cart, Redirect to Cart, Cart Thumbnails, etc. These actually are types of activities performed for your Magento store customers. Keep reading because I am leading you through them one by one now.
1. My Cart Link
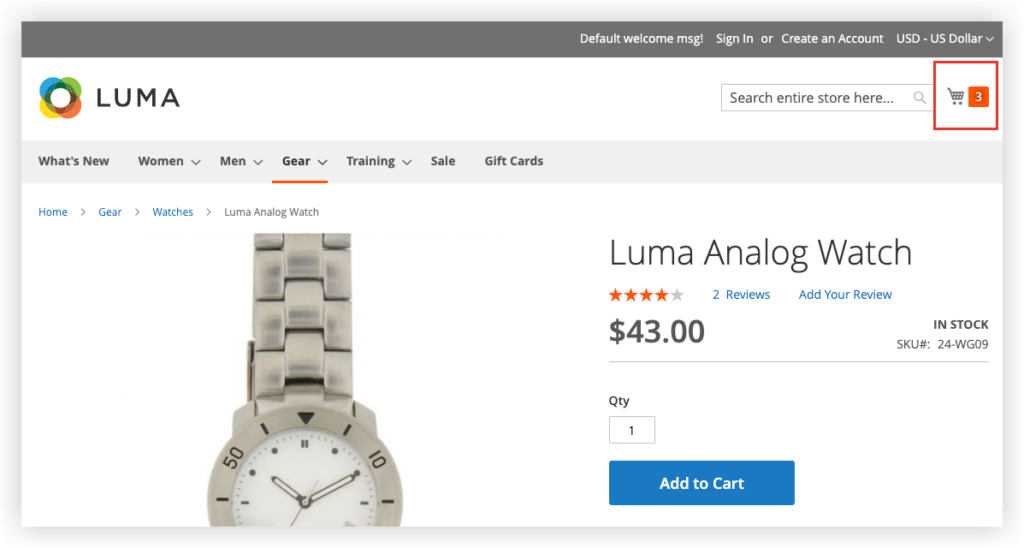
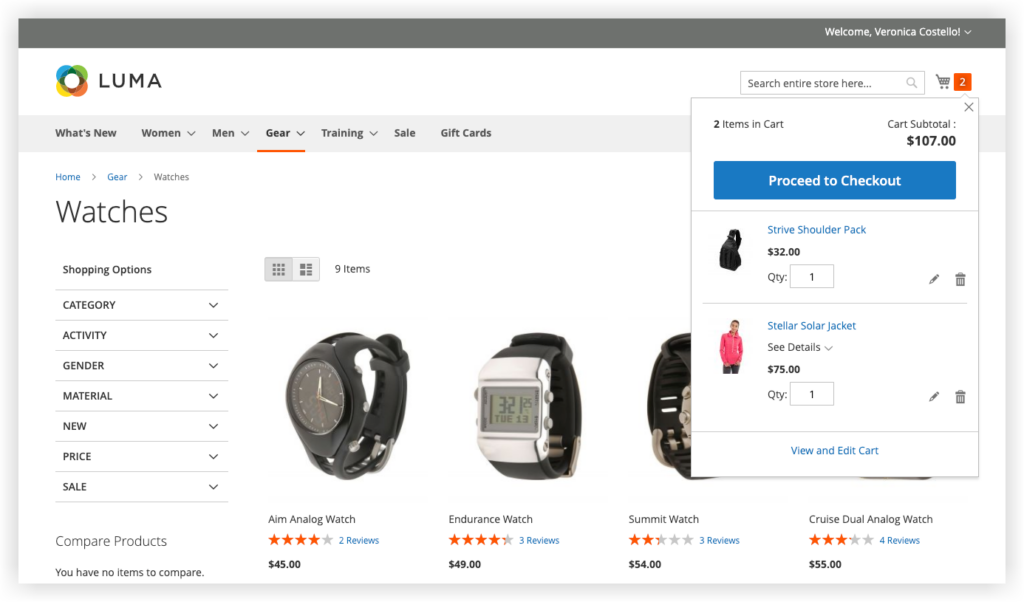
Lying in the upper-right corner of the header, the cart link shows a brief overview of the content inside the cart. When configuring the link, you have two options. An option is to display the many different products (or SKUs) in the cart. The other is to show the total number of all items. If the mini cart is already enabled, you can click the link to display more detailed info.
HOW TO CONFIGURE MY CART LINK
Step 1: On the Admin sidebar on the left-hand side of the screen, go to Stores > Setting > Configuration
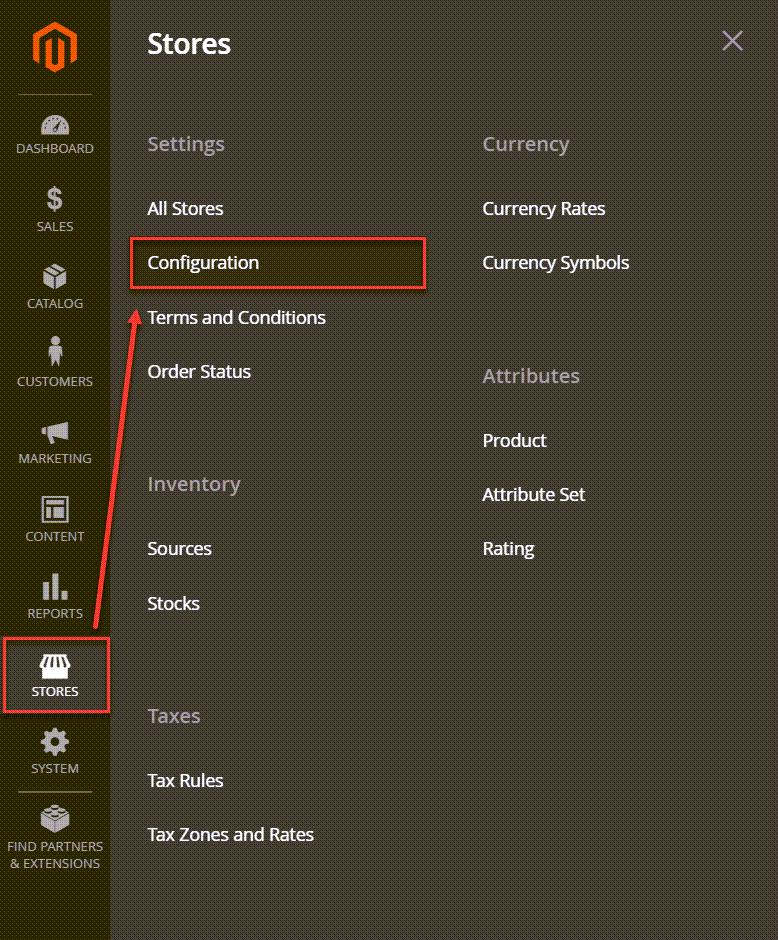
Step 2: You’ll see the sub-category Sales in the left panel. Now expand it and choose Checkout.
Step 3: Expand the My Cart Link section by clicking the expansion selector (the tiny downward arrow). In the Display Cart Summary field, select one of these options:
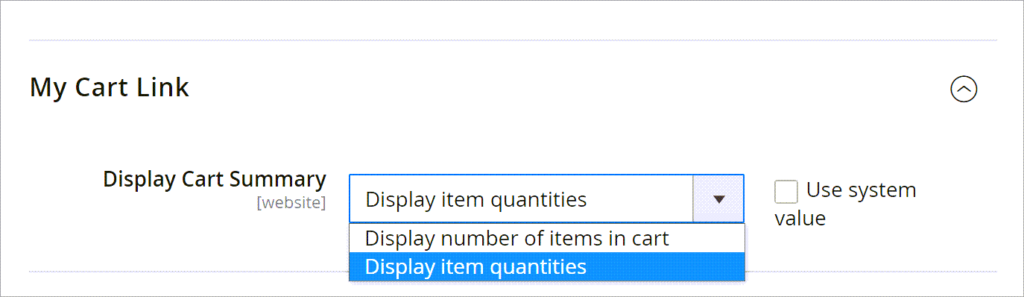
| Display item quantities: By opting for this setting, you allow the cart to show the total number of products in it, adding the quantities for each product. |
| Display number of items in the cart: This setting shows the number of items in the shopping cart, without regard to quantity. |
Step 5: Having finished, click Save Config in the upper-right corner. And it’s done.
2. Mini Cart
The mini cart is a cart summary dropping down from the cart logo when the customer hovers or clicks on the cart link. It appears at the top right-hand corner of the screen, right below the cart link.
HOW TO CONFIGURE MINI CART
Step 1: On the Admin sidebar, navigate to Stores > Setting > Configuration
Step 2: When you see the sub-category Sales in the left panel, expand it and then choose Checkout.
Step 3: Expand the Mini Cart section.
Step 4: If this configuration is for a particular store view, select the store view where you want the configuration applied.
Click OK to continue.
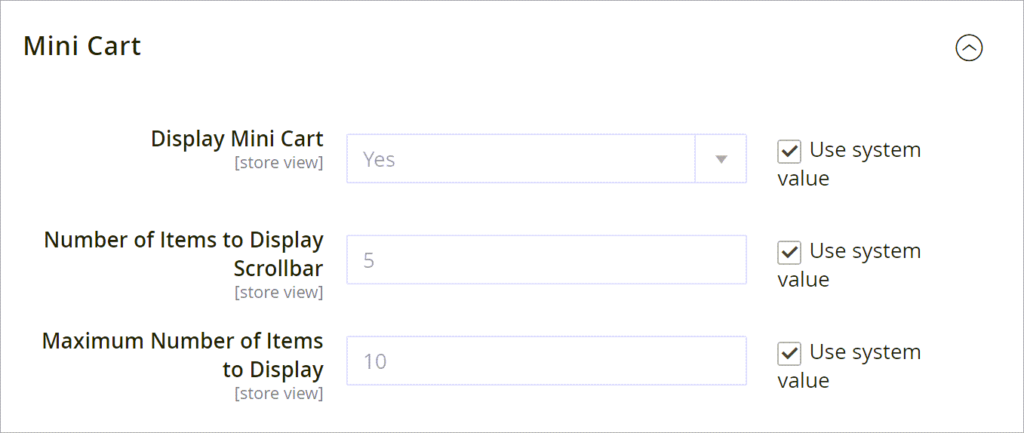
Step 5: In the Display Mini Cart field, select one of these options:
| Yes: If you want the mini cart to display on store pages. The theme of the pages decides how the sidebar looks. |
| No: If you don’t want the mini cart to appear on store pages. |
Step 6: If the display is enabled, move to the two fields below. They have to be filled in to complete the display configuration.

- For Number of Items to Display Scrollbar, you insert the number of items that can appear in the sidebar before it is scrolled down.
- For Maximum Number of Items to Display, you insert the maximum number of items recently added that you want to be in the mini cart.

Optimize Your Magento Store With Powerful Extensions!
Looking for fast, efficient, and well-coded extensions to build or optimize your Magento stores for sales-boosting? Then visit the Magezon website and grab the necessary add-ons for yours today!
3. Redirect to Cart
When customers click the add to cart button, they are still on the product page and continue shopping when the item is added to the cart. However, you can also choose to redirect your customer to the cart page and encourage them to proceed to checkout. Whatever you choose, it almost depends on your preference.
If you want the Magento shopping cart page to show up immediately after a product is added to the cart, continue reading.
HOW TO CONFIGURE WHEN THE MAGENTO 2 SHOPPING CART APPEARS
Step 1: On the Admin sidebar, navigate to Stores > Setting > Configuration
Step 2: You’ll see the sub-category Sales in the left panel. Now expand it and choose Checkout.
Step 3: Expand the Shopping Cart section by clicking the expansion selector.
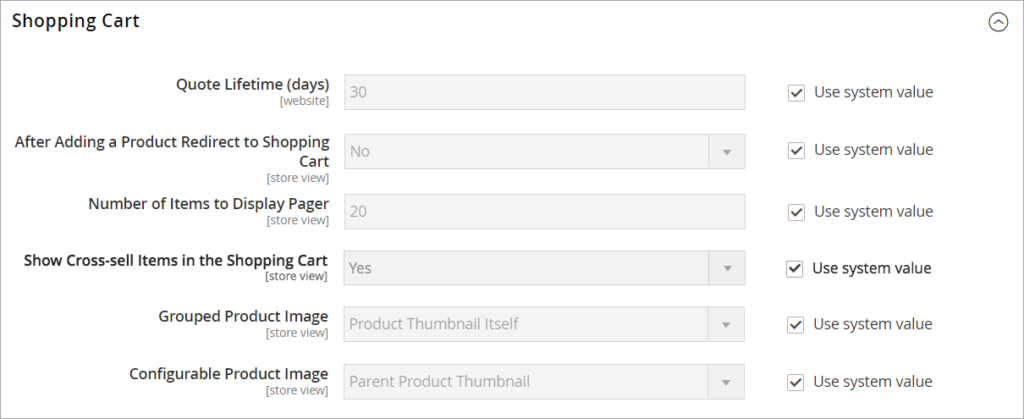
Step 4: Set After Adding a Product Redirect to Shopping Cart to one of these:
| Yes: If you want to redirect your customers to the cart page after they add a product item to the cart. |
| No: If you want to let your customers stay on the same page to continue shopping after they add a product item to the cart. |
Step 5: When you’ve done this, don’t forget to click Save Config.
4. Quote Lifetime
As the name suggests, Quote Lifetime means the course of time the quote lasts. In other words, this is a feature that lets you determine how long a price of a product is valid.

But why do people want to change the price of a product? You may ask. Well, most of the time, it is because the market price fluctuates according to the market demand. For example, Santa Claus costumes on ordinary days undoubtedly don’t cost as much as they do on Christmas Eve. Therefore, the sellers often set a higher price for Santa Claus costumes on Christmas days than on others.
Another common reason for this is that in a promotional campaign, stores might adjust their offerings’ prices so that customers can have discounts. Once the campaign ends, the promotional price may no longer be valid. Such circumstances are when people use Quote Lifetime.
Be noted that when you’ve configured the Magento Quote Lifetime, if a customer leaves the cart unattended, the price automatically updates after the period set in Quote Lifetime.
HOW TO SET UP A QUOTE LIFETIME
Step 1: On the Admin sidebar, go to Stores > Setting > Configuration
Step 2: Expand the sub-category Sales in the left panel and select Checkout.
Step 3: Click the expansion selector to expand the Shopping Cart section.
Step 4: If this configuration is for a particular store view, select the store view where you want the configuration applied.
Click OK to continue.
5. Minimum Order Amount
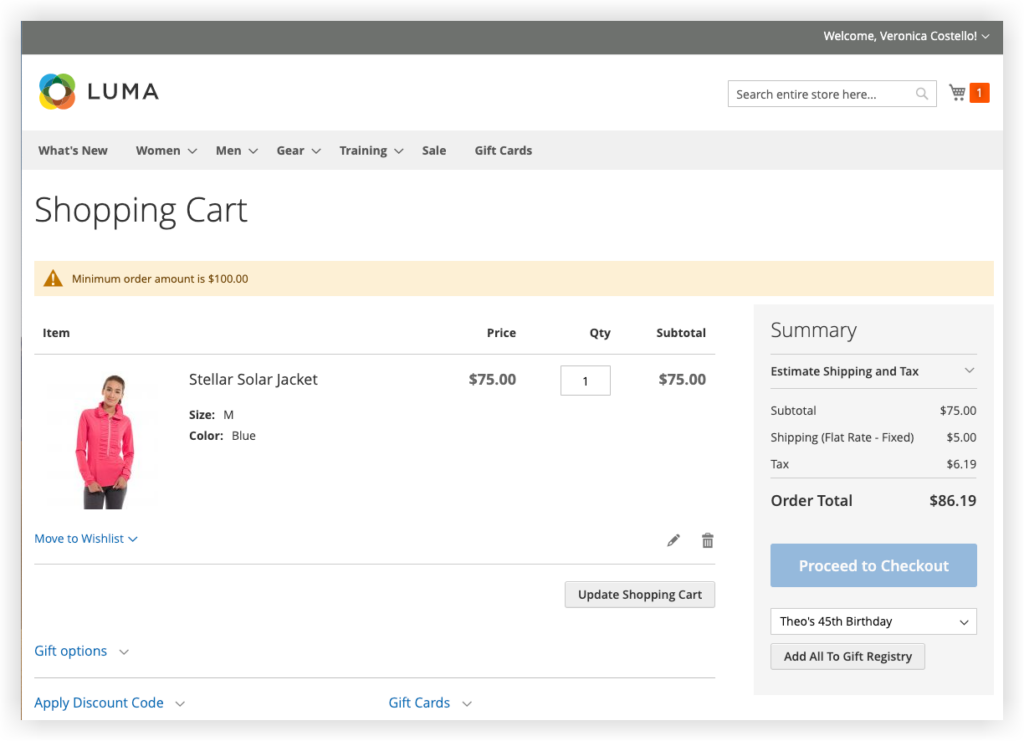
Magento allows its store owners to set a specific threshold for the order amount. It means that only when the order subtotals meet the minimum amount set by the store can the customer proceed to checkout.
The merchants, for example, can enable this Minimum Order Amount as a condition for customers to apply a discount code or to have their orders shipped to multiple addresses. This functionality on Magento aids in boosting e-store sales and increasing the average order value.
HOW TO SET UP A MINIMUM ORDER AMOUNT
Step 1: On the Admin sidebar, navigate to Stores > Setting > Configuration
Step 2: Expand the sub-category Sales in the left panel and select Sales right underneath.
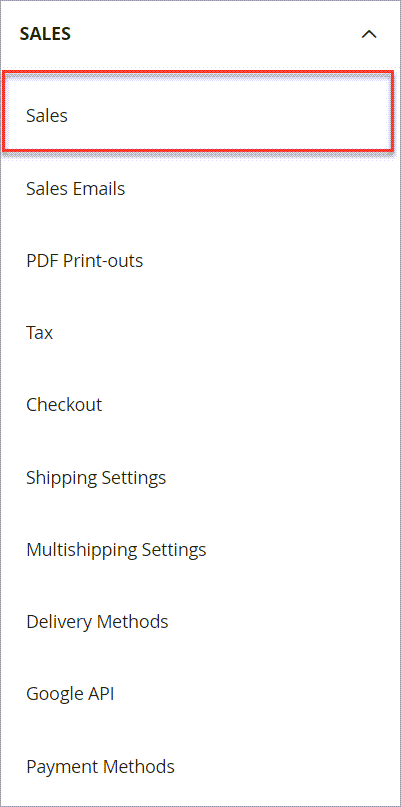
Step 3: Find the Minimum Order Amount section and expand it.
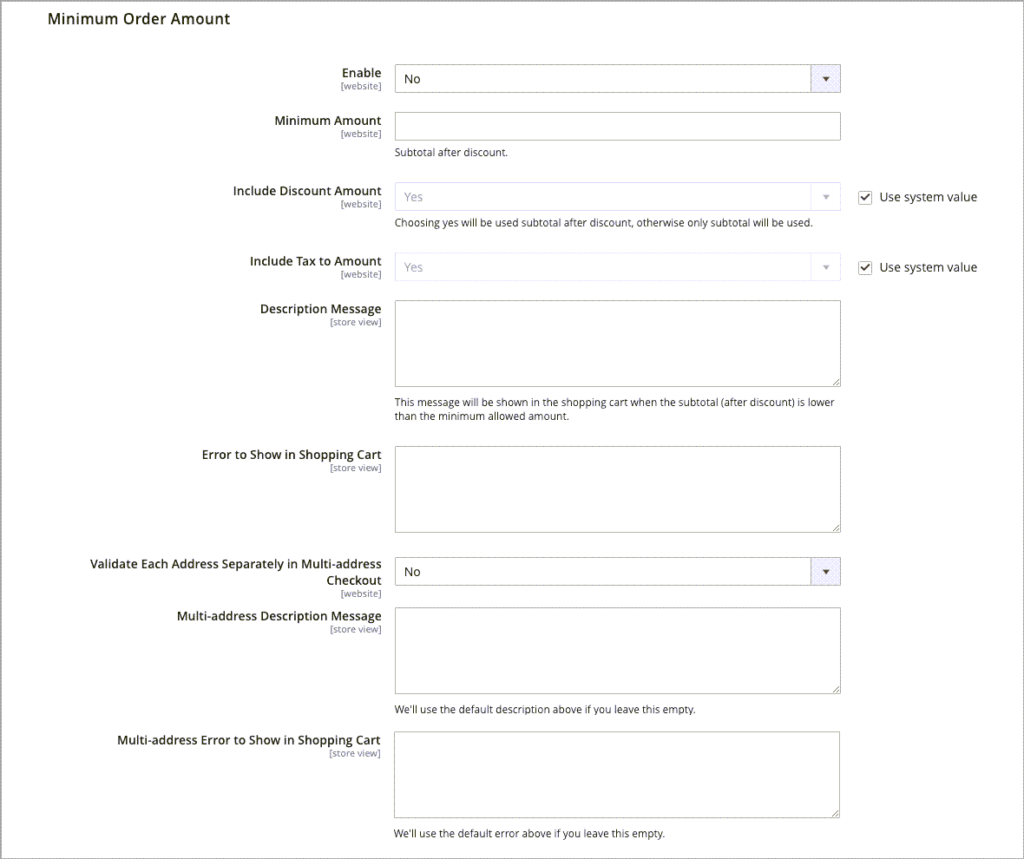
Step 4: Set Enable to Yes to apply a minimum order amount to your store.
Step 5: If the minimum order is enabled, the following fields must be set up to complete the configuration.
- For Minimum Amount, enter the amount required for the subtotal after discounts are applied.
- In Include Discount Amount, choose one of these options:
| Yes: If you want the subtotal to meet the minimum amount, including any discounts. |
| No: If you want the subtotal to meet the minimum amount, not including any discounts. |
- In Include Tax to Amount, select one of the following:
| Yes: If you want the subtotal to meet the minimum amount, including tax. |
| No: If you want the subtotal to meet the minimum amount, not including tax. |
Step 6: The minimum order amount message settings can be customized. This is optional. If you want to use the default messages, leave these fields empty.
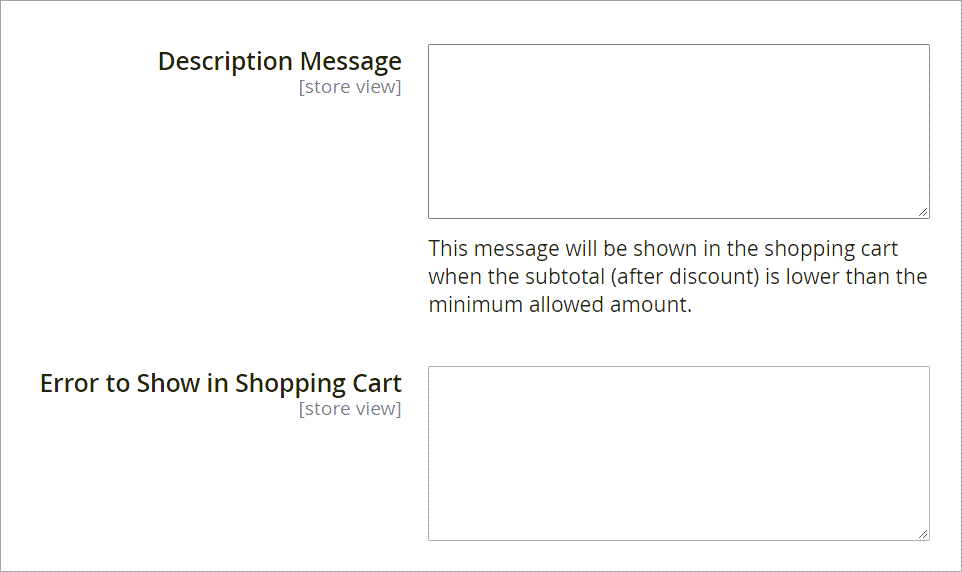
- In Description Message field, write the message that will show up at the top of the cart when the subtotal is lower than the minimum allowed amount.
- In Error to Show in Shopping Cart field, write what you want to use to customize the shopping cart error message.
Step 7: If necessary, you can set up a minimum order amount for multi-address orders.
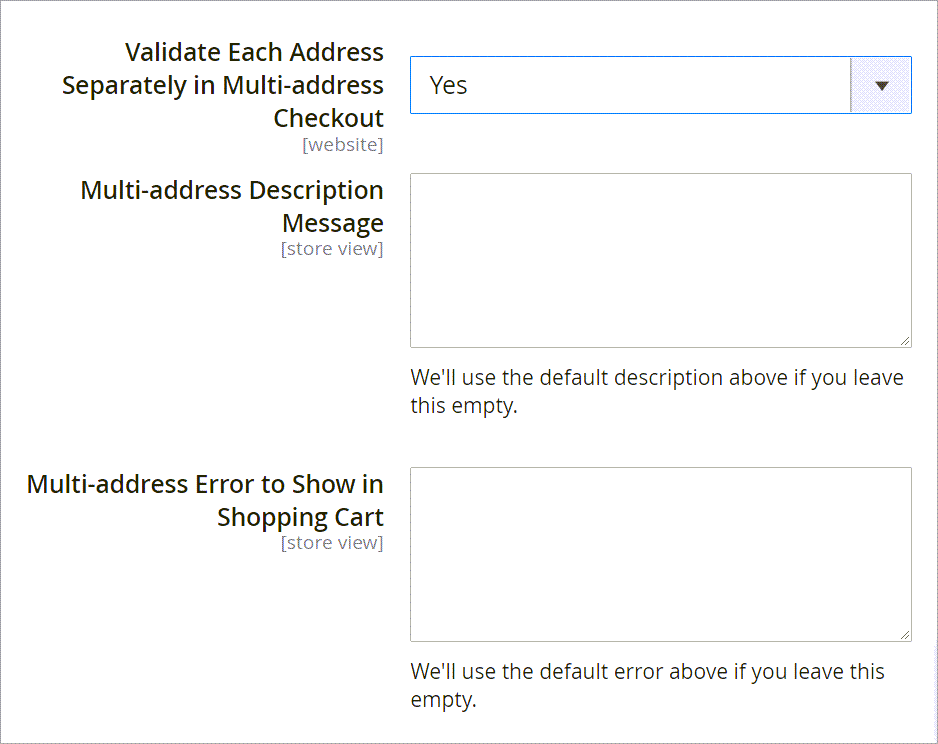
- For Validate Each Address Separately in Multi-address Checkout, select Yes if you want each address in a multi-address order to meet the minimum order amount.
- The minimum order amount message settings can be customized. This is also optional. If you want to use the default messages, leave these fields empty.
| For Multi-address Description Message, write the message that will show up at the top of the cart when the multi-address orders are lower than the minimum allowed amount. |
| For Multi-address Error to Show in Shopping Cart, write what you want to use to customize the shopping cart error message for multi-address orders that do not meet the minimum. |
Step 8: Click Save Config and it’s done!
6. Minimum Order Quantity
To maintain the profit margin, stock, and finest customer service, each e-store has its own order management system. However, sometimes the order management cost exceeds the profit margin which causes losses for the firm. One of the solutions is to set the minimum quantity for checkout.
With this function, you can set the minimum quantity allowed for each order or each customer group. It’s up to you.
HOW TO SET UP A MINIMUM ORDER QUANTITY
Step 1: On the Admin sidebar, navigate to Stores > Setting > Configuration.
Step 2: Expand the sub-category Catalog in the left panel and select Inventory.
Step 3: Expand the Product Stock Options section. In the Minimum Qty Allowed in the Shopping Cart field, set the minimum quantity of the product for an order.
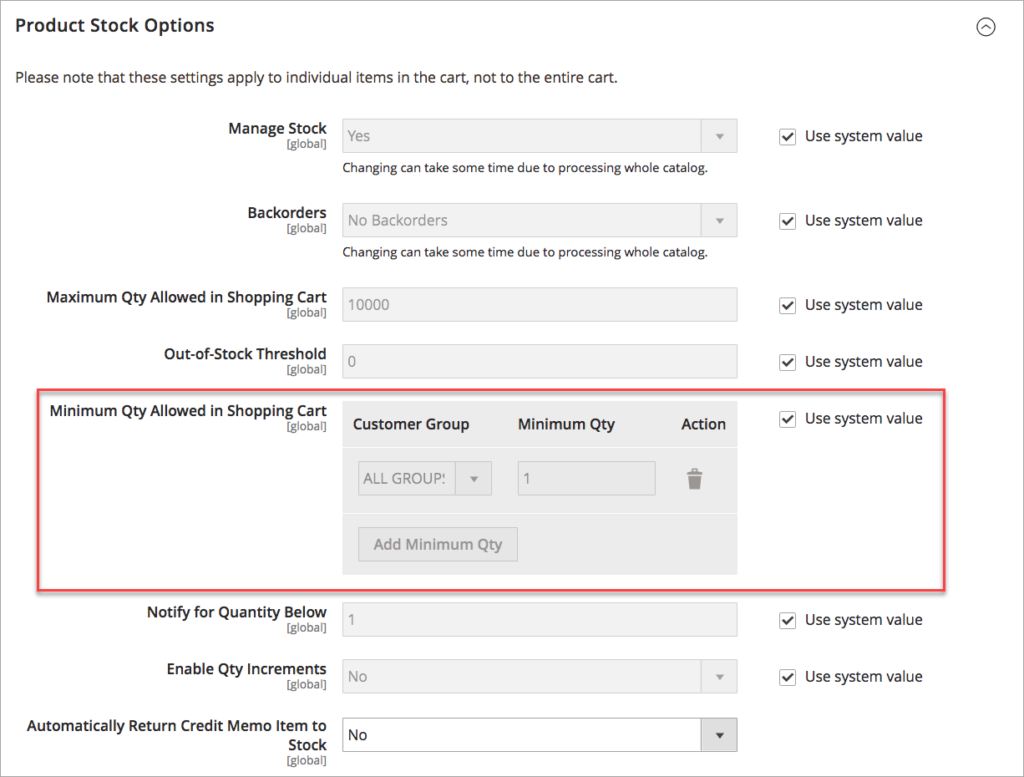
Step 5: If necessary, untick the Use system value checkbox to customize the settings.
- In the Customer Group field, select a specific group and enter the minimum quantity for that group in the Minimum Qty field.
- To add another group and its quantity limit, hit the Add Minimum Qty button below.
Step 6: Click Save Config when you’ve done.
7. Cart Thumbnails
Cart thumbnails are undersized product images appearing in the Magento shopping cart. They give a quick summary of what the product looks like when they’re added to the cart. The thumbnail in the cart should match an item in a specific color or pattern that the customer wants to buy.
However, there are configurable or grouped products with multiple options to select (regarding size and color) and the image can not always match the variation of the product in the cart. For these products, Magento 2 allows store owners to opt for the Cart Thumbnails images from both their “parent” products and the product variation.
HOW TO CONFIGURE CART THUMBNAILS
Step 1: On the Admin sidebar on the left, navigate to Stores > Setting > Configuration.
Step 2: Expand the sub-category Sales in the left panel and select Checkout.
Step 3: Click the expansion selector to expand the section Shopping Cart.
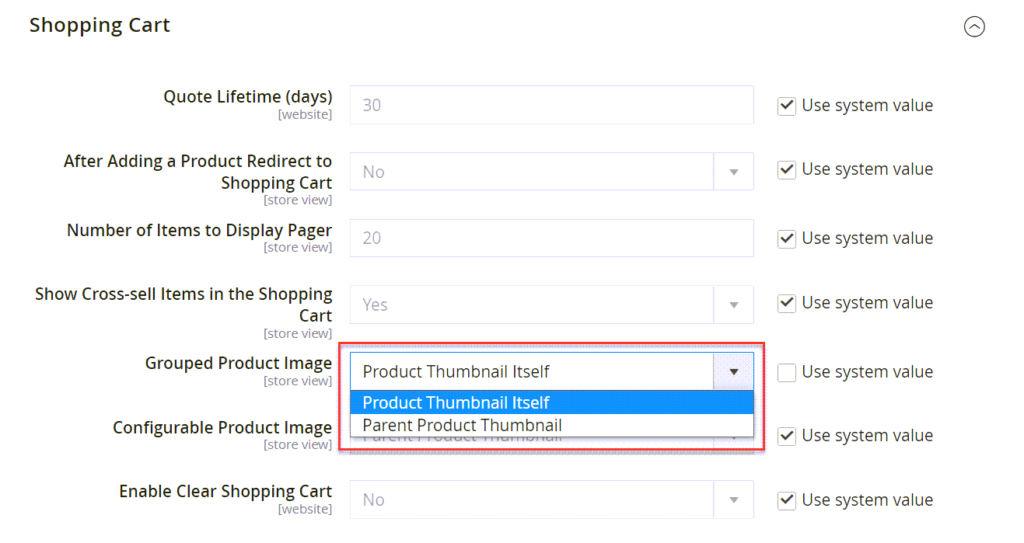
Step 4: Navigate to Grouped Product Image to decide which thumbnail for grouped products appears in the shopping cart.
- Select Product Thumbnail Itself if you want to use the thumbnail assigned to the product variation which is added to the cart.
- Select Parent Product Thumbnail if you want to use the thumbnail assigned to the parent product.
Step 5: Navigate to the Configurable Product Image to decide which thumbnail for configurable products appears in the shopping cart.
Step 6: Click Save Config in the upper-right corner.
And That’s It!
We’ve provided you with the most detailed and easy-to-understand instructions to configure the Magento shopping cart. Hope that this guide is of great help in many ways. If you are stuck at any step, don’t hesitate to leave a comment below. We’ll be responding in minutes. For more guides and instructions like this, visit our collection of Magento tutorials.
At Magezon, we also provide you with many fast, well-coded yet affordable extensions for your store optimization. Visit our website to opt for the necessary ones!
Optimize Your Magento Store With Powerful Extensions!
Looking for fast, efficient, and well-coded extensions to build or optimize your Magento stores for sales-boosting? Then visit the Magezon website and grab the necessary add-ons for yours today!