 Magezon Blog Help Merchants Build Comprehensive eCommerce Websites

In the latest shopping cart tutorial, we guided you to set up Magento 2 Shopping Cart, including managing functions like Mini Cart, Redirect to Cart, Cart Thumbnails, etc. In this blog, we’ll continue with the shopping cart series and discover how to configure Gift Options – the last function of Magento 2 Shopping Carts.
So, what exactly are Gift Options in Magento 2 for?
As you are also a buyer, you’ll know for sure that there are times a customer purchases something on an ecommerce website to send to other people as a present. And just like buying a present conventionally, the shopper desires to have it wrapped or attach a small wishing card with it when shopping online. Therefore, the Gift Options function on Magento 2 e-stores was launched to meet these needs.
How does it work?
Before checkout, available gift options appear in the shopping cart so the customer can select them. This way, the customer can determine whether they can add a gift message or a card and what gift-wrapping options they can have. A separate message and gift-wrapping option can be applied for each item. Plus, a gift receipt and a greeting card can be added when applied to the entire order.
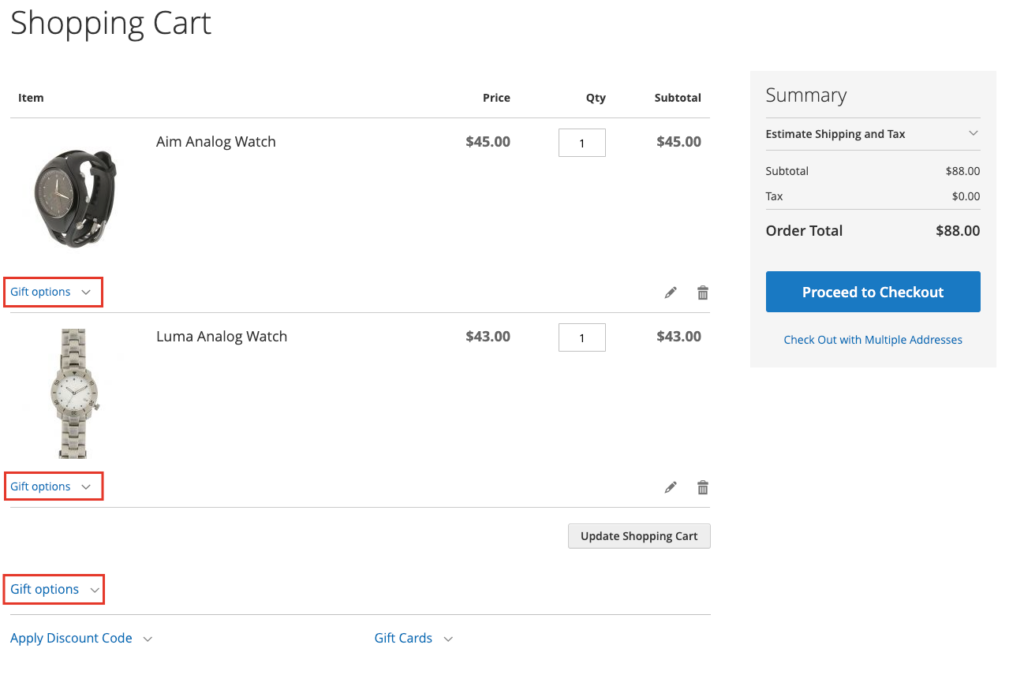
Now you may understand the basics of Gift Options, it’s time to configure it.
Table of contents
How to Enable Magento 2 Gift Options
While the Magento 2 Gift Options configuration applies to the entire website, it can be overridden at the product level. In this part, we’ll learn how to configure Magento 2 gift messages, gift wrapping, gift receipts, and printed card options.
Step 1: Log in to the Admin panel, and navigate to Stores > Settings > Configuration.
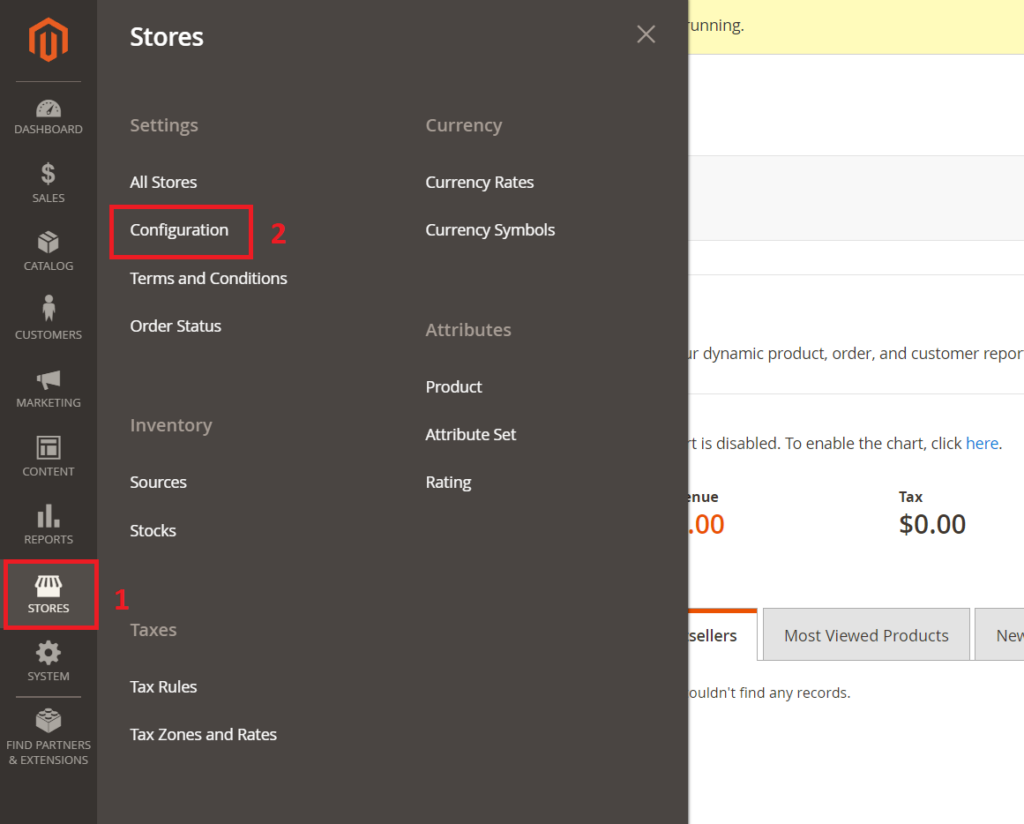
Step 2: You’ll see the sub-category Sales on the left. Now expand it and select Sales underneath.
Step 3: Expand the Gift Options section.
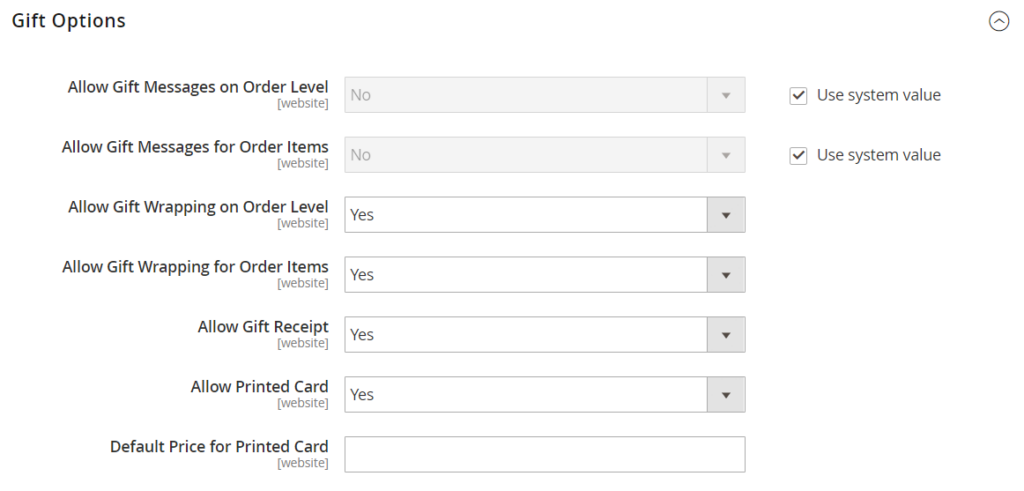
Note: Gift wrapping, greeting cards, and gift receipts are available in Commerce edition only.
Step 4: The first two fields are for gift message options. By default, Magento Commerce lets customers add a customized gift message to their orders and products.
To offer this feature to your customers, just:
- Select Yes for Allow Gift Message on Order Level to allow a single gift message for the entire order. If not, select No.
- Select Yes to Allow Gift Message for Order Items to apply gift messages individually to each item in the Magento 2 shopping cart. If not, select No.
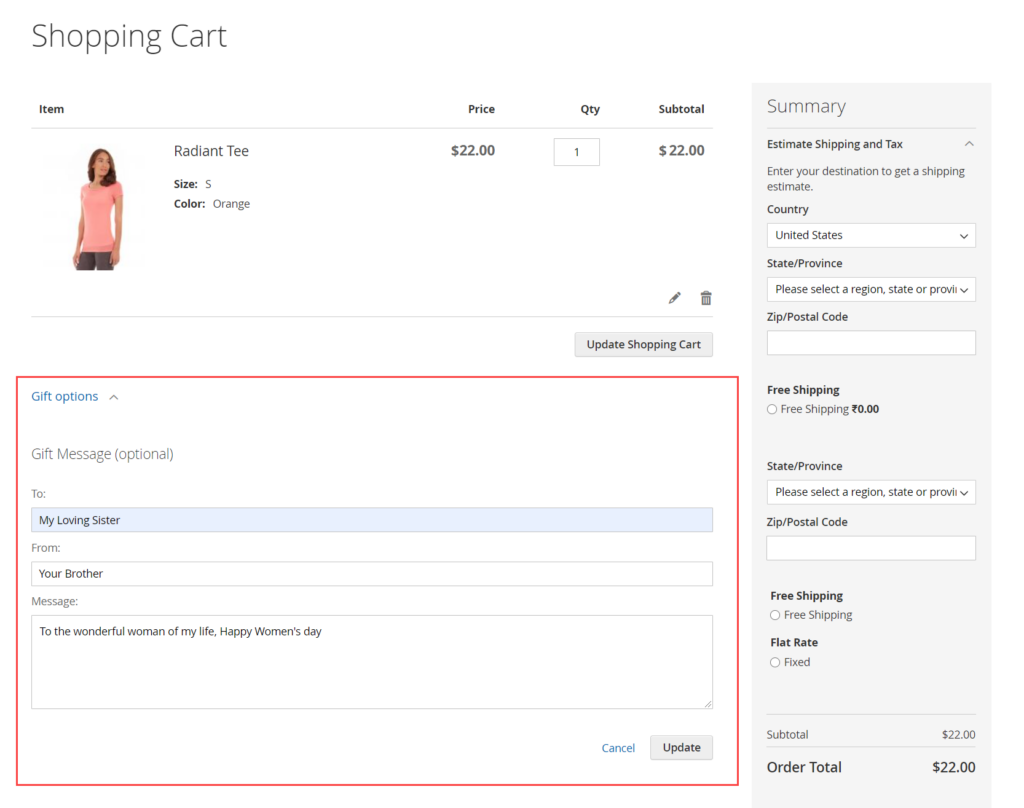
By configuring these, customers can add a gift message to the Gift Message section on the shopping cart page, as in this example:
Read more: Here’s how to configure Magento 2 Persistent Shopping Cart
Step 5: The next two fields are for gift-wrapping options. Choose:
- Yes, for Allow Gift Wrapping on Order Level, if you want to allow a single gift wrapping for the entire order. If not, select No.
- Yes, for Allow Gift Wrapping for Order Items to allow applying gift wrapping individually to each item in the Magento 2 shopping cart. If not, select No.
Step 6: Set Yes for Allow Gift Receipt so that your customers can choose to include a gift receipt. If not, select No.
Step 7: Set Yes for Allow Printed Card so your customers can include a printed card. If not, select No.
Step 8: Decide the Default Price for Printed Card, then enter it in the field.
Final step: Click Save Config once you’ve done.
You have finished enabling (or disabling) all gift options on your e-store. Let’s dig deeper into Magento 2 gift wrap and determine what Gift Options Tax is.

Optimize Your Magento Store With Powerful Extensions!
Looking for fast, efficient, and well-coded extensions to build or optimize your Magento stores for sales-boosting? Then visit the Magezon website and grab the necessary add-ons for yours today!
Magento 2 Gift Wrap: How to Manage a Gift Wrap Design
As you’ve learned, Magento gift wrapping can be applied to either individual items or the whole order. In the Magento Commerce edition, you can manage gift-wrapping designs.
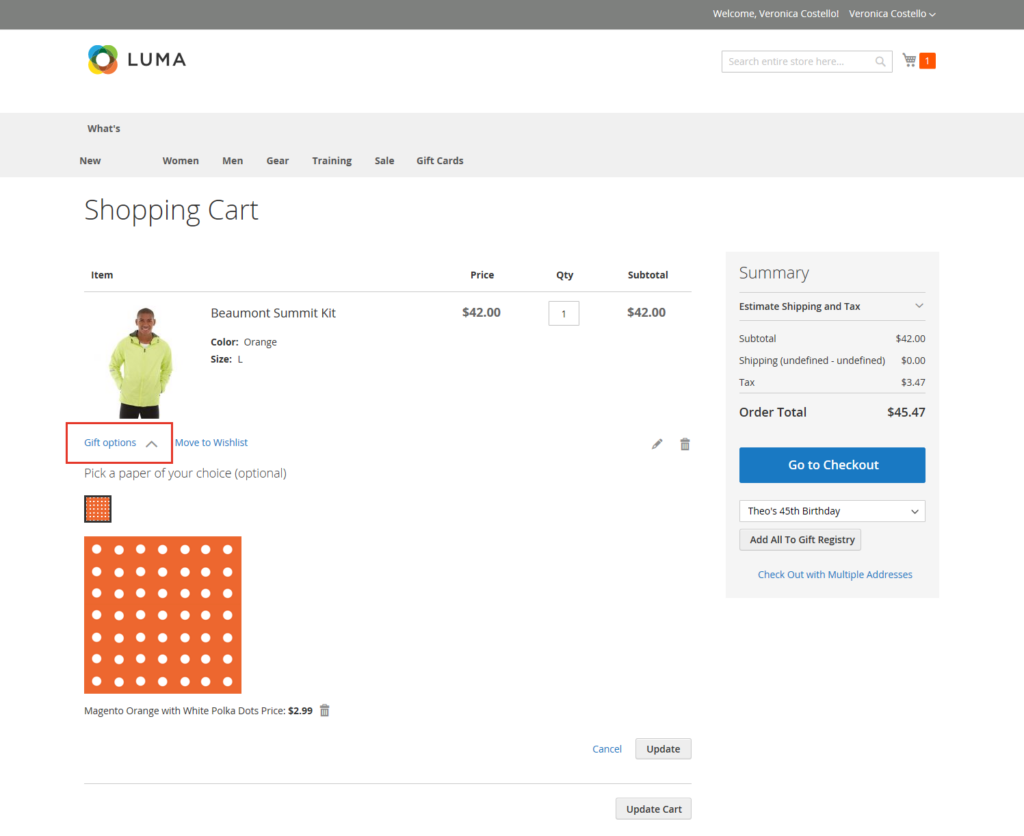
For each design, you can set a different price and upload a thumbnail picture which serves as an option for a product in the Magento shopping cart. When clicked, the thumbnail turns into a full-size image. During the checkout review, the price of the designs shows up along with the other checkout totals in the Order Summary section.
Now, hold tight as you learn how to add, edit and delete a Magento gift-wrapping design!
1. Add a New Gift Wrap Design
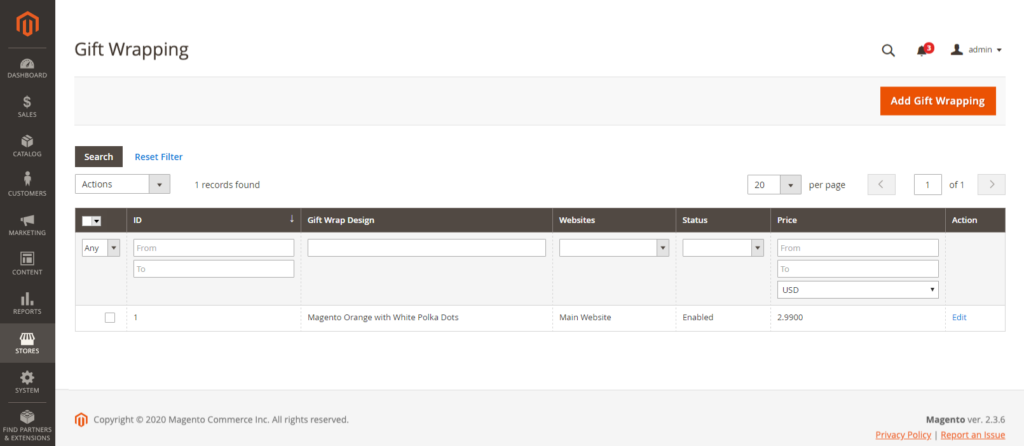
Step 1: Log in to the Admin panel, navigate to Stores > Other Settings > Gift Wrapping.
Step 2: You’ll see an Add Gift Wrapping button in the right corner at the top of the page. Click it.
Step 3: Next, fill in the fields in the Gift Wrapping Information section.
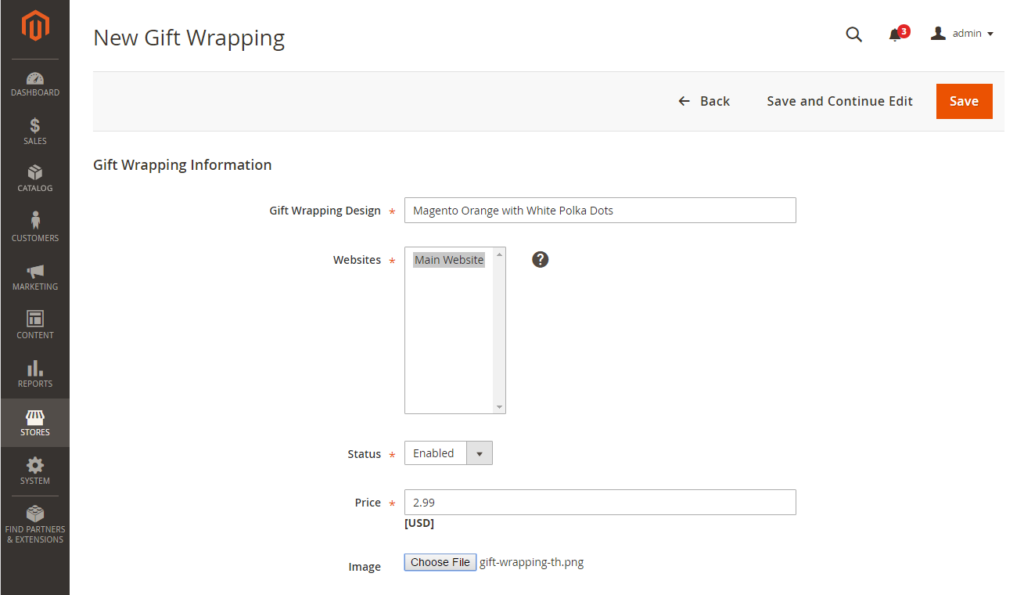
- Enter the name for the Gift Wrapping Design in the namesake field. The name will be visible in the checkout process.
- In the Websites field, choose the website(s) to which you want to add the gift-wrapping design.
- Set Status to Enabled. You can set it to Disable whenever you want, for example, after having a seasonal or temporary wrapping option.
- Decide the Price of the design, then enter it in the namesake field. This setting can be overridden by the gift-wrapping price at the product level.
- For Image, click Choose File to upload a thumbnail for the design. Once the record is saved, the thumbnail will appear in the Gift Wrapping Information.
Step 4: Hit Save Config.
2. Edit a Gift-Wrapping Design
Step 1: Log in to the Admin panel, navigate to Stores > Other Settings > Gift Wrapping.
Step 2: Look for the gift-wrapping record you want to adjust in the list.
Step 3: Make the necessary changes to the aforementioned fields.
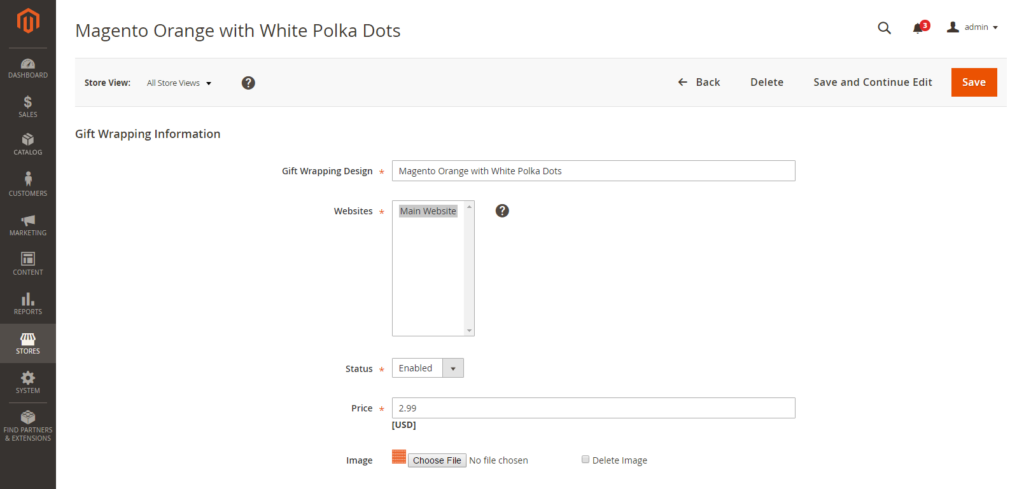
Step 4: Don’t forget to hit the orange Save button after finishing.
3. Delete Gift-Wrapping Designs
Open the Gift Wrapping grid to do this action. There are two techniques to remove gift wrap designs.
Technique 1: Delete a unique gift-wrapping design.
Step 1: Open the gift-wrapping design in edit mode.
Step 2: At the top of the page, hit Delete.
Step 3: Once done, click OK.
Technique 2: Delete various gift-wrapping designs at the same time.
Step 1: In the Gift Wrapping grid, tick the checkbox of each gift wrap design that needs to be deleted.
Step 2: Navigate to the Actions field, and choose Delete.
Step 3: Hit Submit.
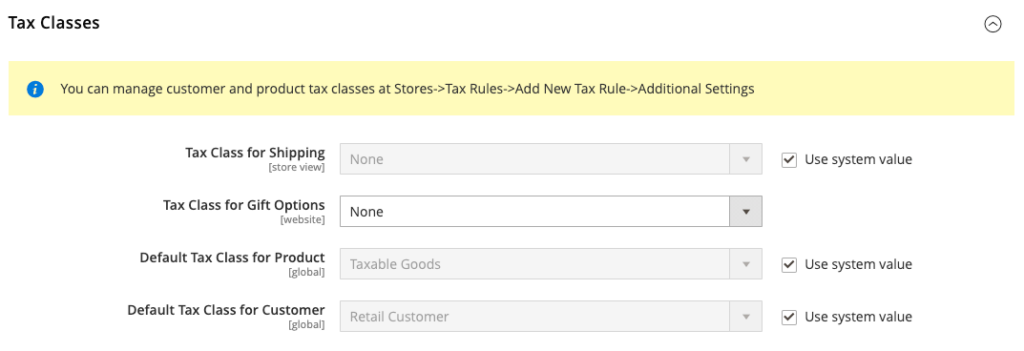
Gift Options Tax
Well, doing business and paying taxes go hand in hand. And offering gift-related services is a part of your business. Hence, you can add the tax to gift wrapping and printed gift card prices if you want.
You can also determine a tax class for those items at either the website or worldwide level.
Read more: Magento Taxes: Everything You’d Wish To Know
How? I’ll show you right away.
Step 1: Log in to the Admin panel, and navigate to Stores > Settings > Configuration.
Step 2: You see the sub-category Sales on the left side? Expand it and select Tax.
Step 3: Expand the Tax Classes. Choose the applicable tax class in the Tax Class for Gift Options field.
Step 5: Expand the Orders, Invoices, Credit Memos Display Settings section.
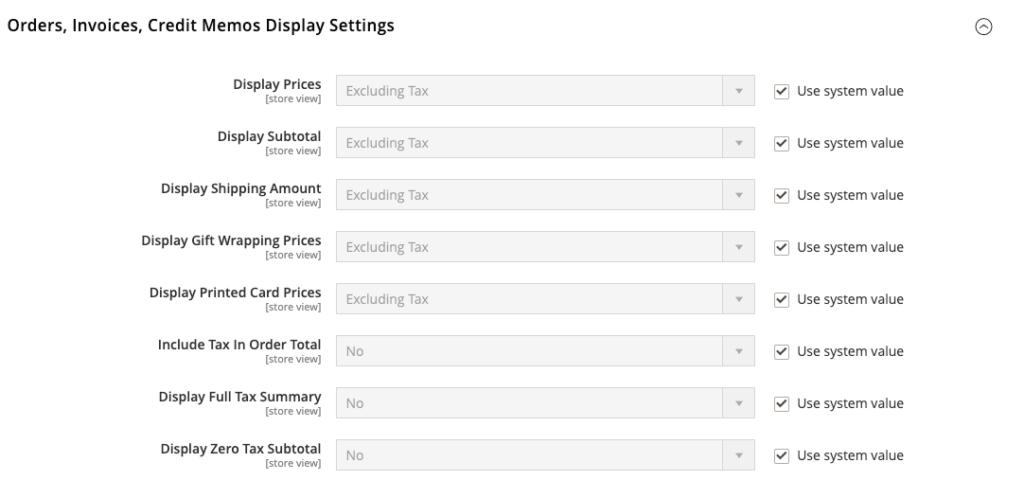
Step 6: For Display Gift Wrapping Prices, select:
- Excluding Tax if you want to display the price without tax.
- Including Tax if you want to display the price with tax.
- Including and Excluding Tax if you want to display both options.
Step 7: For Display Printed Card Prices, select:
- Excluding Tax if you want to display the price without tax.
- Including Tax if you want to display the price with tax.
- Including and Excluding Tax if you want to display both options.
Step 8: And don’t forget to hit Save Config.
And That’s all!
We’ve explained to you the steps to configuring Magento 2 Gift Options in the most detailed way. Let us know if you’re not clear at any point. And if you want us to do a tutorial about any topic, don’t hesitate to tell us. We’d be glad to go with you on the journey of discovering the Magento 2 backend.
Lastly, for more in-depth instructions like this, visit our Magento 2 Tutorials series.
At Magezon, we also provide you with many other fast, well-coded, yet affordable extensions for your store optimization. Visit our website to opt for the necessary ones!
Optimize Your Magento Store With Powerful Extensions!
Looking for fast, efficient, and well-coded extensions to build or optimize your Magento stores for sales-boosting? Then visit the Magezon website and grab the necessary add-ons for yours today!