| Follow the Magento Page Builder series for useful tutorial |
What is the most important thing of an eCommerce website? Obviously, the product. Your landing page or homepage may set the first impression for the customers, but eventually, the one that makes them stay is your products.
The way you display the products on your website is crucial, too. We understand that, and today we want to introduce you to the Magento Page Builder Products content type. With this content type, you can optimize the display style of your products to capture as much attention as possible. In other words, convert visitors into customers and increase sales.
Hesitate no more, let’s start our article and learn about how to use the Products content type in Magento.
Table of contents
Where Is the Magento Page Builder Products Content Type Located?
In Magento Page Builder workspace, you can find the Products content type in the left panel, under the Add content drop-down section.

| Learn how to use Add Content content types: Magento Page Builder: All About the Block Content Type |
Introduce Products Toolbox in Magento Page Builder
In order to display the products toolbox, hover over the products container.

Same as other content types in Magento Page Builder, the products toolbox has several elements:
| Tool | Icon | Description |
| Move | Changes the position of the products container and its content on the stage. | |
| Settings | Access the Edit Products page and you can change the products list and alter the container’s properties here. | |
| Hide | Make both the products container and its content unseen. | |
| Show | Show the unseen products container and its content. | |
| Duplicate | Copy the products container and its content. | |
| Remove | Remove the products container and its content. |

Try FREE Magezon Page Builder demo today
Easily create beautiful, engaging Magento website in any style whenever you want without relying on developers or designers. Just by drag & drop.
Create a Products List Block in Magento Page Builder
Let’s move on to how to create it. Note that you can create it directly from the stage or create a products list block first and add it to the page later.
Let’s start with the products list block right away.
- On the Admin sidebar, choose Content > Elements > Blocks
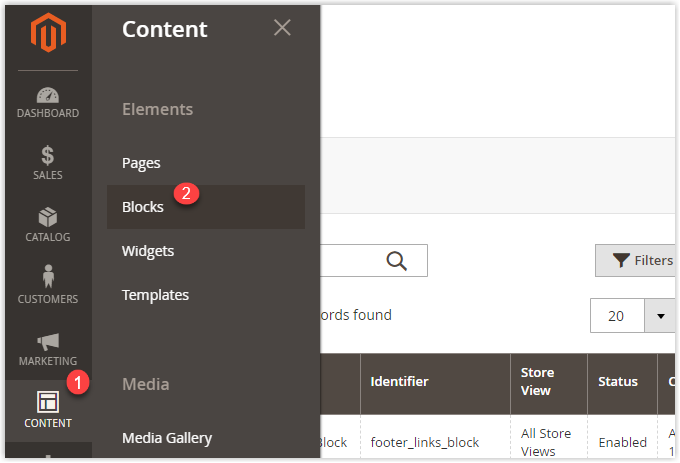
- Select Add new block in the upper-right corner

- Toggle Yes to enable Block
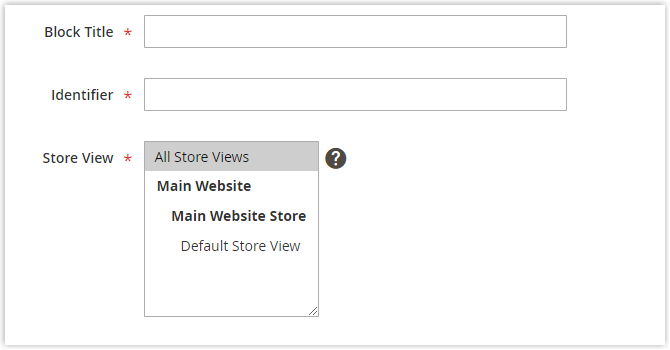
- Fill in the Block Title (name of the block) and Identifier (a unique identifier for the block). You can learn more about Magento 2 Block in the Content category of our Magezon blog.
- Select the Store View, where you want the block to appear.
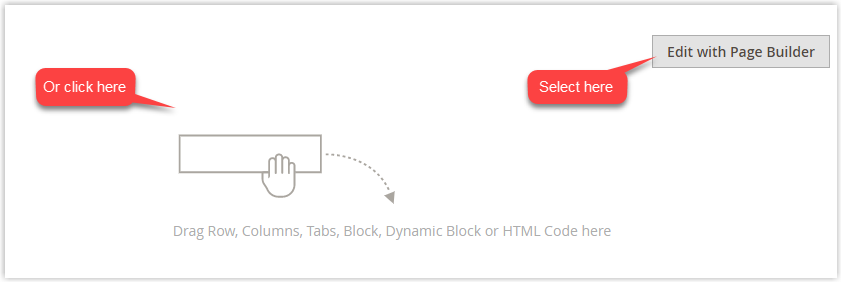
- Scroll down and select Edit with Page Builder or click inside the content preview area to access the Page Builder workspace.
- Under Add Content section, drag and drop the Row content type, then the Products placeholder to the stage. Notice to make adjustments to the ow as necessary.
Configure the Products List Container
In this part, we will dive into the detailed settings of the product list container.
Hover over the Products container and when the toolbox appears, click the Settings (![]() ) icon.
) icon.

Appearance Settings
Once you’ve accessed the Settings page, the first section you need to adjust will be Appearance.
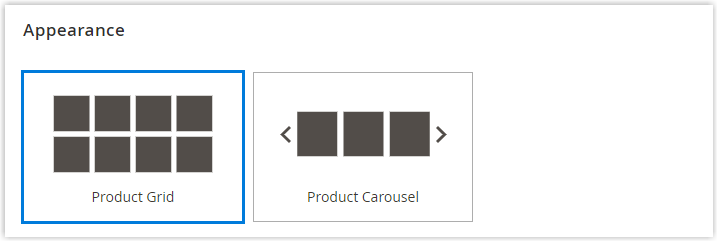
There will be 2 options to display the products:
| Product Grid | Shows the products in a grid with an optional number of rows (Magento has set 5 rows by default but you can change it as you wish in the Number of Products to Display box) |
| Product Carousel | Shows the products in a carousel (or a slider). Each slide contains 5 products. |
Warning of responsiveness: as for the Product Carousel option, you should add the Products content type directly to a responsive row, tab, or one-column layout that won’t show too many products per slide on smaller screens. On the contrary, when you use the narrower content types compared to the width of the page like a narrow column, more of the products in the carousel will appear per slide, regardless of the screen size.
If you choose to stay with the Grid option, below are some things you should do:
- Identify what products to display
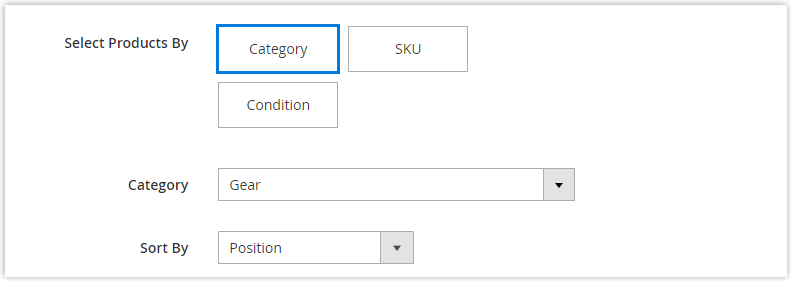
There are 3 options you can select: Category, SKU, and Condition.
Note that these options are mutually exclusive, you can only use one of these 3, not simultaneously, to display your products.
Let’s go down to the details of each option:
- Category – use a chosen category to display your products.
When you choose this option, there will be a Category selector right below where you can choose the category of products to show. Select the type of products you wish.
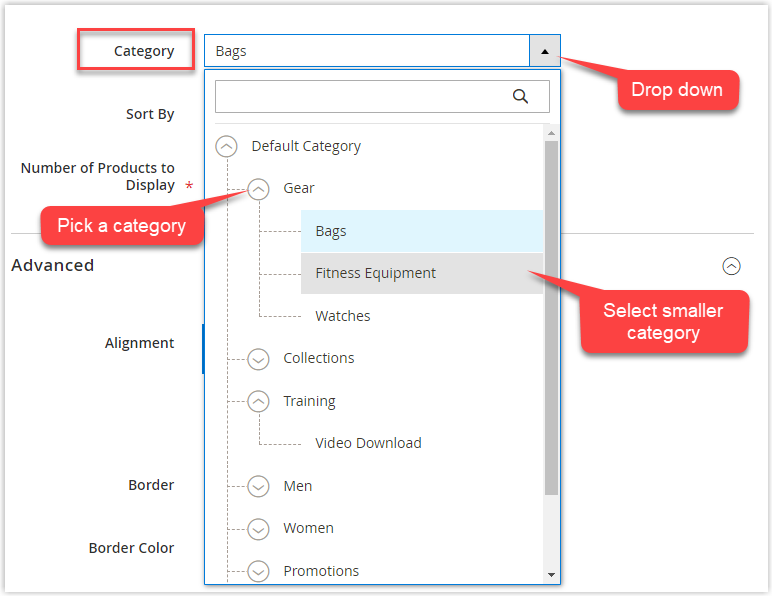
- SKU – use one or more SKUs to display the products.
When you choose this option, there will be a Product SKUs text box to enter the SKUs of the products you want to display. Remember to separate them with commas.
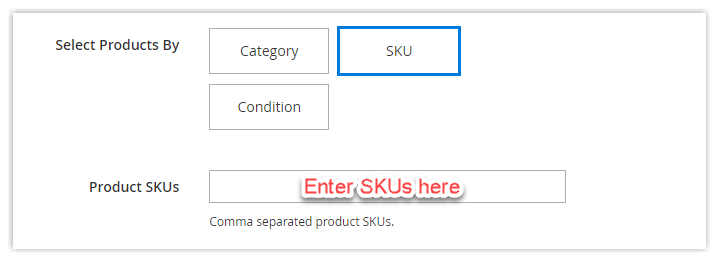
- Condition – define one or more conditions of the products you want to display.
When you choose this option, there will be some tools to add products’ conditions. Click the green Plus icon (![]() ) to add one condition. Repeat to add more.
) to add one condition. Repeat to add more.
If you want to remove any conditions, simply click on the red (![]() ) icon nearby.
) icon nearby.
- Select the sort order for the products.
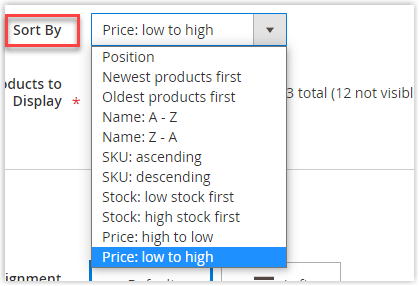
| Position | Only available with Category and SKU options. With Category: the products appear in the same order as in the catalog.With SKU: the products appear in the SKUs order that you have entered in the Product SKUs textbox. |
| Newest products first | Products appear in the order of the day they were added, in other words, the most recently added product will appear first. |
| Oldest products first | On the contrary to the newest products first option, the oldest product will appear first. |
| Name: A – Z | Products appear in alphabetical order. |
| Name: Z – A | Products appear in reverse alphabetical order. |
| SKU: ascending | Products appear in alphanumeric order. |
| SKU: descending | Products appear in reverse alphanumeric order. |
| Stock: low stock first | Products appear in order of the stock available, the lowest will appear first. |
| Stock: high stock first | On the contrary to the low stock first option, the highest will appear first. |
| Price: high to low | Products appear from highest to lowest price. |
| Price: low to high | Products appear from lowest to the highest price. |
- Fill in the Number of Products to Display to finish this section.
Note:
- After you set all the Category, SKU, or Condition, not all the products will display in the grid or carousel if they are disabled, marked as invisible, out-of-stock, or assigned to another website.
- In the Admin area, the price of configurable, grouped, and bundled products are undefined. In other words, you can not see the products in the preview if you filter them by price, and they will not appear in the exact order that you have assigned.
If you choose to try the Carousel setting, there is something you may do:
- To identify the products you want to display, follow the same steps as with the Grid option.
- The Carousel Mode setting helps you to set how the products will appear within the carousel.

If you switch between Default and Continuous settings, the only thing that will be changed is the Infinity Loop setting.
- You can set the Autoplay option to Yes or No as you want.
- If Yes, the carousel will automatically scroll when the page loads. Then you can set the delay in milliseconds between each slide in the Autoplay Speed textbox.
- If No, the customers have to click the navigation (dots or arrow) to see each slide in sequence.
- In the Default mode, you can toggle Infinity Loop.
When you set Infinity Loop to Yes, the slide show will play non-stop when the page is open. If No, the slide show will only play once.
Note: if Infinite Loop is No and the Autoplay is Yes then the autoplay will stop at the last products of the sequence.

- The last settings are Show Arrows and Show Dots.
If you set Yes to Show Arrows, there will be next and previous navigation arrows on both sides of the slider. If No, nothing will appear on the left and right sides.
If you set Yes to Show Dots, at the bottom of the slider, there will be navigation dots. If No, nothing will appear.
Now if you still haven’t been satisfied with the results yet, then let’s move on to the Advanced settings.

Try FREE Magezon Page Builder demo today
Easily create beautiful, engaging Magento website in any style whenever you want without relying on developers or designers. Just by drag & drop.
Advanced settings
- Select the Alignment to set the products list’s position within its container. Here are some options for you:

| Default | Keeps the default alignment setting of the current theme. |
| Left | Allows the list to be aligned along the parent container’s left border, with any padding given. |
| Center | Allows the list to be aligned in the center of the parent container, with any padding given. |
| Right | Allows the list to be aligned along the parent container’s right border, with any padding given. |
- Choose the style for the border of the Products container:
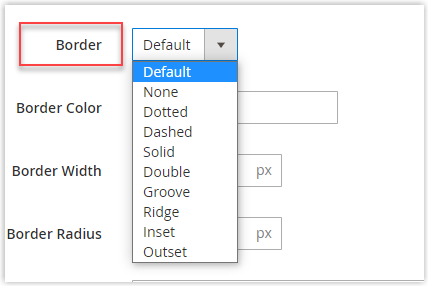
| Default | Keep the default setting of the border style that is set by the associated style sheet. |
| None | Set the container border as invisible. |
| Dotted | Set the container border as a dotted line. |
| Dashed | Set the container border as a dashed line. |
| Solid | Set the container border as a solid line. |
| Double | Set the container border as a double line. |
| Groove | Set the container border as a grooved line. |
| Ridge | Set the container border as a ridged line. |
| Inset | Set the container border as an inset line. |
| Outset | Set the container border as an outset line. |
- You may want to alter some other border display options, including Border Width and Border Radius after enabling the Border style.

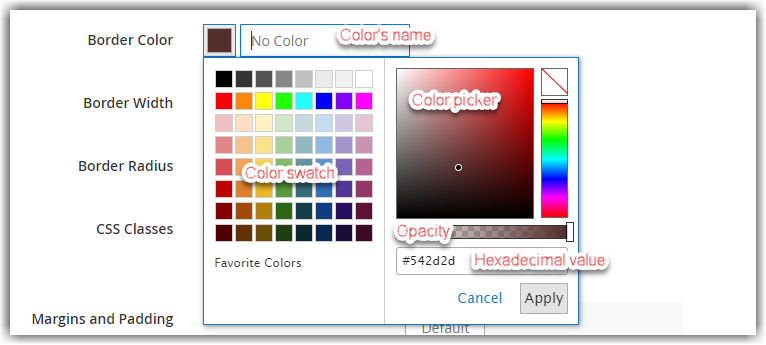
- Border Color – identify the color of the border with a swatch, the color picker, a valid color name, or a hexadecimal value.
- Border Width – identify the borderline width in pixels.
- Border Radius – identify the size of the radius of each corner.

- If you know how to code and want to optimize the display, then you can add some CSS classes from the current style sheet. Note that you need to separate the class names with a space.
- The final settings will be for the Margin and Padding
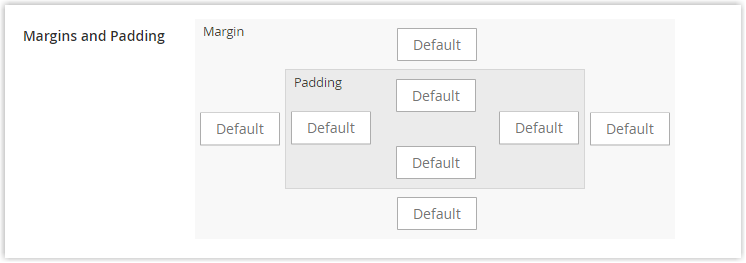
Enter the values in pixels to determine the outer margins and inner padding of the Products container.
| Margins | The outside blank space on the top/ right/ bottom and left of the container |
| Padding | The inside blank space on the top/ right/ bottom and left of the container |
There you are, now you have finished all the settings of the Products content type in Magento Page Builder. Next, we will see how it turns out.
Save and Preview on the Stage
Click the Save button in the upper right corner to return to the Page Builder workspace and preview the result.

If you have chosen the Carousel option with visible Arrow and Dot, this is what you got:
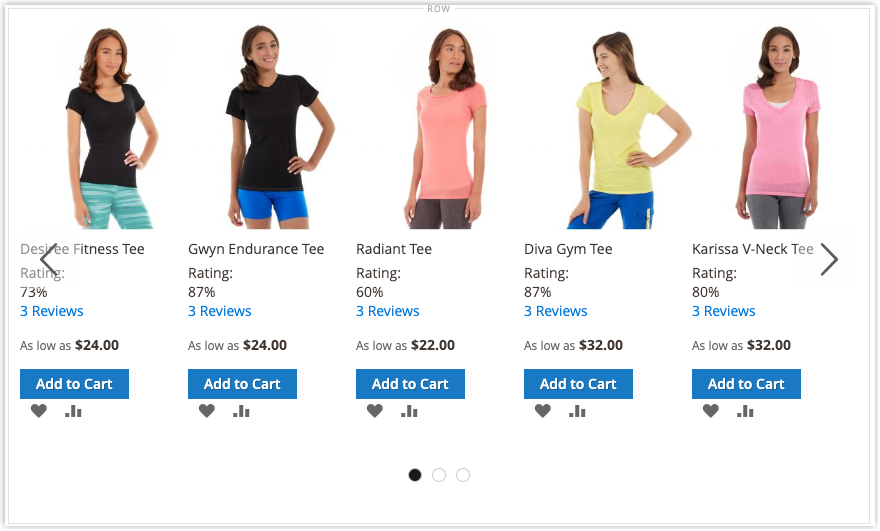
If you have chosen the Grid option then the result will be the same as the photo above without the navigation arrow and dots.
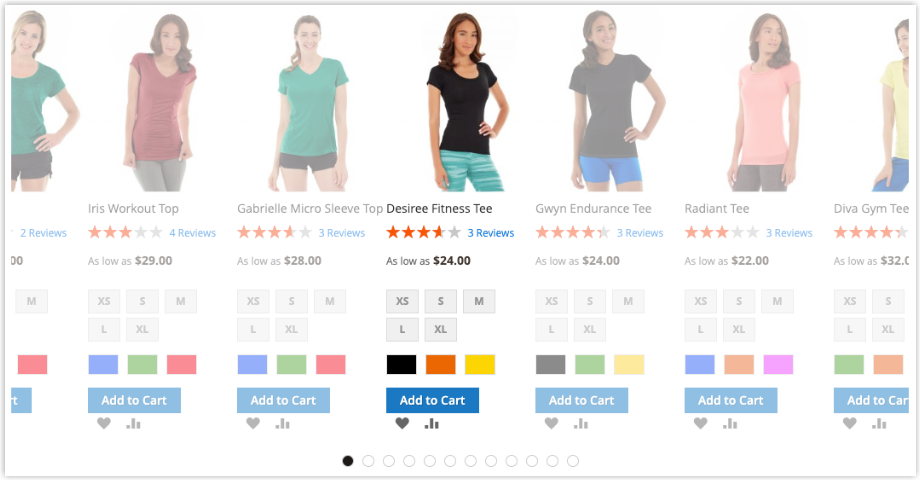
If you have chosen the Carousel option in Continuous mode this is what you got:
Since we’ve configured the Products block, now you can use a Widget or Block to place this block wherever you want.
That’s all about the Products content type in Magento Page Builder. Next part, we will show you how to optimize your products display with Magezon Page Builder.
Level up Your Website With Magezon Page Builder
If you are already satisfied with the results that you got from the Magento Page Builder Products content type then you can continue to go optimize other contents on your website. If you are not, then let’s go with us to explore what Magezon Page Builder can do to stand your store out.
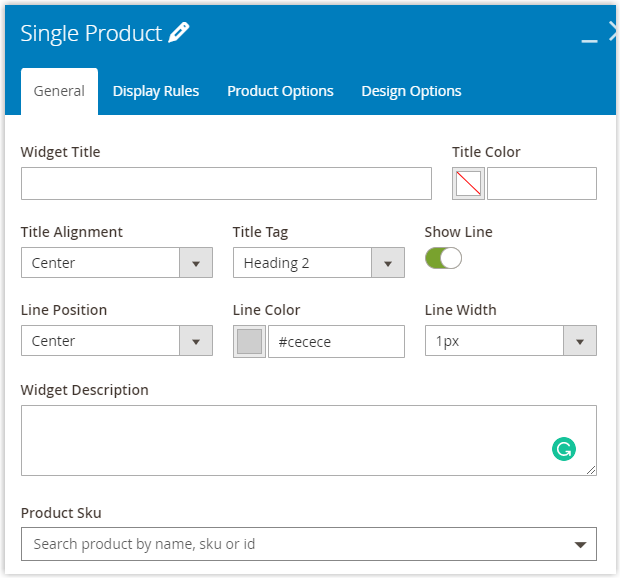
We offer a Single Product option as a widget so that you can display a specific product as needed without creating a single, different product category as in Magento Page Builder. You can simply enter the name, SKU, or id of the product to identify the widget and place it wherever on the page.
For the Carousel Options in Product Slider and the Grid Options in Product Grid, we also optimize the customization process and responsiveness.
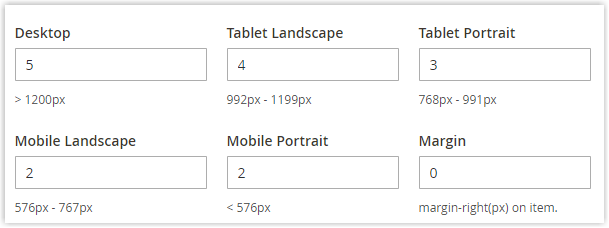
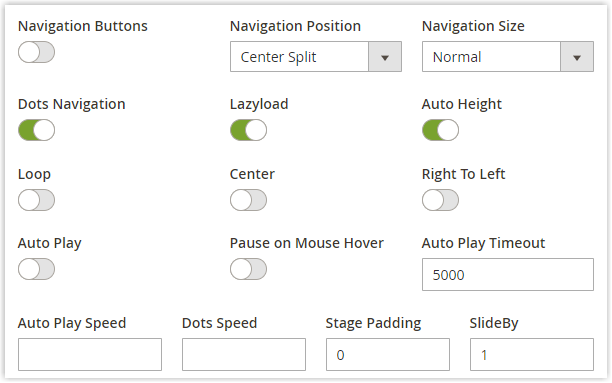
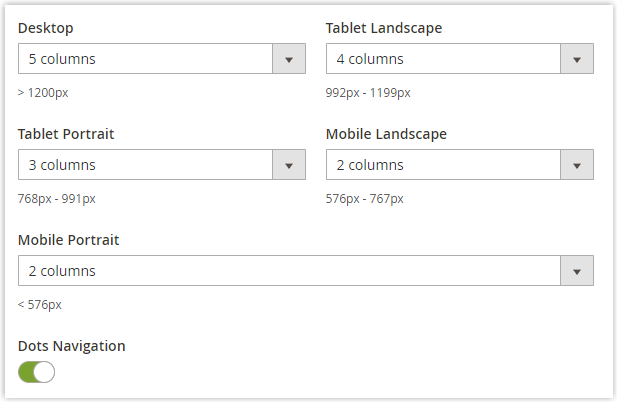
You can customize not only the Products container like Grid or Slider but also the product itself.
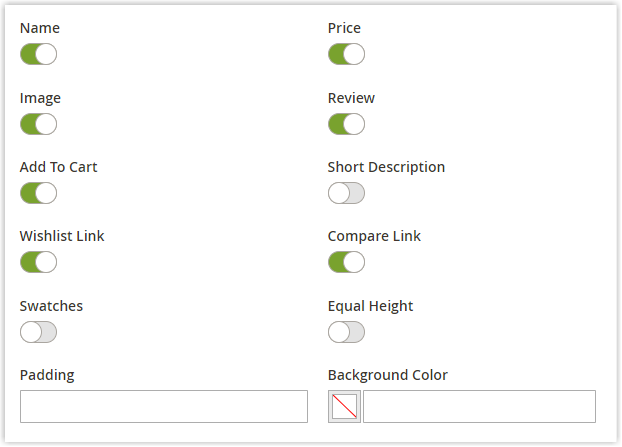
After presenting some special features of Magezon Page Builder Single Product, we also would like to dig a little bit deeper into our builder extension alone. When you own this user-friendly website creator with more than 50 elements, you can easily build any high-converting page layout with no need for coding.
Further, we offer other Magento 2 extensions that you can find in the Magezon extension market.
Final Words
We hope that after the tutorial, the Products content type in Magento Page Builder is not a challenge anymore. You can stop right there if it is everything you need now, but if you are not satisfied then let Magezon Page Builder help you.

Try FREE Magezon Page Builder demo today
Easily create beautiful, engaging Magento website in any style whenever you want without relying on developers or designers. Just by drag & drop.
 Magezon Blog Help Merchants Build Comprehensive eCommerce Websites

