 Magezon Blog Help Merchants Build Comprehensive eCommerce Websites

After June 2020, Magento will no longer support Magento 1, that is also the time when e-commerce businesses rush to convert their electronic goods from Magento 1 to Magento 2. However, not all of them know the conversion methods or things to keep in mind during the process to avoid unnecessary risks. So the question is how to migrate Magento 1 to Magento 2? This article will show you that Magento Data Migration Tool is the best answer to your question.
Table of contents
- What is Magento Data Migration Tool?
- 5 things you need to know before using Magento migration tool:
- Advantages and disadvantages of the tool
- How to transfer data using Magento Data Migration Tool
- Conclusion
What is Magento Data Migration Tool?
According to Magento DevDocs: “Data Migration Tool is a command-line interface (CLI) used for transferring data from Magento 1 to Magento 2. The Tool verifies consistency between Magento 1 and 2 database structures (tables and fields), tracks the data transfer progress, creates logs, and runs data verification tests.”
Therefore, it can be simply understood that Magento migration tool is a tool to migrate from Magento 1 to Magento 2 manually. This saves you money compared to hiring a 3rd party service while still controlling your migration.
Migration process includes 4 steps:
The Magento 2 data migration tool tutorial can be summarized through the following 4 steps:
First – Install Magento Data Migration Tool: The first thing you need to do to transfer data from Magento 1 to Magento 2 is to install this tool on your server.
Secondly – Configure migration: This step includes 2 main jobs: Backup your store’s database and Configure migration
Thirdly – Migrate from Magento 1 to Magento 2 using Data Migration Tool: You start by installing before the migration, then run the migration command. If there is an error, fix it.
Lastly – Post-migration checkup: Migration by yourself can cause many errors so you need to check after migrating.
5 things you need to know before using Magento migration tool:
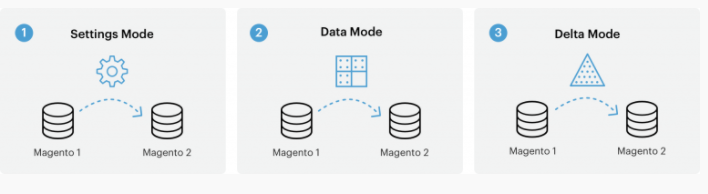
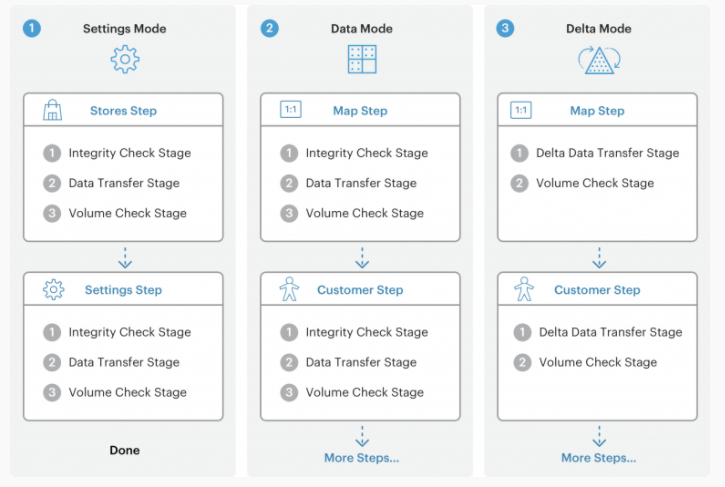
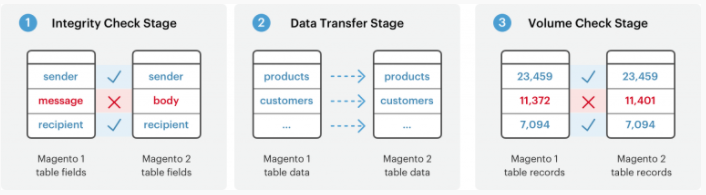
- The Magento 1 to 2 migration tool is divided into three modes: Settings mode, data mode, and delta mode. Knowing the features and steps of each tool will help you a lot in the process of migrating data from Magento 1 to Magneto 2. The pictures below are a list of data migration steps in each mode in the Magento migration tool:
- You need to check that you have stopped all Magento cron jobs.
- While migrating data, except for order management, you cannot make any changes to Magento admin.
- While on the go, you must not modify the codes either.
- The user interface is also something you must not change during data movement from Magento 1 to Magento 2.
Advantages and disadvantages of the tool
1. Advantages
- Magento Data Migration Tool is completely free to use: You won’t need to pay any fees no matter how much data you move. This is one of the biggest advantages that make customers use this Magento 2 migration tool. And it is even more useful for businesses with large amounts of data that need to be moved.

- Magento Data Migration Tool has many documents and detailed instructions: One of the big obstacles in the process of migrating data from Magento 1 to Magento 2 is that you may encounter many risks or errors. The fact that Magento provides many detailed instructions and Magento 2 migration guide for this tool helps you minimize the risk of problems.
- Magento Data Migration Tool also allows you to move data flexibly: With three completely different migration modes, you can flexibly choose the most suitable mode for your store. This not only saves time but also helps you migrate data in the most complete and safe way.
2. Disadvantages
- Your source store must experience downtime: To switch to Magento 2 using Magento Migration Tool you must put your Magento 1 store in maintenance mode. Therefore, during the transition, the e-store will not be able to operate, causing your business to stall.

- You will not receive official support: Although there are accompanying documents and very detailed instructions, Magento does not provide official support such as call center or support staff for this Magento 2 migration tool. So you need to be very careful during data migration because you will be solely responsible for the results of the conversion. You can look for more answers and Magento 2 data migration tool tutorials, but they usually only come from other users, not Magento.
- You need in-depth technical knowledge to use this Magento tool: The use of this Magento 2 migration tool is very complicated so you need to be a technically savvy person to avoid errors like Exception printing and Data loss. Errors that occur may prevent you from migrating your data or cause omissions.
How to transfer data using Magento Data Migration Tool
#Step 1: Install Data Migration Tool
1.1. Install Data Migration Tool
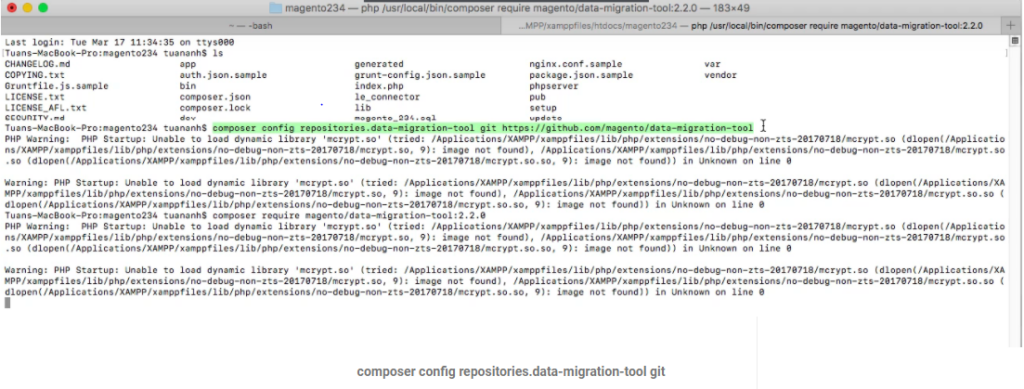
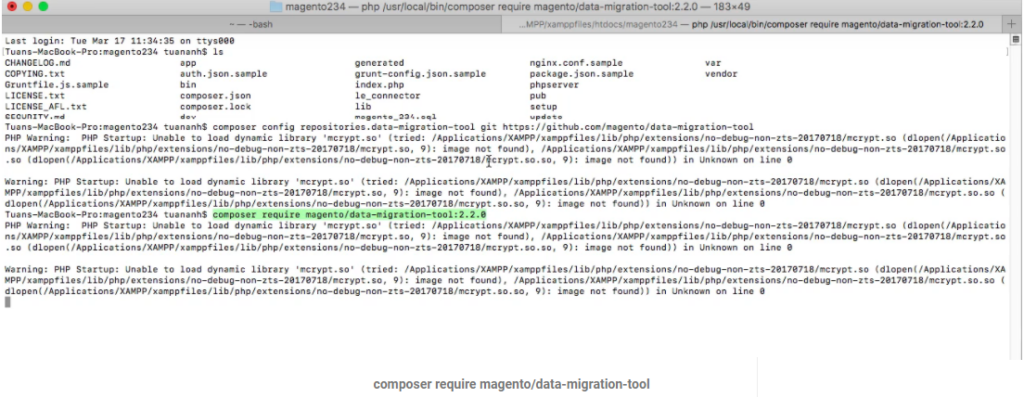
First, you have to update composer.json in Magento root installation directory. Once you find the location of the Data Migration Tool package, install it. Take the process of installation via Github as an example.
- Log in to your Magento server as the file system owner, or change to that mode.
- Switch to Magento 2 root directory.
- Type the commands below:
1.2. Check the version of installed Data Migration Tool
Do as these steps:
- Change to your Magento 2 migration tool directory:
<vendor>/magento/data-migration-tool.
- Open composer.json
The version entry in that file is the version of the Data Migration Tool.
You must note that each version of magneto will require a separate version of PHP. For example, you need PHP version 7.4 to use Magento version 2.4.3. You can learn more about this at Magento’s Installation Guide.
#Step 2: Migrating Configuration
2.1. Backup target store’s database
Insert the command:
mysqldump -uadmin -p databasename target> databasename target.sql
2.2. Configure migration
You have to create a config.xml configuration file from the given sample before migrating any data.
There are two ways to configure the Data Migration Tool, they are configuring migration:
- In a separate module
- In the vendor folder
You can configure migration in a vendor folder in 2 steps:
Step 1: Sign in or switch to your Magento server as the Magento file system owner.
Step 2: Make alterations to to the following directory:
<your Magento 2 install dir>/vendor/magento/data-migration-tool/etc/<migration edition>/<ce or version>
- Insert the following command to create a config.xml from the provided sample:
cp config.xml.dist config.xml- Open config.xml in a text editor.
- The config.xml file must contain access details to M1 and M2 databases and encryption keys.
1    <source>
2    <database host=”127.0.0.1″ name=”magento1″ user=”root”/>
3    </source>
4    <destination>
5    <database host=”127.0.0.1″ name=”magento2″ user=”root”/>
6    </destination>
7    <options>
8    <crypt_key />
9    </options>
Optional parameters:
- Database user password: password=<password>
- Database custom port: port=<port>
- Table prefix: <source_prefix>, <dest_prefix>
For instance, if your database owner’s username is root with password pass and you use the prefix magento1 in your Magento 1 database, use the following in config.xml:
1    <source>
2    <database host=”127.0.0.1″ name=”magento1″ user=”root” password=”pass”/>
3    </source>
4    <destination>
5    <database host=”127.0.0.1″ name=”magento2″ user=”root” password=”pass”/>
6    </destination>
7    <options>
8    <source_prefix>magento1</source_prefix>
9    <crypt_key>f3e25abe619dae2387df9fs594f01985</crypt_key>
10   </options>
When completed, save your changes to config.xml then exit the text editor.
#Step 3: Migrate using Data Migration Tool
3.1. Migrate settings
To start migrating settings, run:
bin/magento migrate:settings [-r|--reset] {<path to config.xml>}
After the installation is successfully migrated, the migration completion message will be displayed.
3.2. Migrate data
To start migrating data, run:
bin/magento migrate:data [-r|--reset] [-a|--auto] {<path to config.xml>}where:
where:
- [-a|–auto] is an optional argument that prevents migration from stopping when it encounters integrity check errors.
- [-r|–reset] is an optional argument that starts migration from the beginning. You can use this argument for testing migration.
- {<path to config.xml>} is the absolute file system path to config.xml; this argument is required
Commom Errors
Here are some bugs we noticed after testing this Magento 2 data migration tool that you may encounter while using:
Error no 1: MySQL Error 153 – Got a packet bigger than ‘max_allowed_packet’ bytes
This normally occurs when MySQL is running with default settings. Many Magento store owners have been experiencing this situation. You can review the bug at Magento Stack Exchange.
Error no 2: Integrity constraint violation
Cause: This happens when you try to migrate again (e.g: because you failed the first attempt). It leads to the key in the table eav_attribute_set is duplicated.
Solution: Delete the table eav_attribute_set
Error no 3: Undefined offset
Cause: This occurs because attribute_set_id in eav_attribute_group is duplicated.
Solution: Delete the database in two tables: eav_attribute_group and eav_attribute_set.
Error no 4: Unknown deviation due to missed keys
Cause: This error pops up because table eav_attribute has been deleted then reimported. However, in the process, some keys were missed out.
Solution: Start over the whole process from scratch.
3.3. Migrate changes
To run recent data, run the command line:
bin/magento migrate:delta [-r|--reset] {<path to config.xml>}However, be careful with an unstoppable circle of data processing over and over. We have encountered this issue after running the command line and have not found a solution yet.
Step 4: Post-migration checkup
It is essential that you check after data migration because some errors have been reported after transferring data using this Magento 2 data migration tool. The following article will show common error and ways to solve:
Error: Exception printing

Cause: It is a frequent error. You may encounter this error while installing anything that goes wrong with cache folder in Magento 2.
Magento 2 cannot run normally because of the conflict between components like extensions or themes causing the “exception printing is disabled by default for security reasons” error in Magento 2.
Solution: Check local.xml file reflects username and password created in MySQL admin. This may change, especially if the software updates etc
Conclusion
After Magento 1 ends, migrating your store to Magento 2 is a very necessary task. Hopefully, through this article, you have understood how to use Magento Data Migration Tool to migrate your store and avoid mistakes that should not be made during the migration process.
Follow us on Facebook, Twitter, Instagram, and LinkedIn to be informed about the latest news and information about Magento and Magento extensions.
