 Magezon Blog Help Merchants Build Comprehensive eCommerce Websites


Since the end of 2018, Magento has enabled Open Source users to use the functionality called the Magento 2 Multi-Source Inventory, in short Magento 2 MSI. This functionality helps store owners select the appropriate sources for the sales channels using the algorithms to enhance delivery efficiency and then get the highest profit. To help you have deep insight into this functionality in native Magento 2, we will highlight terms as the basic elements of the Magento 2 multi-source inventory feature. They are:
- Sources
- Stocks
- A new section “assign sources” on the product edit page
- Salable quantity
- Source priority algorithm
Each element has a close connection with the others. For each, we will clarify their definition and specific examples and show you how to create or edit them (if any). Okay, here we go.
Table of contents
Sources
1. What Is a Source in Magento?
A source refers to a physical location where a product is stored. In reality, sources can be warehouses, brick-a-mortar stores, distribution centers, rental rooms, or even an underground garage.
If you have one source, you will be considered a Single Source merchant. And that source should be the Default Source as your single location for inventory storage and shipments. However, if you have more than one source, you must be a Multi-source merchant. Being in the Multi-Source mode requires you to create additional sources that will be selected and grouped in a particular stock using a source selection algorithm.
Read more: How to Manage Stock and Inventory in Magento 2
2. How to Create a New Source in Magento 2
In Magento, you can create multiple sources. Each of them represents a physical location. After that, you must assign the quantity per product to each source.
To help you better understand, we will show the available sources we’ve created before. First, navigate to the Stores from the admin sidebar. Then, under Inventory, choose Sources.

You will be redirected to the grid which contains and manage all sources, including:
- A pre-existing default one (Default Source)
- Pre-made sources (Store NY, Warehouse California, Warehouse Texas)

Apart from Default Source, we have two different kinds of sources: store and warehouse. There is one store (Store NY) and two warehouses (Warehouse California and Warehouse Texas). Also, these sources belong to different geographical locations.
Now, it’s time to create a new source. In the upper right corner, click on the orange button named Add New Source. The New Source page will then appear with three sections: General, Contact Info and Address Data.

Let’s walk through each section.
a. General

- Enter the name of the source. Note that the selected name must be unique. Otherwise, the newly-created source with the same name as any existing source will replace this old source. Thus, it can be considered as the act of editing the source edit page. Further, if you head back to the Sources grid, four old sources remain.

Optimize Your Magento Store With Powerful Extensions!
Looking for fast, efficient, and well-coded extensions to boost sales for your Magento stores? Then visit the Magezon website and grab the necessary add-ons to optimize yours today!
Here you can see once its page has been saved, the phrases Edit Source is added before its last name.

- Enter the code of the source. The source code is used for assigning to the stock or importing and exporting the data. Be aware the code must be unique, too. If you assign the code of any current source to this new source, the old source will be replaced with the new one. The image below illustrates this clearly.

- The old source is Warehouse California, of which the source code is whcalifornia.
- The new source is Warehouse A with the same source code.
After the newly-created source is saved, the old source disappears from the source grid. Note: The code must be upper letters, lower letters, or numbers, dashes, and no spacings (underscores instead).
- Is enabled: Toggle Yes to allow the source. If you choose No, the quantity per product at this source will not be included in the stock to which it is assigned
(See the example in section VI. Magento 2 MSI Salable Quantity).
- Description: Give a brief description of the source.
- Latitude & Longitude: Enter the GPS coordinates of the location.
To find the GPS coordinates using Google Maps, follow these steps:
- First, type the source address in the Search box.
- Right-click on the red marker on the map.
- Select the option What’s here?

Later on, a details box with the GPS coordinates appears like the image below.

- Use as Pickup Location: Toggle Yes if the source is used as a pickup location for in-store delivery. In-store delivery, simply put, is a method that enables customers to select a source as their pick-up location during the checkout.
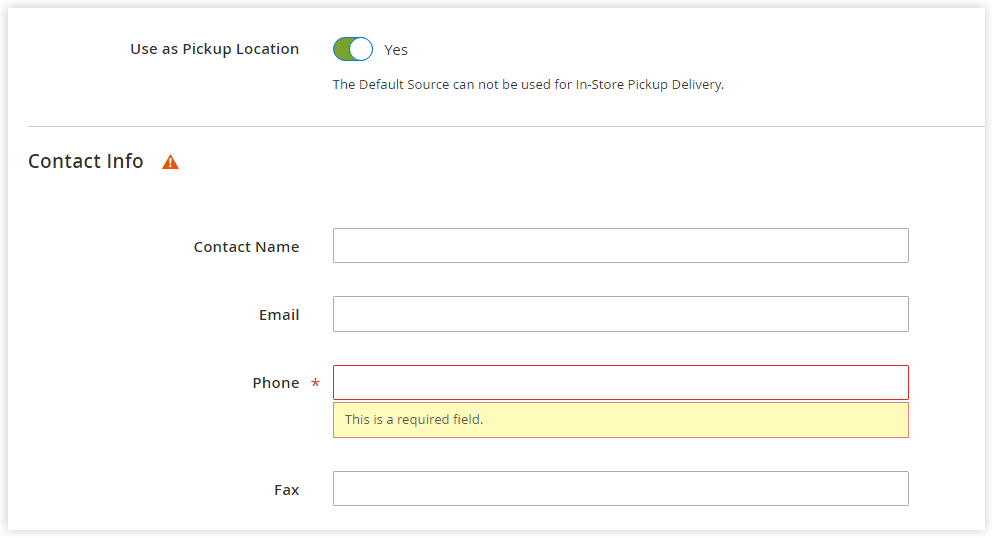
In this case, the Phone field in the Contact Info section and the City and Street field in the Address Data section will change to the required fields.


Note: Pickup locations are decided based on the geographical area of your customers. This feature makes order delivery quick and economical.
b. Contact Info
- Contact Name: Enter the contact name at this source (location).
- Email, Phone, and Fax: Enter the email address, phone number, and fax number to contact the location.
c. Address Data

- Enter the Country, State/Province, City, and Street where the source is located.
- Postcode: Enter the postal code of this source.
Stocks
1. What Is a Stock in Magento?
A stock is a combination of multiple appropriate sources. Depending on your stock configuration, every single stock may be linked to several sales channels through which your products are sold. Sales channels can be websites, store views, B2B customer groups, etc. Each channel may have only one stock that is connected to it.
2. How to Create a Stock in Magento
To create a stock, go to Stores → Inventory → Stocks.

The Stocks grid with all stocks will then show up.

The grid above has three stocks. Out of them, there are two sources we’ve created before, namely the United States and Europe.
On this page, click on Add New Stock to start creating a stock. And here is the stock configuration page with three sections:
- General
- Sales Channels
- Sources

a. General
- Enter the name of the stock. The name must be unique.
b. Sales Channels

- Website: Choose the website where the stock is available. You can choose more than one website per stock. In this case, there is only one sales channel, namely the Main Website.
You may like: Magento 2 website, store, and store view: what’re the differences?
Don’t forget this channel only has a stock that is connected to it. Hence, when we intentionally choose the Main Website for both stocks (the United States and Europe), this sales channel only uses one stock that has been configured more lately.

c. Assign Source
This section allows you to assign sources to the stock. However, be aware you cannot assign custom sources to the Default Stock.
- Code: The unique source code
- Name: The unique source name.
- Unassign: Exclude any source from the stock by clicking on its trash bin icon.
To illustrate, we will take United States stock as an example. To assign sources to this stock, do the following:

- Hit Assign Sources to add your desired sources that are grouped in the stock.
- Remove any sources from the stock by clicking the trash bin icon.
- Drag any source and drop it to the desired position. The source at the top takes the highest priority. The source selection uses the sorting order of assigned sources as the only one algorithm in Default Magento to determine the most suitable source during shipping.
Here is the result after we have assigned all sources to all corresponding stocks:

The United States stock comprises three sources, namely Store NY, Warehouse California, and Warehouse Texas. This stock is assigned to a particular website. Thus, all sales on this website are deducted from sources that belong to this stock.
Optimize Your Magento Store With Powerful Extensions!
Looking for fast, efficient, and well-coded extensions to boost sales for your Magento stores? Then visit the Magezon website and grab the necessary add-ons to optimize yours today!
How to Assign Sources on the Product Edit Page
Since the Magento 2 multi-source Inventory functionality has been available for Open Source Edition, the default product edit page has an additional section called Sources. This new section is used to assign any sources to a particular product.
To go to a product edit page, navigate to Catalog → Catalog → Products. Then choose your desired product in the Products grid.

After clicking Assign Source as in the image above, a popup named Assign Source will show up after that. In the first column, tick the checkboxes of the sources that you want to attach to the product.

In our case, we choose Warehouse California and Warehouse Texas. After hitting Done, we are headed back to the Sources section on the product edit page.

The table above contains the assigned sources’ names, status, item status, quantity, notification quantity, and actions (Used to unassign the source from the product).
- Explanation of the Notify Quantity: Merchants will receive a low stock notification when the salable quantity has reached a specified threshold. This point is Notify Quantity which is set to 1 by default. To modify it, uncheck Use Default so that you can enter the number for Notify Quantity.
After assigning the sources to the product, you need to enter the number of this product’s quantity per source. Note: If this product is part of bundle products or grouped products, it’s a must to remove it from these products. Otherwise, you can’t assign sources to this product.
Below is our example:

Here are all existing sources and the number of items per product per source.
- United States stock includes:
- Warehouse California: 6 items
- Warehouse Texas: 9 items
- Store NY: 12 items
- Europe stock includes:
- Warehouse France: 7 items
- Warehouse Italy: 8 items
3. Southwest Asia stock includes:
- Warehouse Thailand: 10 items
- Warehouse Vietnam: 11 items
Salable Quantity
Let’s take a closer look at the 2 highlighted columns: Quantity per source and Salable Quantity. Because the data in the Quantity per source column doesn’t show completely (Image 1), it’s advisable to see it in image 2.

Image 1

Image 2
The Quantity per source column shows us the quantity per product at every source. The quantity at a source changes only when a shipment is created. Meanwhile, the Salable Quantity column represents a sum of APPROPRIATE sources and the number of items per stock.
- Salable quantity of United States stock = 12 (Store NY) + 6 (Warehouse California) + 9 (Warehouse Texas) = 21 items. However, the actual number is 15. This mismatch is because we’ve disabled the source Store NY before.
- Salable quantity of Europe stock= 7 (Warehouse France) + (Warehouse Italy) = 15 Items.
- Salable quantity of Southeast stock = 10 (Warehouse Thailand) + 11 (Warehouse Vietnam) = 21 items.
Let’s suppose you were a Europe-based customer and wanted to purchase 20 items of this product. All sources added up (15 items) are not enough to supply. As a result, you wouldn’t place this order. But if you’ve visited the website connected to the Southeast Asia stock, you could make a purchase.
Source Selection Algorithm (SSA)
The algorithm in the default Magento 2 Multi-Source Inventory MSI helps determine whether the sources bring cost-effective shipments. In reality, the standard Magento 2.3.0 had only one algorithm to select the sources. That is the priority of assigned sources. If the source with the highest priority has enough items to supply, its salable quantity will only be deducted from this source. Otherwise, another source will be chosen. In case all sources added up still are not enough to supply, the shipment doesn’t happen.
However, the current Magento version has the distance priority algorithm configuration. This algorithm helps determine what source is the closest compared with the location of the shipping address, based on the entered address and GPS coordinates of existing sources. For further details, refer to the blog: How to configure Distance Priority Algorithm in Magento 2 MSI.
That’s all About Magento 2 Multi-Source Inventory (MSI)
The Magento 2 multi-source inventory MSI is a real tool to let store owners assign separate sources to the suitable stocks connected to sales channels. If you need more custom algorithms to select the sources flexibly, you can consider using third-party extensions.
Hopefully, this blog may help you understand the default Magento 2 multiple inventories in detail. Don’t hesitate to comment below if you have any questions or ideas. Follow Magento 2 catalog categories to build a comprehensive catalog for your Magento store.
Visit the Magezon website if you seek advanced extensions to boost your websites.
Optimize Your Magento Store With Powerful Extensions!
Looking for fast, efficient, and well-coded extensions to boost sales for your Magento stores? Then visit the Magezon website and grab the necessary add-ons to optimize yours today!
