 Magezon Blog Help Merchants Build Comprehensive eCommerce Websites


Magento product attributes are the components of a product in a Magento 2 store. They help describe all characteristics of that product, such as color, size, material.
Thanks to product attributes, store owners can provide customers with as detailed information as possible. Further, by filtering via attributes, visitors/shoppers can find it easier to get the exact items, bringing them better experiences.
Understanding the importance of product attributes to owner stores, we’ll make a bunch of blogs about product attributes. As a start, this blog is all about how to create Magento product attributes (3 main steps).
Table of contents
Get Started
In the sidebar, go to Stores → Attributes → Product.

You will be redirected to the page Product Attributes. Click on the orange button Add New Attribute to create a new attribute.

Here is the page New Product Attribute to start to create Magento 2 product attributes:

Before moving on to the main part, we want to introduce some buttons that helps improve your workflow:

- Back: Click on this button if you want to get back to the product attribute grid. Be sure to save all necessary changes before leaving.
- Reset: Choose Reset option to get the latest saved data.
- Save and Continue Edit: Choose this button to save the data and continue editing on the working page.
- Save Attribute: Click Save Attribute after you complete. Then, you will land on the product attributes grid.
- NOTE: The existing product attributes have a button named Delete Attribute to remove the attribute.

Without further, let’s move on to the main part, “How to create product attribute in Magento 2”.
How to Create Product Attribute in Magento 2

There are three vertical tabs: Properties, Manage Labels, Storefront Properties. These tabs are also three steps to take.
Let’s get started with Properties as Step 1.
Step 1: Complete the Attribute Properties


Optimize Your Magento Store With Powerful Extensions
Looking for fast, efficient and well-coded extensions to boost sales for your Magento stores? Then visit Magezon website and grab necessary add-ons to optimize yours today!
Section 1: Basic Attribute Properties
Default Label: Enter the name of the product attribute. This field with a red asterisk requires you to fill in.
Catalog Input Type for Store Owner: This lets you collect various types of customer data such as image, choices, date and time.
Magento 2 offers 13 various input types to select:
| Text field | Yes/No | Fixed Product Tax |
| Textarea | Multiple Select | Visual Swatch |
| Text editor | Dropdown | Text Swatch |
| Date | Price | |
| Date and Time | Media Image |
Read this blog to know more about these input types of product attributes in Magento 2.

Value Required: Set Value Required as Yes if the attribute field is required to fill in. The required field is often marked with a red asterisk.
I will show you an attribute set Value Required: Color. If you don’t fill in, the message “This is a required field” will be shown up.

ADDITIONAL: FOR SOME PARTICULAR INPUT TYPES, THERE ARE EXTRA FIELDS/SECTIONS.
- Multiple Select and Dropdown input types: have a section in common called Manage Option.


The Manage Options section of these two input types is nearly the same. So, I will take the one of Dropdown to illustrate.
- Required:
(1) Under the section Manage Option, click Add Option.
(2) Enter the name of the option for the Admin (Required field) and each store view (if necessary). In case you don’t enter any values in store view boxes, the default value is the admin’s one.
- Optional:
(3) Change the sort order of the given options by dragging and dropping them.
(4) At Is Default, you can tick the options button/checkboxes as the default value of the attribute. (5) Click on the button Delete to remove the option if needed.
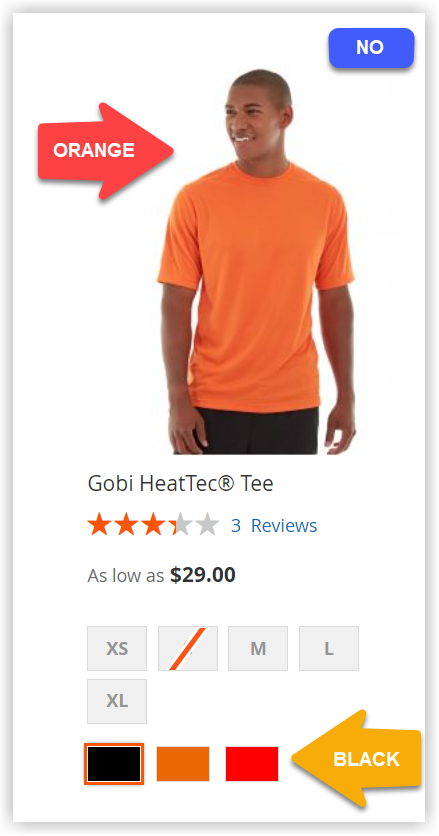
2. Visual Swatch has 2 extra fields: Update Product Preview Image & Use Product Image for Swatch if Possible.

- Update Product Preview Image: If you choose Yes, the product image will be updated on the catalog page when you select a swatch option. Otherwise, the product image remains unchanged no matter whatever swatch option you choose.

I will take the attribute Color as an example. Have a try with No first. Whether I choose swatch Black, Orange, or Red, the product image stays the same. (Image 1).
When you select Yes in Update Product Preview Image, the product image will vary depending on what color swatch option you take.
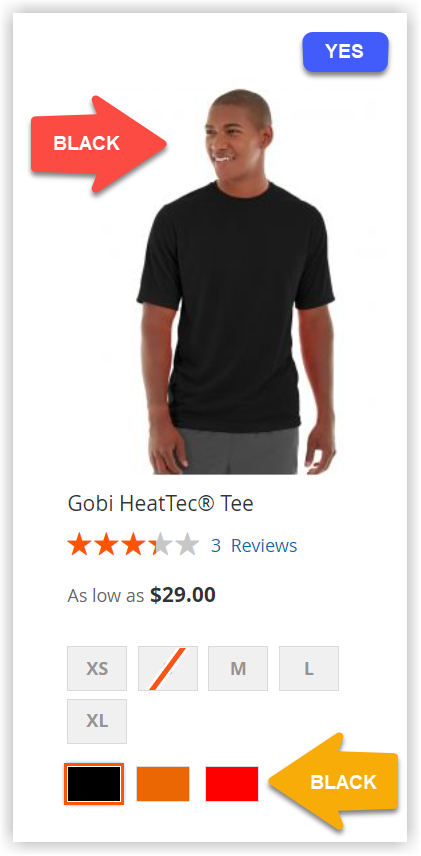
- Use Product Image for Swatch if Possible: Allow to replace the color swatch option WITH the product images. (Right Image).


3. Text Swatch has a additional fields: Update Product Preview Image.
- Update Product Preview Image: Enables you to update the product image on the catalog page when selecting a text swatch option. Otherwise, the main product image remains unchanged no matter whatever swatch option you choose.

Take the attribute Size as an example. Have a try with No first. Whether I choose swatch XS, S, M, L, XL, the product image will stay the same (Image 1).

But when you select Yes in Update Product Preview Image, the product image will vary depending on the text swatch option you take.

Section 2: Advanced Attribute Properties

Attribute Code: Enter the attribute code which is internally used. If you don’t fill in this field, its value is based on the Default Label.

NOTE: The Attribute Code must:
- Begin a letter.
- Include only letters (a-z or A-Z), numbers (0-9), or underscore (_) in this field.
- Exclude spaces (Underscore is used instead) and special characters.
- Consist no more than 60 characters.
If you don’t ensure the requirements above, a notification will be shown up:

Scope: Allow showing the product attribute in the scope of your store hierarchy: Store View, Website, Global.

The scope of that attribute is right below the name of the attribute and enclosed in square brackets([..]).

Default Value: Enter a value that will be automatically filled in a field when creating a new product.
NOTE: You CAN’T set default values for the following input types:
- Multiple select
- Dropdown
- Price
- Media Image
- Fixed Product Tax
I’ll show you the attribute Size as an example. When we create a new product, the default value of Size is M.

Unique Value: Requires attribute value entered in an attribute field must be unique. This comes in helpful for the attributes as product identifiers such as SKU, barcode, ID.
For instance, each product has a single SKU (Stock Keeping Unit which is used for tracking inventory). So, the SKU value of that product must be unique. When we enter 123 as the SKU value of product X, you can’t use 123 for product Y.
To illustrate, I choose the product Voyage Yoga Bag with SKU 24-WB01.

And, the SKU value of the Push It Message Bag is 24-WB04.

Now, I set the SKU value of the Push It Message Bag (24-WB04) as the same as the one of Voyage Yoga Bag (24-WB01). Let’s go and see how it’ll change.

As you can see, the new SKU value of the Push It Message Bag (24-WB04) becomes 24-WB01-1 which is different from Voyage Yoga Bag (24-WB01).
Input Validation for Store Owner: Allow you to set input validation rules for the data entered. It helps prevent users from filling in the field with the wrong format.
Input Validation is ONLY applied for the input type is Text Field. Here are seven rules of input validation:
- Decimal Number
- Integer Number
- Email Number
- URL
- Letters
- Letters (a-z, A-Z) or Numbers (0-9)

Add to Column Options: Lets you add this attribute to the Column option on the page of the product grid.

Use in Filter Options: Enables to add this attribute to the Filter option on the page of the product grid.

Optimize Your Magento Store With Powerful Extensions
Looking for fast, efficient and well-coded extensions to boost sales for your Magento stores? Then visit Magezon website and grab necessary add-ons to optimize yours today!
Step 2: Manage Title
This functionality allows you to customize the title of the attribute field per store view. It’s perfect if you’re controlling multiple stores.
- Enter the translated names for each store view. If you leave it blank, the system will use the admin name.

Step 3: Complete All Storefront Properties

Use in Search: Allows searching a product more specifically by using the attribute value. For example, you can search product A in black by using the term “black” (Black is the attribute value of Color).
Search Weight: Enables admins to assign a search weight to an attribute when searching for a product. The attributes with the higher priority get preference over other attributes in the search results.
Suppose that in your Magento store, there are 2 product attributes: Color with search weight 2 and Description with weight 1. When a shopper searches for the term blue, the list of products with blue attribute value will show up. The products whose descriptions have blue words won’t appear.
Visible in Advanced Search: Allows users to include the attribute in a form called Advanced Search. Note that using too many attributes may cause slow searches.
Now, let’s try the attribute Color. Set Yes for Visible in Advanced Search.

On the homepage, scroll down to Advanced Search at the bottom.

Then, a form named Advanced Search will appear with the attribute Color

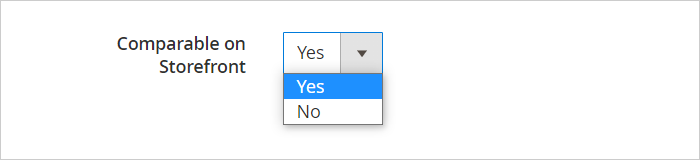
Comparable on Storefront: Allows to show the attribute in the Compare list.
Here is the attribute Color in Compare list:

Use in Layered Navigation: Enables customers to filter products by attributes in the Layer Navigation of the catalog page.
NOTE: This option is applied for Yes/No, Dropdown, Multiple Select, and Price input types ONLY. More, the ‘Filterable (no results)‘ option can not be applied for Price.
This field offers you three options to select:

I will take the attribute Climate as an example.
- No: Choose No if you don’t want to display the attribute as a filter in Layered Navigation.

- Filterable (with Results): When you take this option, the attribute will become a filter in the Layered Navigation. Also, its attribute values whose counts of product results are greater than zero (>0) will appear as filters in the Layered Navigation.
")
- Filterable (no Results): Allow displaying the attribute as a filter in the Layered Navigation. More importantly, it will show all available attribute values, even those with their product counts at zero (=0).
NOTE: If the attribute value is a swatch (Text Swatch, Visual Swatch), the value at zero (=0) will be crossed out.

Use in Search Results Layered Navigation: Allow you to filter the search result using this attribute in the Layer Navigation.
For example with the attribute Climate, I set Yes for Use in Search Results Layered Navigation. When I enter Top on the search box. The search result page appears with the attribute Climate.

Position: Enables you to decide the position of the attribute in the layered navigation.
NOTE:
- If you leave this field blank, the order number is set at zero (=0).
- The smaller the number at Position, the higher its priority.
- In case several fields have the same number at Position, creation time decides their order in the layered navigation. The more newly-created an attribute is, the higher its priority is.
At first, the position of Color was set 0. Then, I changed it to 1.

Here is Before (Left) and After (Right) of the Color position.

Use for Promo Rule Conditions: Allow you to offer discounts on a product by creating promo rule conditions with the attribute.
Allow HTML tags on Storefront: (Text Field and Text Area input types only): Enable you to format the attribute value with HTML tags.
Visible on Catalog Pages (Product Detail page) on Storefront: Enables showing the attribute on the product detail page (Additional Information tab).
 on Storefront")
Take the attribute Climate as an example. Now, let’s make them visible on the product detail page.
Change Visible on Catalog Pages on Storefront to Yes. Go the the storefront and check the result.
 on Storefront")
Used in Product Listing: (Depends on the selected design theme) Allow showing the attribute in the product summary on the product listing.

See the attribute Color on the product listing.

Used for Sorting in Product Listing: (Depending on the selected design theme) Allow you to include the attribute as a Sort By option in the product listing.

Here is Size as a parameter in Sort By:

That’s All
We hope you now understand how to create product attributes in Magento 2. Any questions or ideas about this topic? Don’t hesitate to leave comment down below. Learn more about Magento 2 at Magento 2 Tutorials.
If you’re looking for robust, well-coded extensions, take a quick tour around Magezon website. Trust me, you will get your right one.
Optimize Your Magento Store With Powerful Extensions
Looking for fast, efficient and well-coded extensions to boost sales for your Magento stores? Then visit Magezon website and grab necessary add-ons to optimize yours today!
