 Magezon Blog Help Merchants Build Comprehensive eCommerce Websites


Magento 2 configurable product is one of 6 product types in Magento 2. This individual product is made up of its variations. Each variation is a simple product with a unique SKU. Thus, you can track the stock of each child product. A Magento 2 configurable product covers similar simple products on one page, bringing you the following benefits:
- Save your time in creating many similar products.
- Avoid duplicate content that may cause your site to rank lower on Google.
- Improve customer shopping experience: They don’t have to spend much time searching for their favorite option because all similar products are on the same page.
If you are starting to build your catalog, knowing how to create Magento 2 configurable products is necessary. This blog will give you the step by step guide on it for beginners. Let’s start.
Table of contents
Preparation
Before getting to work, you need an attribute set including AT LEAST ONE attribute whose input type must be one of the following: Dropdown, Multiple select, Visual swatch, Text Swatch. This enables you to create child products for the configurable product in Magento.
Take the Top attribute set as an example. This attribute set has two attributes: Color and Size. And their input types are Visual Swatch, Text Swatch, respectively. As a result, many options appear (black, blue, yellow) & (XS, S, M, L, XL). These options are combined to create variations of that Magento 2 configurable product (Green-S, Yellow-M, Yellow-L, Orange-S, Orange-M, .etc.).

How to Create Configurable Products in Magento
Step 1: Select the Product Type
- Go to Catalog. Then Products.

- On the orange drop-down menu Add Product, select Configurable Product.

- Then you will be redirected to the New Product page. This is where to create a new product.

Step 2: Choose the Attribute Set
- Make sure the attribute set you choose meets the condition mentioned earlier (Preparation). In this case, we choose the Top attribute set that has the Color and Size attribute.
- Click on the drop-down arrow of the field Attribute Set. Select your wished attribute set or type its name in the Search box.

- After choosing the attribute set Top, all attributes in this set will be immediately updated on this page. The two attributes, Color & Size, as our illustration, appear after that.

- To add an extra attribute to the attribute set, click the black button Add Attribute. To create a new attribute, follow this blog.


Optimize Your Magento Store With Powerful Extensions
Looking for fast, efficient and well-coded extensions to boost sales for your Magento stores? Then visit Magezon website and grab necessary add-ons to optimize yours today!
Step 3: Fill in Required Fields

- Product Name: Enter the name of the product
- SKU: Use the default SKU which is based on the product name. Or you can change it if needed.
- Price: Set the price for the product. However, when you add the child products to this Magento 2 configurable product and then save it, the Price field will be empty and disabled like the image below.
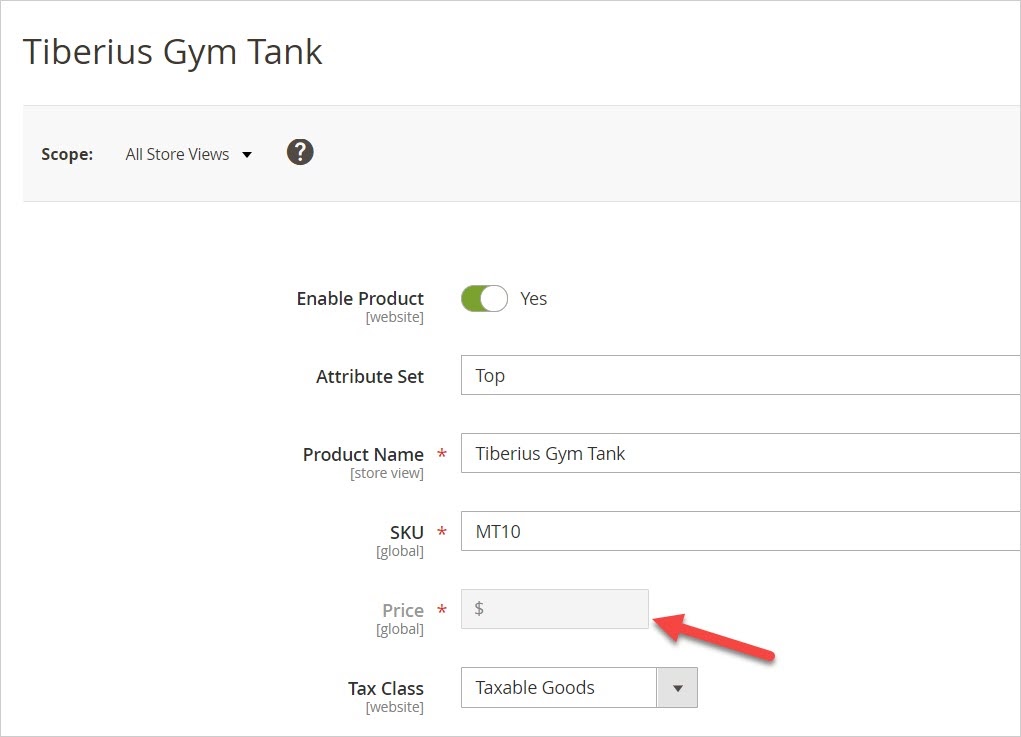
- After completing three required fields, set Enable Product to No because this product has not been finished yet.
- Click Save and continue to edit the product.
After saving, the product name and scope appear. Next, choose the store view where products will be available.

Step 4: Fill in the Optional Fields

- Tax Class: Choose Taxable Goods if you want to apply tax to the product. Choose None if you don’t.
- Quantity: The quantity of a configurable product is determined by the quantity of each child product it has. So, the Quantity field in the edit page of the configurable product is automatically empty and disabled even if you have already filled in the field before. In short, you can leave this field blank.
- Stock Status: The availability of its child products determines the stock of a configurable product. Thus, we will track the stock status of each instead of the configurable product’s one. You can skip this field.
NOTE: The default value in Stock Status is In Stock. If you don’t fill in the Quantity field and then save, the Stock Status will be Out Of Stock.
- Weight: You don’t need to fill in this field because the weight of the configurable product technically doesn’t exist. Instead, the system will calculate the weight by the weight of each child product a customer adds to the cart.
- Categories: From the drop-down list, tick the category that you want to assign to the product. Or click New Category to create a new one.

- Visibility: Choose the position where the product is on display.
- Not Visible Individually: When you select this option, you can hide the configurable product from both Catalog and Search pages.
I want to make this clear. When you choose this option, the configurable product can’t appear alone on the Catalog or Search page but be a part of other products. For example, it is a part of a bundle product. That’s the definition of Not Visible Individually. However, by default, you can’t add the configurable product to the bundle products.
- Catalog: Allows displaying the product on the Catalog page.
- Search: Make the product visible on the Search Result page.
- Catalog, Search: Enables you to display the product on both the Catalog and Search Result pages.

- Set Product as New From…To: This allows you to include the product in the New Products list within a specific date range. After this period is over, the product will no longer be available in the New Products list.


NOTE: Make sure the New Product List is available in your Magento 2 store so that the product set as New will be shown.
In case your store doesn’t have this section, go to Content in the admin sidebar. Then, choose Widget. Click on the Add widget button to create a new widget. Focus on two fields:
- Display Type. Be sure to choose New Product.
- Number Of Product To Display

- Country of Manufacture: Enter the name of the manufacturing country.
Step 5: Save and Continue
Click save to continue editing the product. In the next part, we’ll add configurations.
Optimize Your Magento Store With Powerful Extensions
Looking for fast, efficient and well-coded extensions to boost sales for your Magento stores? Then visit Magezon website and grab necessary add-ons to optimize yours today!
Create Product Configurations
Below are the steps to add product configurations:

Scroll down to the Configurations section. Then, click on the Create Configurations button.

Step 1: Select the Attributes that Enable Creating Product Variations
In this example, I choose the Color and Size attributes, two of three attributes in the selected attribute set Top.

Click the orange button Next on the upper-right corner to move on to the next step.
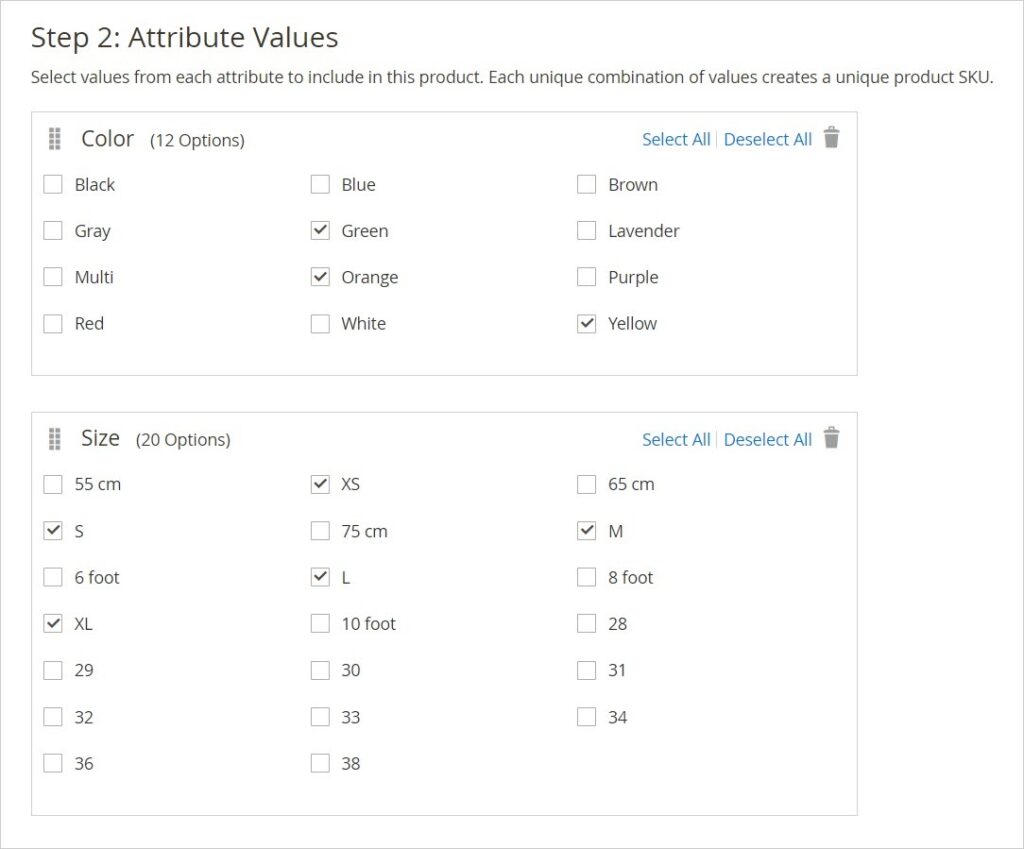
Step 2: Choose the attribute Values
Each combination of values will create an individual product SKU.
- Color: Green, Orange, Yellow
- Size: XS, S, M, L, XL
- Combination of attribute value: Green-XS, Green-S, Green-M.etc.
Step 3: Set up the Images, Price, and Quantity

This step determines the images, price, and quantity of each child product. You can:
- Apply the SAME price, quantity, and images to all SKU
- Or, apply the DIFFERENT price, quantity, and images to each SKU
If you don’t want to do the settings, skip it.
1. Set up the Image
- If you want to apply the same images to all SKUs, follow these steps:
(1) Tick Apply single set of images to all SKUs
(2) Choose your wished images by uploading them from your device or dragging them.
(3) Remove the image by clicking the trash bin icon right on the image.

- If you want to set the different images to each SKU so that customers can view the exact image of the child product, they add it to the shopping cart.
(1) Select Apply unique images by attribute to each SKU
(2) Choose the attribute that you base on to apply the different images to each variation
(3) Upload the image to the box of the attribute value

NOTE: After uploading the image for each variation, you need to do some configurations to display the exact image for each child product displayed in the shopping cart as a thumbnail.
- From the Admin sidebar, navigate to Stores > Settings > Configuration.
- Expand Sales. Then choose Checkout.
- Expand the Shopping Cart section.
- In the Configurable Product Image field, untick Use system value. Then select Product Thumbnail Itself.
- Last, click Save Config.
2. Set up the Price
- If the same price is the same to all SKUs, follow the following steps:
(1) Tick Apply single price to all SKUs
(2) Enter the price that you want to set for all SKUs

- If the price for each child product is different, do the following steps:
(1) Select Apply unique prices by attribute to each SKU.
(2) Choose the attribute that you rely on to set different prices. In this example, I select the Color attribute that is the basis for setting the different prices.
(3) Enter the price in the field of each attribute value

3. Setup the quantity
- If the quantity of each product child is the SAME, follow the following steps:
(1) Select Apply single quantity to all SKUs.
(2) Enter the quantity applied to all SKUs.

- In case the quantity of each SKU is DIFFERENT from others, do the following:
(1) Select Apply unique quantity by attribute to each SKU
(2) Choose the attribute that you want to set the different quantity to each SKU
(3) Enter the quantity for each attribute value

When finished, click Next to continue the next step.
Step 4: Generate the Product Configurations
Wait a moment for the list of products to appear and do one of the following:
- If you are satisfied with the configurations, click Next.
- To make corrections, click Back.
Here is the list of child products:

If you want to make any changes, click Back in the upper right corner. If everything is okay, you can close the form.
Step 5: Complete the Product Information
To complete the information of the following section if needed, please refer to Step 5 of the blog “How to Create a Magento 2 Simple Product – The Ultimate Guide.”
- Content
- Related Products, Up-Sells, and Cross-Sells
- Search Engine Optimization
- Customizable Options
- Products in Websites
- Design
- Gift Options
Step 6: Publish the Product
If everything is okay, toggle Enable Product to Yes.

- Next click Save & Close. Then you will be redirected to the product grid.
- If you want to save the product and continue to create another product, choose Save & New. Then you will be redirected to the page for creating the new product.
- If this product you are about to create is similar to the newly-created product, click Save & Duplicate. Then you will be redirected to the duplicated page with the different SKU.

To check the product on the front-end, click Customer View from the drop-down menu.

To Sum up
That’s all about how to create a configurable product in Magento 2. We hope you’ve got a firm grasp of it and successfully apply to your business. If you have any confusion, please leave a comment right below. We try our best to clear up your mess.
Follow our Magento tutorials to expand your knowledge about Magento and eCommerce.
Magezon is an official Adobe Innovate Exchange Partner and one of the leading Magento 2 extension providers in Vietnam. Visit our store to pick up robust and affordable extensions for your Magento stores.
Optimize Your Magento Store With Powerful Extensions
Looking for fast, efficient and well-coded extensions to boost sales for your Magento stores? Then visit Magezon website and grab necessary add-ons to optimize yours today!
