If you are facing some troubles in managing all your product photo albums, Magento 2 Image Gallery may be a smart solution for you to cope with it. No matter how many photo albums you have, this module can help you organize them by category or tag in minutes.
Grouping albums to relevant categories and tags, both store owners and customers can save time in finding products. To help you tackle the problem, in this article, we’ll show you how to organize photo albums by category & tag using Magento 2 Image Gallery.
Table of contents
I. Why need to organize photo albums by category & tag?
You may be wondering why you need to organize photo albums by category and tag? This question will be clarified in this article.
First, easily increase customer shopping experience. In fact, making customers feel satisfied is the most prior criteria of every store. When you group photo albums to relevant categories and tags, your audience can quickly find their needed products just by some keywords without opening all albums to find.
Second, it not only benefits customers but also brings benefits to you. You are not able to manage hundreds to thousands of product albums, so assigning them to appropriate categories and tags will help you determine where they are in the store clearly.
Finally, organize photo albums by categories and tags may make your store more professional and enhance customer trust. A store with well-organized structure can easily gain customers attention and motivate them to use.
II. How to organize photo albums by category & tag using Magento 2 Image Gallery
Now we’ll introduce you 2 ways on how to organize photo albums by category & tag using our Magento 2 Image Gallery extension. Let’s find out what they are!
1. Method 1
First, from the admin panel, navigate to Magezon >> Image Gallery >> Albums
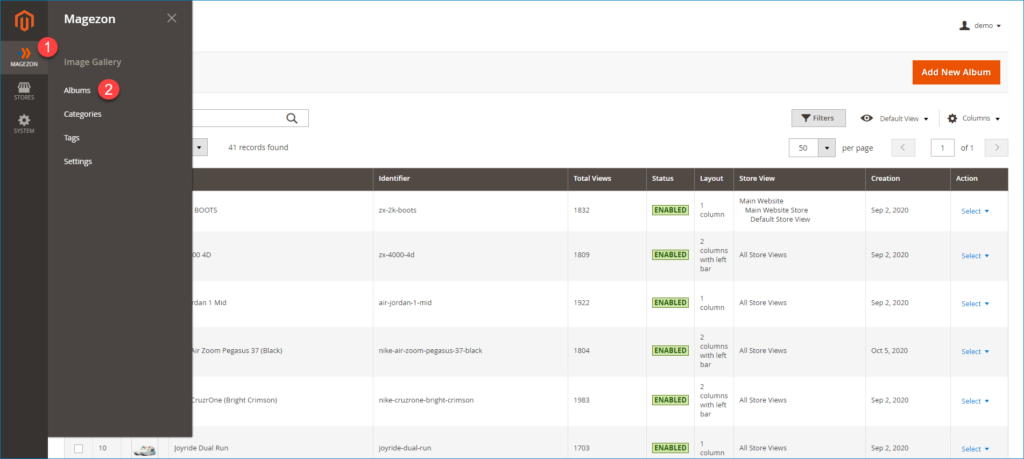
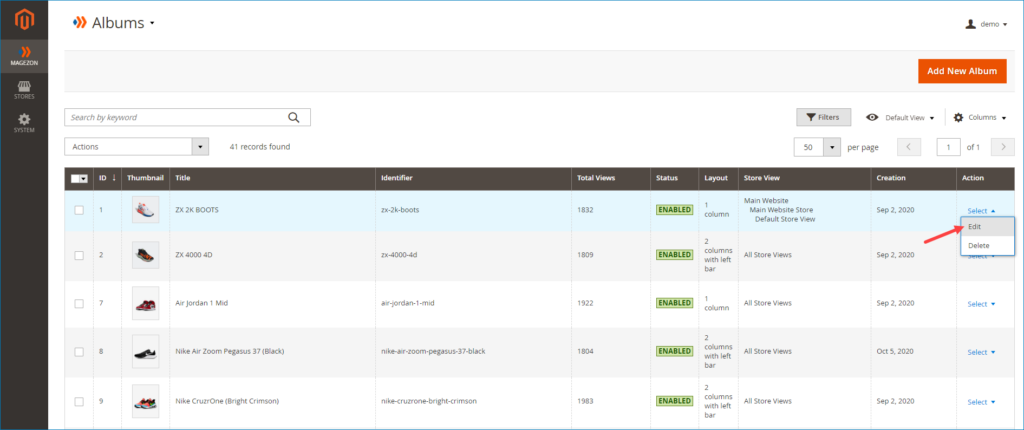
Then you will see a grid that includes all created albums. In the albums grid, find and open an album that you want to organize by category & tag in Edit mode.
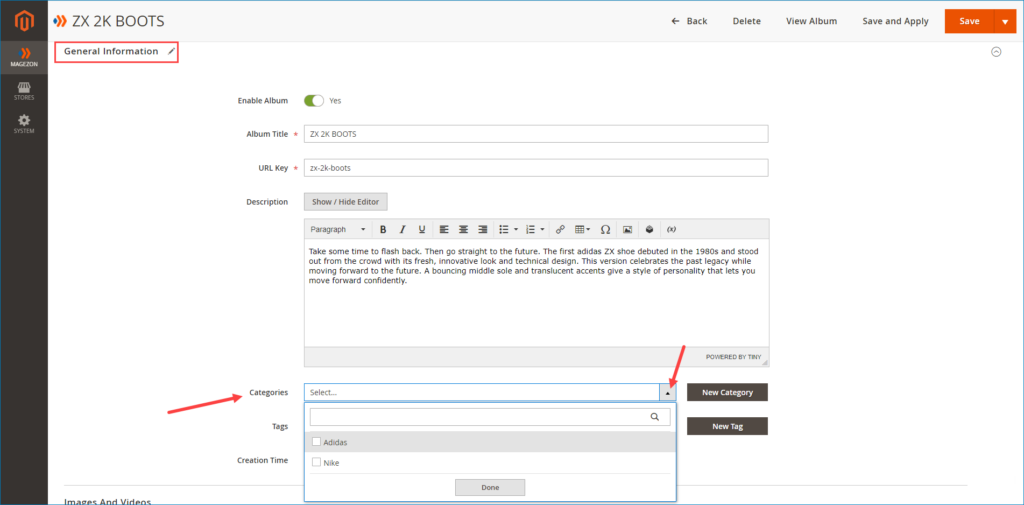
Next, in the General Information section, scroll down to the Categories and Tags field. In these two fields, drop down arrow and select relevant categories & tags.
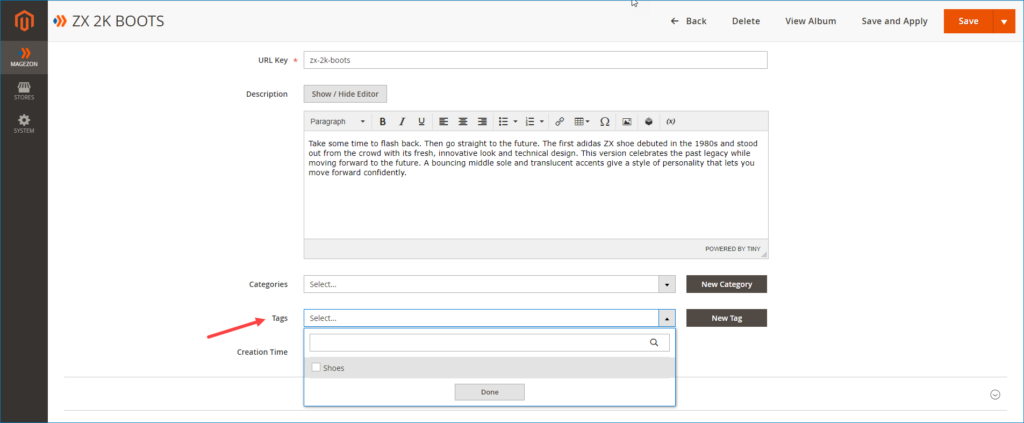
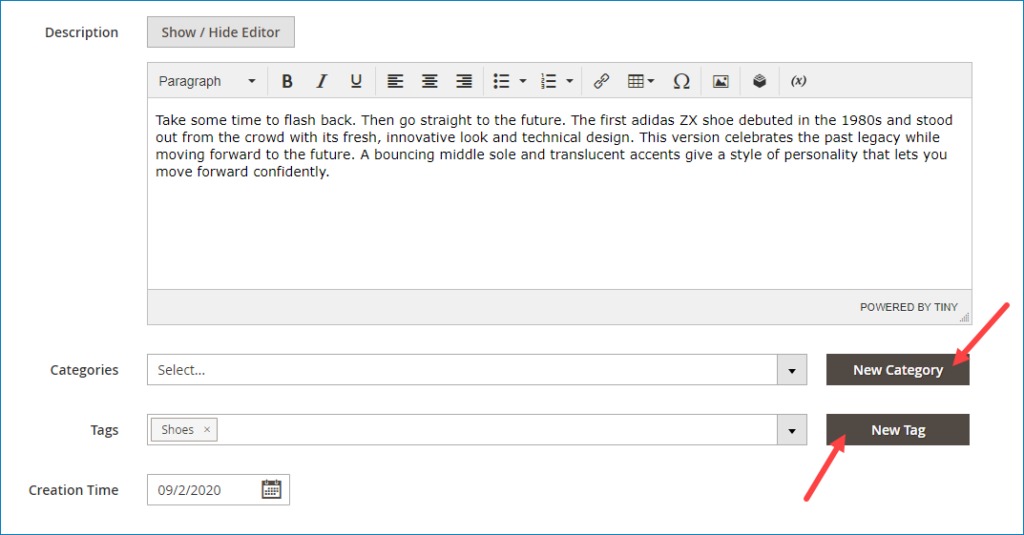
In case you don’t find your desired category and tag, click on the New Category and New Tag button to create a new one.
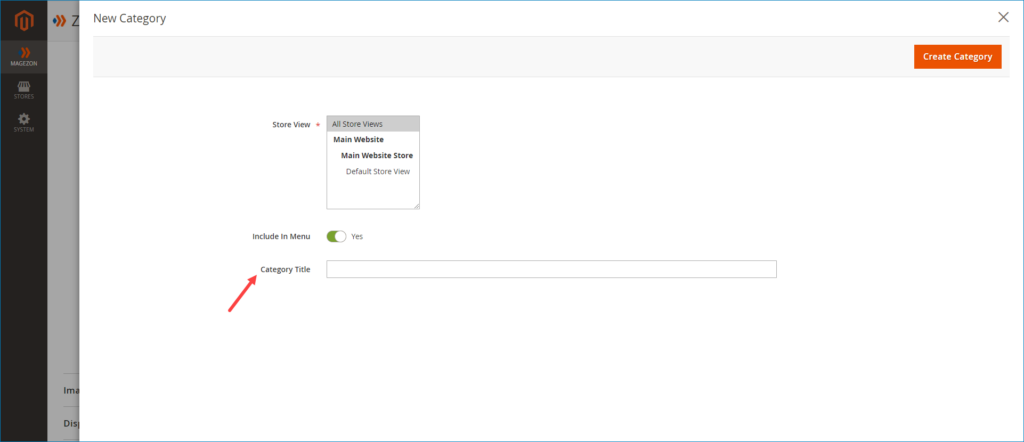
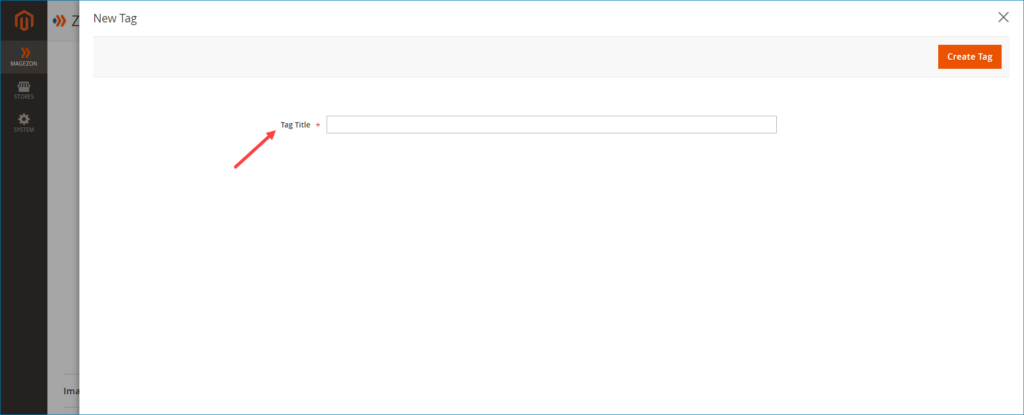
After you hit the New Category and New Tag button, their settings will show up like the image below. Enter a title for the new category and new tag in the Category Title & Tag Title field.
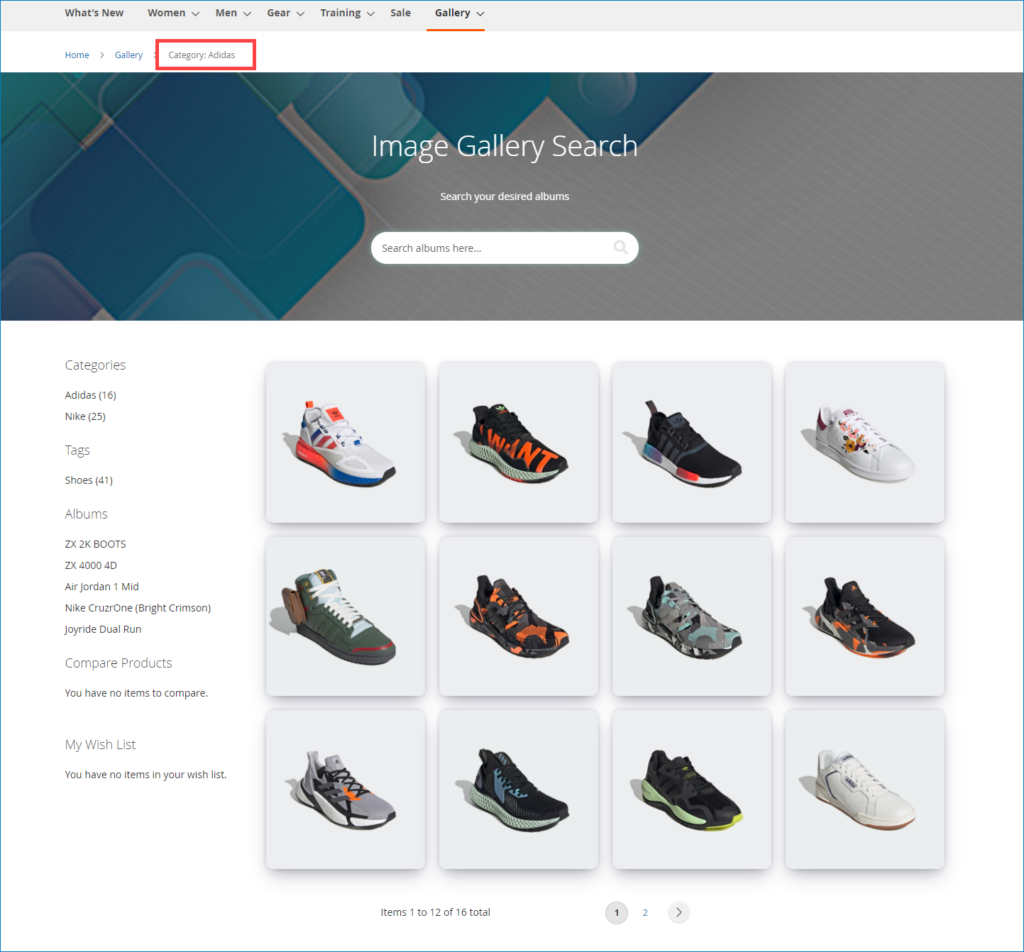
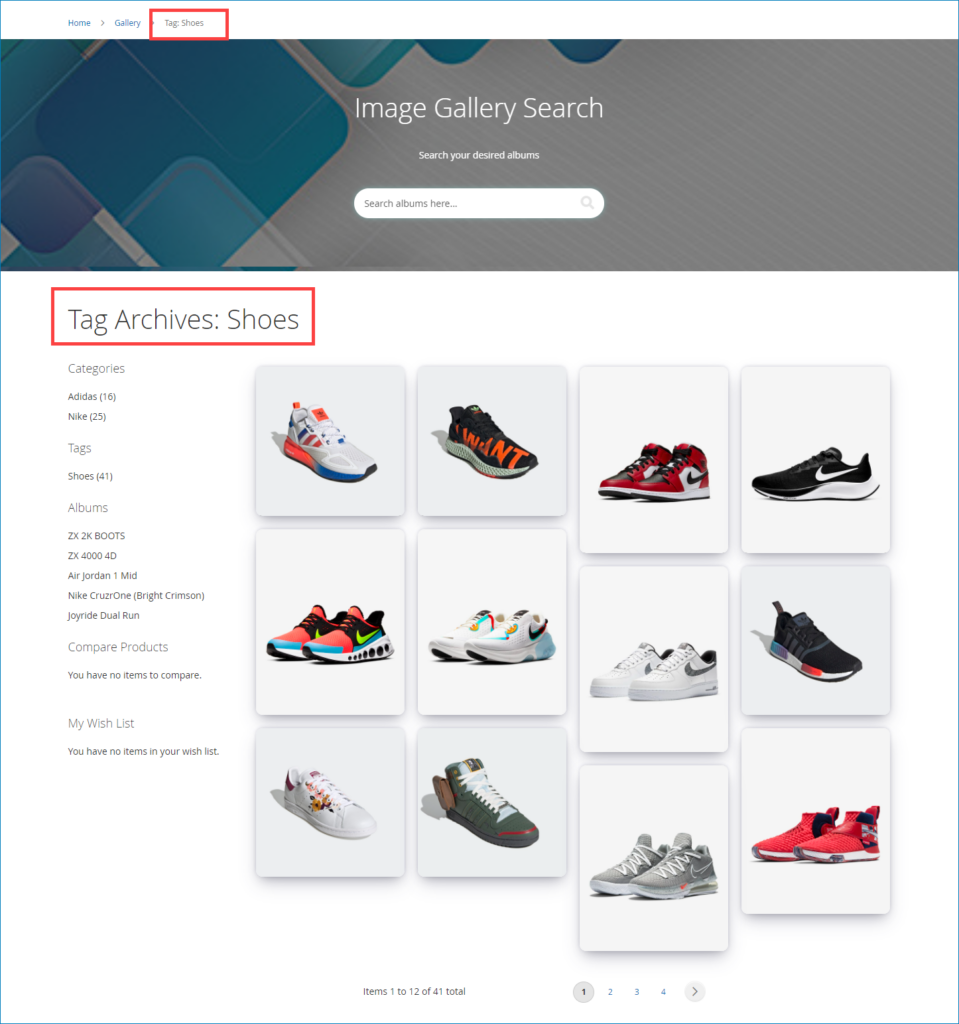
Applying above steps with other albums, you will get the result like this:
+ Albums on the category page. They are organized by Adidas category.
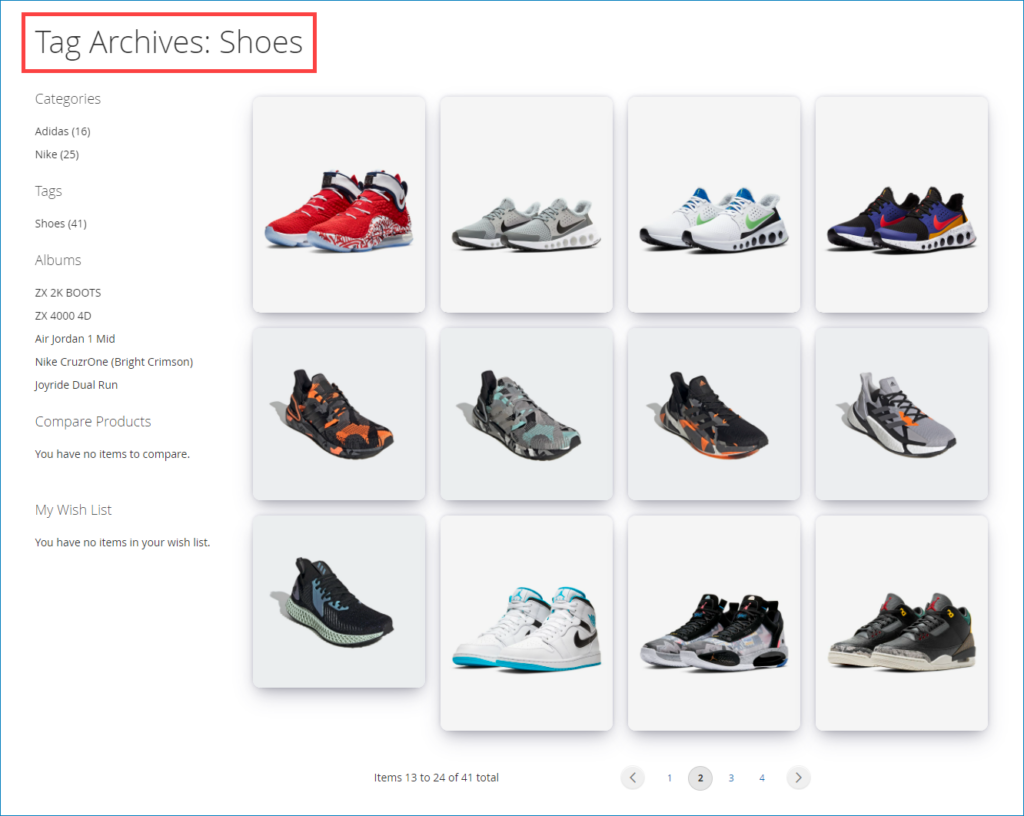
+ Albums on the tag page. They are organized by Shoes tag.
2. Method 2
Instead of assigning each album to the appropriate category and tag, method 2 helps you save time by allowing you to organize multiple photo albums at once. It’s faster and more convenient compared to method 1.
2.1: Organize photo albums by category
In the backend, navigate to Magezon >> Image Gallery >> Categories
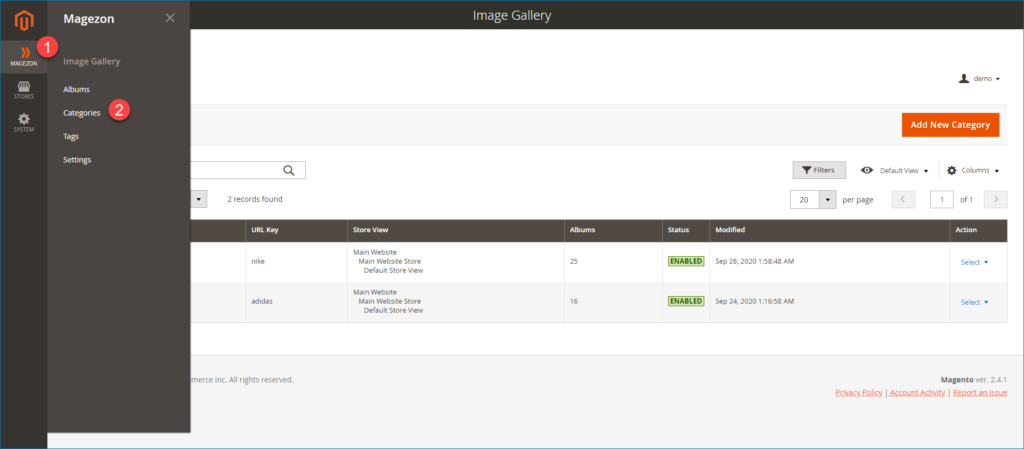
After that, a grid that contains all created categories will display. In this grid, open your desired category in edit mode.
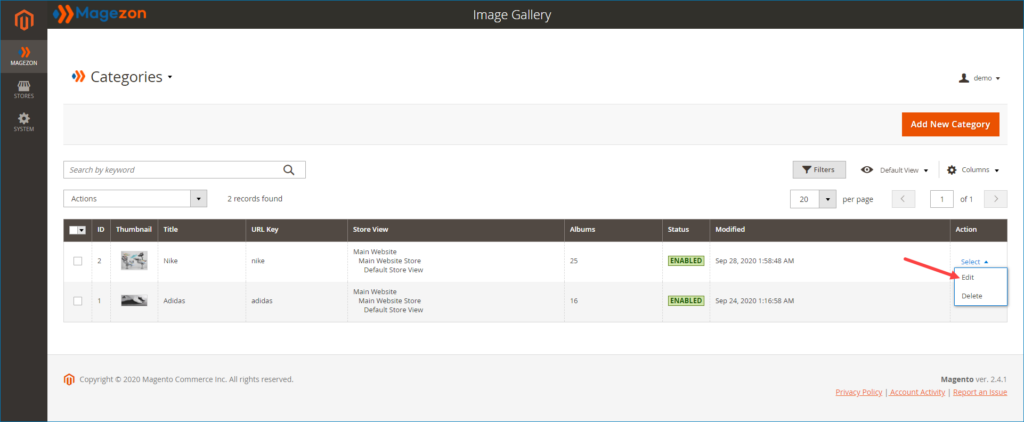
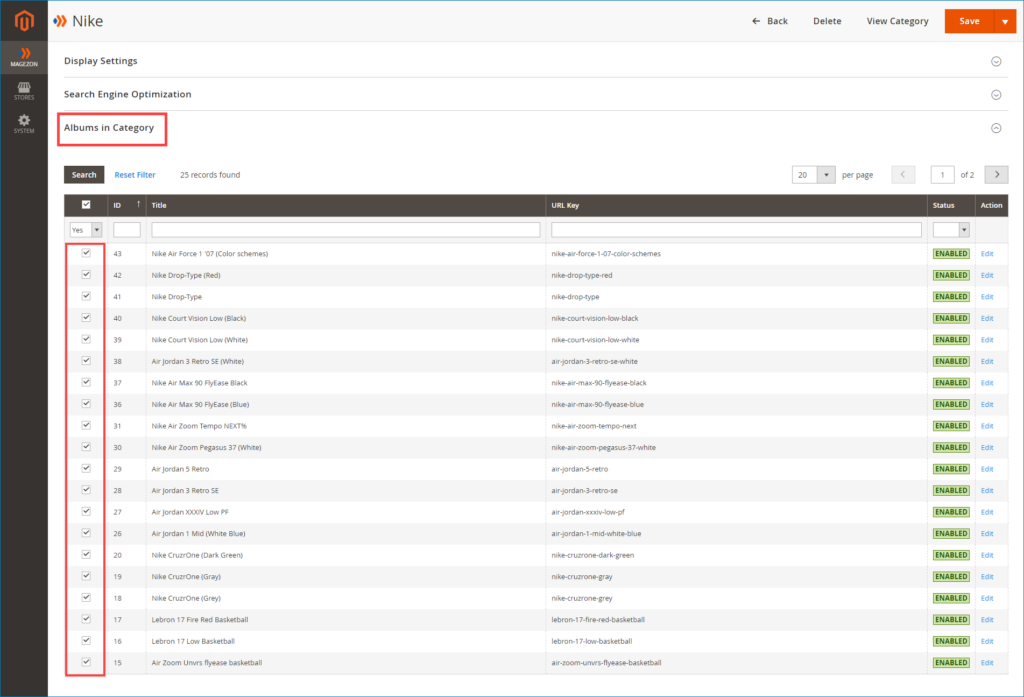
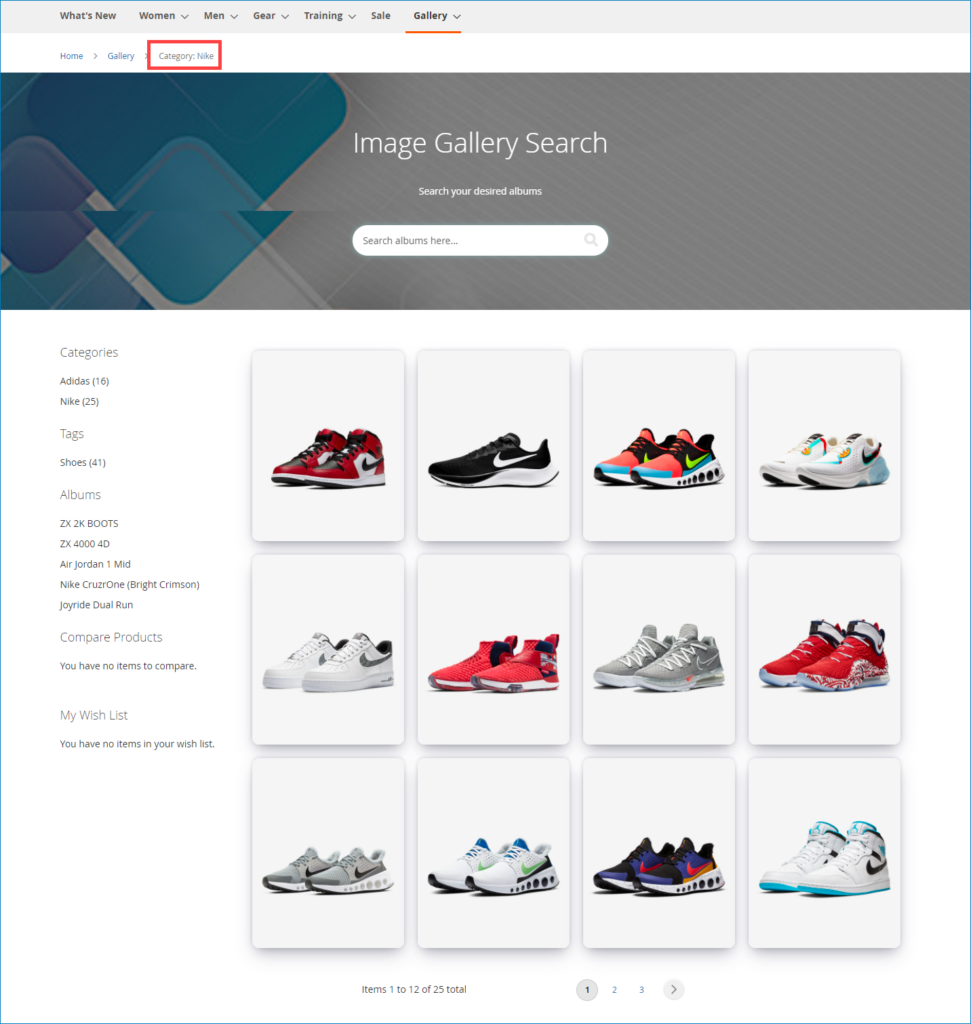
Next, expand the Album in Category section. Choose relevant albums to assign them to the category. Then all selected albums will be organized by this category on the frontend.
Now see the result we get:
NOTE:
If your desired category is not available, click on the Add New Category button on the grid page to create a new one.
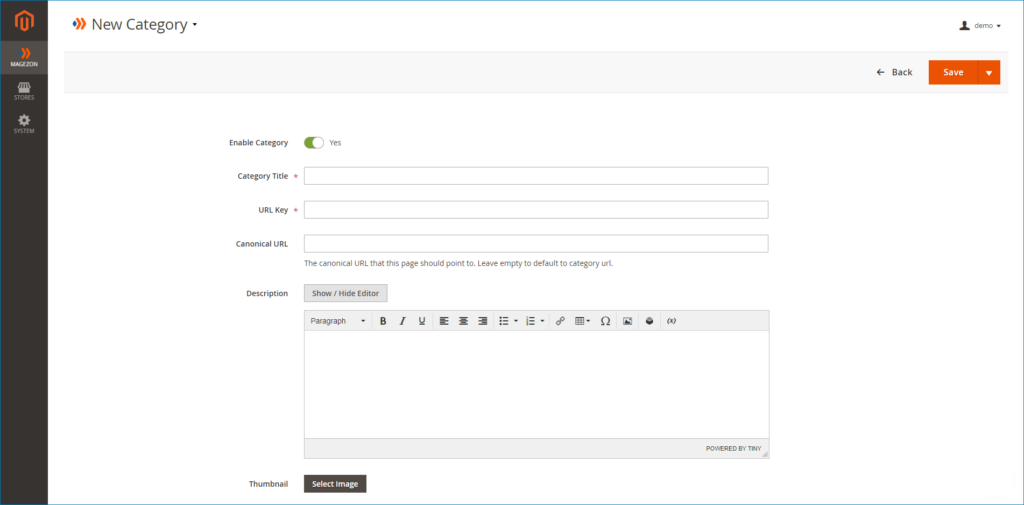
Customize General Information of new category:
- Enable Category: Turn on this button to enable category
- Category Title: Set a title for category
- URL Key: Specify URL key for category page
- Canonical URL: Set the canonical URL for the category page to help Search Engine define which is your main URL. It is useful for your better SEO
- Description: Write category description in this field
- Thumbnail: Upload a thumbnail image for category page
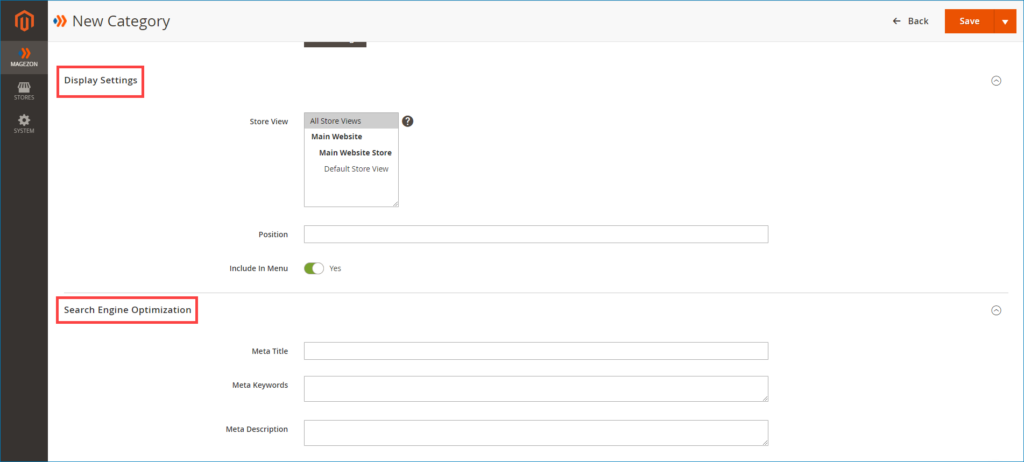
Next, specify the Display Settings and Search Engine Optimization section:
- Store View: Choose a specific store view to display category
- Position: Enter a value for the category (category with lower value will display first on the frontend)
- Include in Menu: Turn on/off button to show/hide category in navbar
- Search Engine Optimization: Specify meta title, meta keywords, and meta description for category page in this section.
After specifying these sections above, go to expand the Album in Category section and customize as the step above.
2.2: Organize photo albums by tags
From admin panel, follow this path: Magezon >> Image Gallery >> Tags
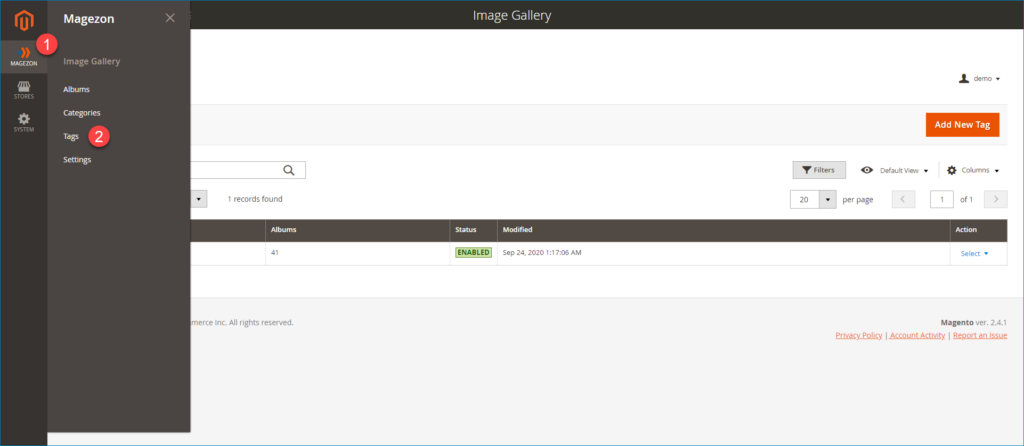
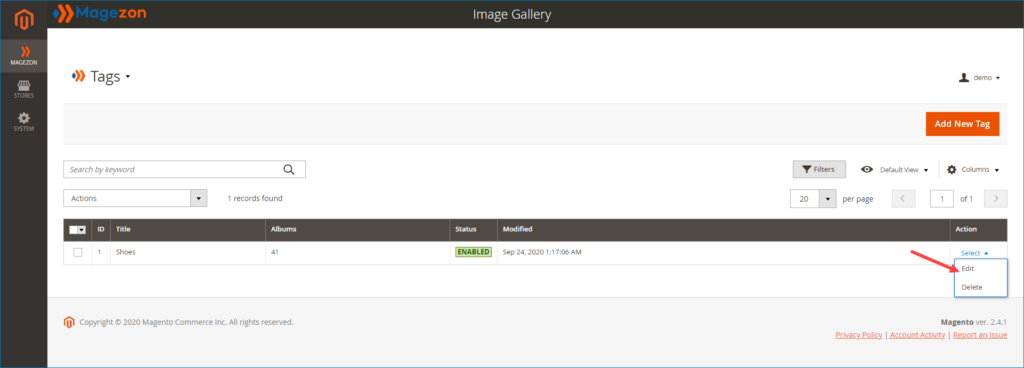
In the grid that includes all created tags, open your desired tag in Edit mode:
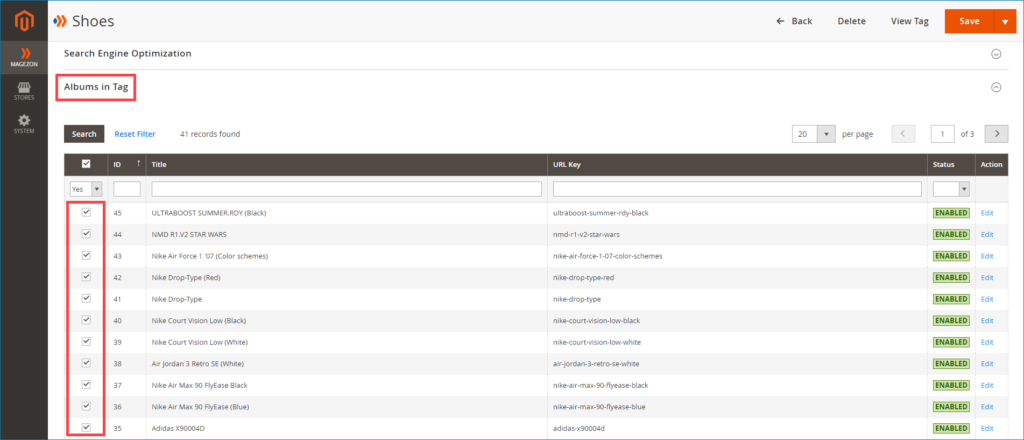
Then go to customize the Album in Tag section. Select appropriate albums to assign them to tag. After that, all selected albums will be organized by the tag on frontend.
This is the result we get:
NOTE:
Create a new tag if your desired one doesn’t exist by hitting on the Add New Tag button in the tags grid page.
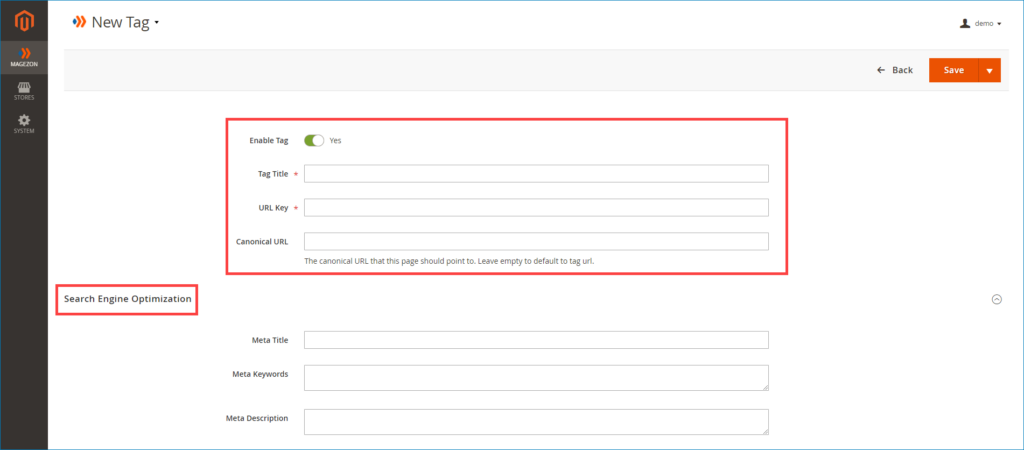
Customize General Information and SEO for new tag:
- Enable Tag: Turn on button to enable tag
- Tag Title: Enter a title for tag
- URL Key: Specify URL key for tag page
- Canonical URL: Set the canonical URL for the category page to help Search Engine define which is your main URL. It is useful for your better SEO.
- Search Engine Optimization: Enter meta title, meta keywords, and meta description for tag page in this section.
Once you’ve completed customizing these fields, move to the Album in Tag section and organize photo albums like the step above.
In Short
Above are 2 methods answered for the question – How to organize photo albums by categories and tags with Magento 2 Image Gallery extension. Hope this guide is helpful for you! Contact us or leave comments below if you have any questions.

Optimize Your Magento Store With Powerful Extensions
Looking for fast, efficient and well-coded extensions to build or optimize your Magento stores for sales boosting? Then visit Magezon website and grab necessary add-ons for yours today!
 Magezon Blog Help Merchants Build Comprehensive eCommerce Websites

