 Magezon Blog Help Merchants Build Comprehensive eCommerce Websites

In e-commerce websites, including Magento ones, categories are crucial for merchants to organize and classify their products in a way that helps them better manage their catalog. For customers, categories make it much easier for them to find what they are looking for.
For example, a default Magento 2 store has the following parent categories on the menu bar: What’s New, Women, Men, Gear, Training, and Sales. Every category has a set of subcategories. Like the Women, the category is made up of Top and Bottom.
If you are starting to create a new category in Magento 2 store, this step-by-step blog is for you.
| Get more tutorials on Catalog at Catalog Tutorial |
Table of contents
Get Started
From the admin sidebar, go to Catalog. Choose Categories.

Then, a page named Default Category will appear. This is where to create new categories for your Magento store.

Before getting down to work, I want to present all numbered sections on this page so that you can know well what they are.
- This section enables you to decide where the category you are creating will be available.
- Add Root Category enables you to add the root category that contains a set of subcategories. They will be displayed in the top menu bar on the front end. To create these subcategories, click on Add Subcategory.
- Section number three is where the category tree is placed. The category tree is the category structure of your catalog, including the Root Category, Subcategory, and Child subcategory.
- Section 4 is about all settings of the default root category named Default Category.
7 Steps to Create a New Category in Magento
Now, it’s time to start. To create a new category in Magento, you must first assign it to a category as its parent. And my choice is the Women subcategory. So, clicks on Women in the category tree.

You are now landing on the settings of the Women category.

Click Add Subcategory to add a new category. The page New Category will then appear.

As you can see above, there are 7 sections to work with, namely:
- Basic Settings
- Content Settings
- Display Settings
- Search Engine Optimization Settings
- Products in Category Settings
- Design Settings
- Schedule Design Update
Step 1: Complete Basic Settings

- Enable Category: Toggle Yes/No to activate/deactivate the category in the store.
- Include in Menu: Toggle Yes to include the category in the main menu (top navigation).
- Category Name: Enter Accessories as the category name.
Hit Save. And let’s check the result on the front end.

Step 2: Complete the Content Settings

- Category Image: Choose the image that will be displayed at the top of the Accessories category page. You can upload the image from your device by clicking Upload or select the existing ones in Media Storage by clicking Select from Gallery.
Note: The maximum image size is 4 MB, and you are allowed to upload the image with the following file formats: Jpg, gif, or png.
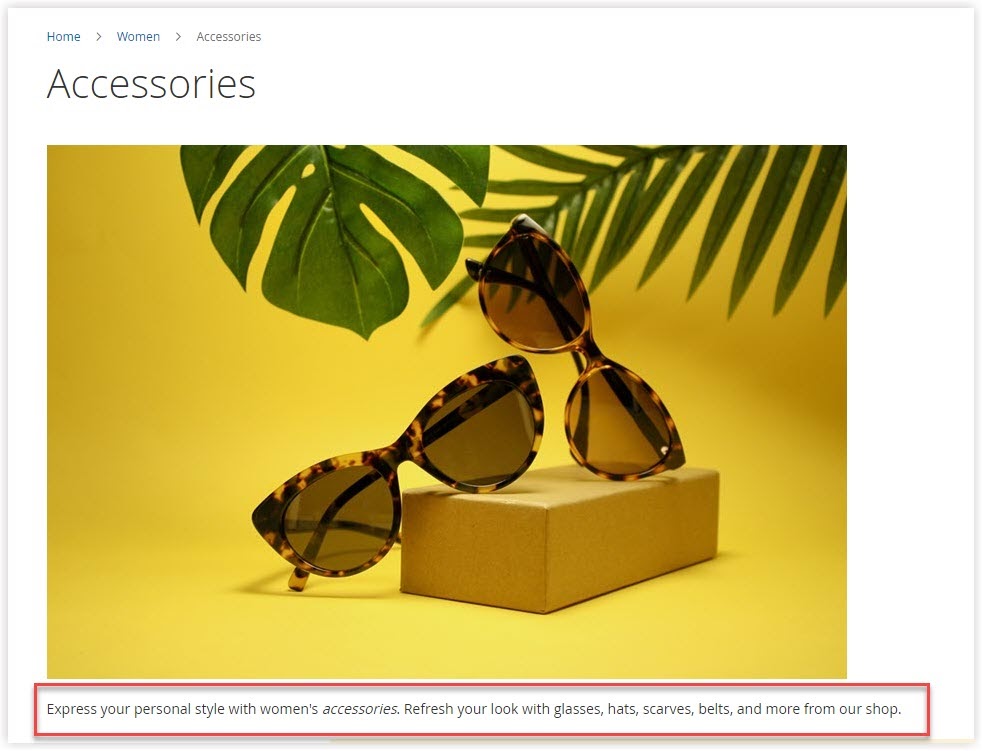
- In the Description, enter the content that describes the Accessories category landing page. This description will be displayed at the top of this page.
- Add CMS Block: To add a content block to the category page, select one option from the Add CMS Block drop-down list. In this case, we choose Gift Card.
To make the selected block visible on the category page, you must set the Display Mode of this category (in the Display settings) as Static block only or Static block and products.

Now, have a look at the front store:
And below is the Gift Card block:

Magento 2 Page Builder from Magezon
Wanna create dynamic content for category pages with diverse custom options such as images, videos, galleries, or icons. If the answer is Yes, Magezon Page Builder is an ideal solution.
With over 50 elements and over 50 functionalities, you can easily create any amazing category page layout using an intuitive drag-and-drop editor.

Step 3: Complete Display Settings

- Display Mode: Select what to display on the category landing page:
+ Product only allows you to display products only. When you take this option, a static block will not appear even though you add any static block to the category page.
+ Static block only lets showing a static block only on the category page.
+ Static block and products enable you to make a static block and products visible on the category landing page.

- Anchor: This lets you add/hide the Filter by Attribute section in the Layered Navigation. Let me give you a specific example with the Top category, which already has existing data.

- Available Product Listing Sort By: Enables you to select the criterion for customers to sort the product listing. Be sure to untick the checkbox of Use All so that you can choose your desired criterion.
Note:
- Hold down and press the Ctrl key (Window) or Command key (Mac) to select multiple options or deselect any option.
- Remember that you need to take the Default Product Listing Sort By; the result can’t save it successfully. For example, the default option we choose is Position.

And the front end is:

- Default Product Listing Sort By: Choose one default sorting option that will be displayed in Sort by. Once customers visit the category page, this default one will be the representative value for Sort by. Also, you first need to clear the checkbox Use Config Settings. In the example below, the default value is Position.

So, what about the front end?

- Layered Navigation Price Step: By default, Commerce displays the price range in increments of 10, 100, and 1000, depending on the products in the list.

Step 4: Complete Search Engine Optimization Settings

- URL Key: a component of a product’s URL addresses a single product page on the website (Image 1).
- The Meta Title of the category landing page appears in the following:
- The title tab of your browser
- The search results in listings
Ideally, the title should only be used for the category page and should be less than 70 characters long. If you don’t enter anything in the Meta Title field, the meta title of the category page is based on the category name. (Image 1).
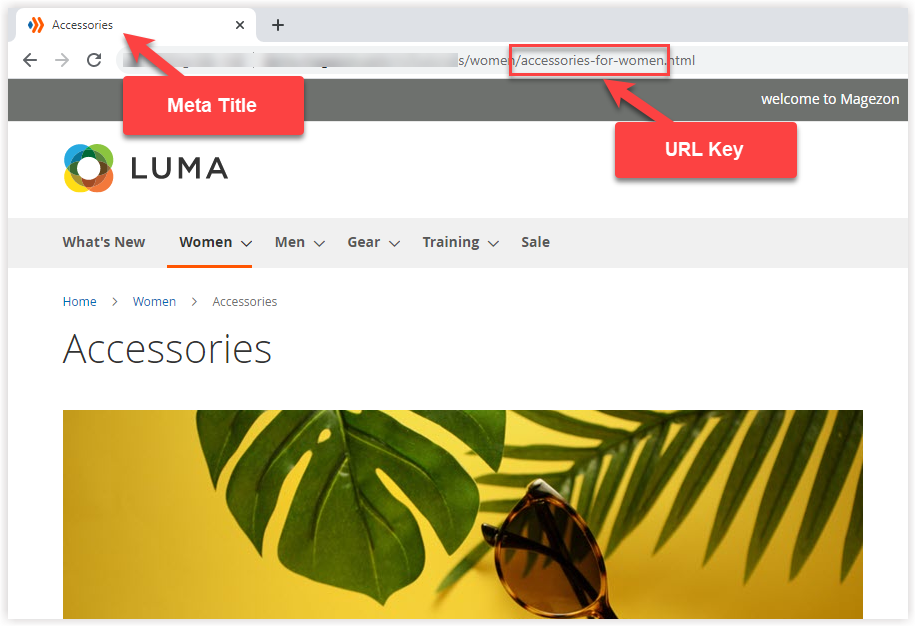
Image 1: Meta Title and URL Key
- Meta Keywords: Enter the keyword used in the meta description and meta title. Online customers may use it to search for products.
- The category’s Meta Description gives Internet users a brief description of the category page on the search result pages. A good meta description should be between 150-160 characters in length.
- Click Save and continue to edit.

Optimize Your Magento Store With Powerful Extensions!
Looking for fast, efficient, and well-coded extensions to boost sales for your Magento stores? Then visit the Magezon website and grab the necessary add-ons to optimize yours today!
Step 5: Choose the Products in the Category

- Scroll down and expand the section Products in the Category.
- You will then see a grid that contains all products in your catalog. Click on Reset Filter so that all products appear in the grid.
- By using filters (ID, Name, SKU, Visibility, Status, Price, Position), you can quickly find the products that belong to this category. Then choose the desired ones for this category by checking the checkboxes of these products.
- If you want to remove any products from this category, just untick them and next hit Save.
Step 6: Complete the Design Settings

- Use Parent Category Settings: Toggle Yes to apply the settings of the parent category page (Women in this case) to this category.
- Theme: Enables you to select the design of the category page. There are two themes for you to choose from Magento Blank (Image 3) and Magento Luma (Image 4).
+ Magento Blank:

+ Magento Luma:

- Layout: This allows you to set the column layout of this category page to the following:

- The No layout updates option is preselected by default.

- Empty: Only the category container is displayed when you choose this option. The containers of other components, such as the header, and the footer, will disappear, which is the difference between Empty and 1 Column.

- 1 column: the content area will cover the width of this category landing page as one column.

- 2 columns with left bar: The content area of the landing category page is divided into two columns. The left column at a smaller width includes the layer navigation. And the bigger right column presents products that belong to this category.

- Two columns with the right bar: The content area comprises two columns. The right bar with a smaller width is attached to the layer navigation. And the content column on the right shows this category’s products.

- 3 columns: The content area is separated into 3 columns. The middle column at the greatest width contains the main content. The left and right columns have the same width to display content blocks.

- Toggle Apply Design to Products to Yes if you want to apply the same design settings for the pages of the products in this category.
Step 7: Schedule Design Update
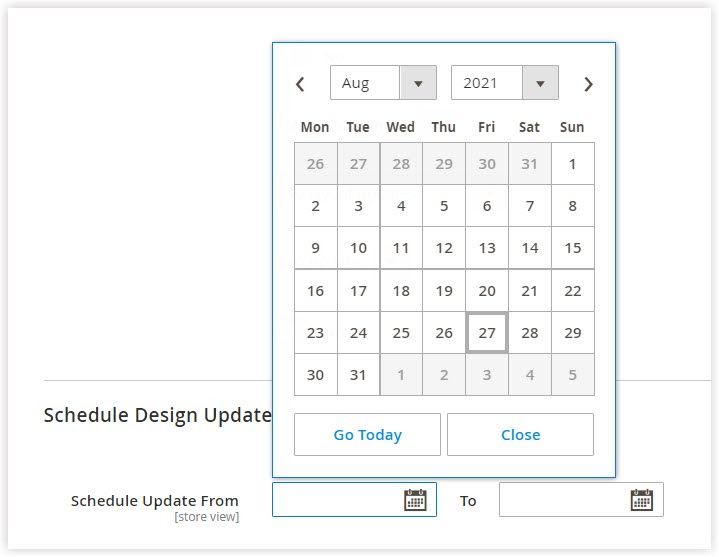
To schedule the design update for a specific time period, follow these steps:
- Expand the section Schedule Design Update.
- Select the Schedule Update From and To dates from the calendar.
- Hit Save to complete.
Sum up
This blog has shown you how to create a new category in Magento 2 with details. I hope it can help you. Leave your comment if you have any questions or wanna share ideas.
Follow our Magento tutorials to learn more about Magento. Visit our Magezon website to pick up fast, safe, and efficient extensions for your stores.
Optimize Your Magento Store With Powerful Extensions!
Looking for fast, efficient, and well-coded extensions to boost sales for your Magento stores? Then visit the Magezon website and grab the necessary add-ons to optimize yours today!
