Admittedly, no matter the industry you work in, the market of your target, or the kinds of products you provide, collecting customer information is a crucial key to better improve your business based on customer’s preferences. Without data, it may be hard to build marketing strategies to reach the right customers as well as their needs.
If you’re seeking an effective solution for collecting data, this article is for you! We’ll show you an amazing solution with a detailed guide on how to collect customer information by Magento 2 Hide Price module.
Table of contents
I. Why Is It Important to Collect Customer Information?
Before breaking the detailed instruction, let us show you a handful reasons why you should collect data.
1. Get insight of customer segmentation
The biggest reason why you should collect customer information is that it helps your business to have a much better understanding of customer’s preferences. Hence, it’s easier to define products they most prefer, which things they want your business offering and changing, or analyze how shopping behavior changes due to the customer’s age.
Once knowing more in-depth about audience demands will help you set up everything in your business such as support, price, promotions to better meet their needs. From that, improving customer satisfaction and shopping experience become easier than ever.
2. Improve your marketing strategies
Collecting customer information like phone number, or email address opens the door for diversifying your marketing channels such as email marketing, social media, and even SMS.
Further, data will be able to tell you how consumers are engaging and responding to your marketing campaigns. This statistic can give business an idea of what campaigns are effective, and which products are most attractive to audiences.
Data also help mapping users paths and personalizing their journeys on your website. From that, you can make the necessary adjustments and convert users to customers.
II. How to collect customer information by Magento 2 Hide Price
1. Add a new rule
Navigate to Magezon >> Manage Rules >> Add New Rules
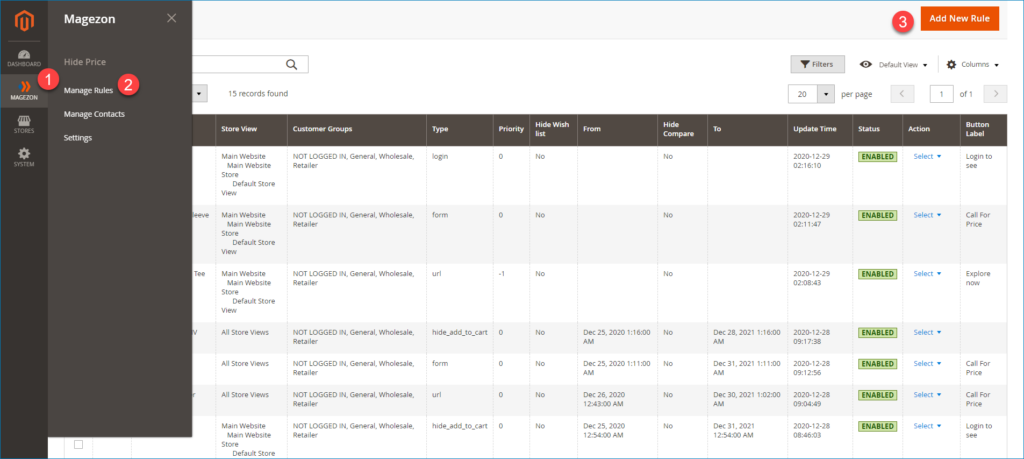
First, configure the rule information
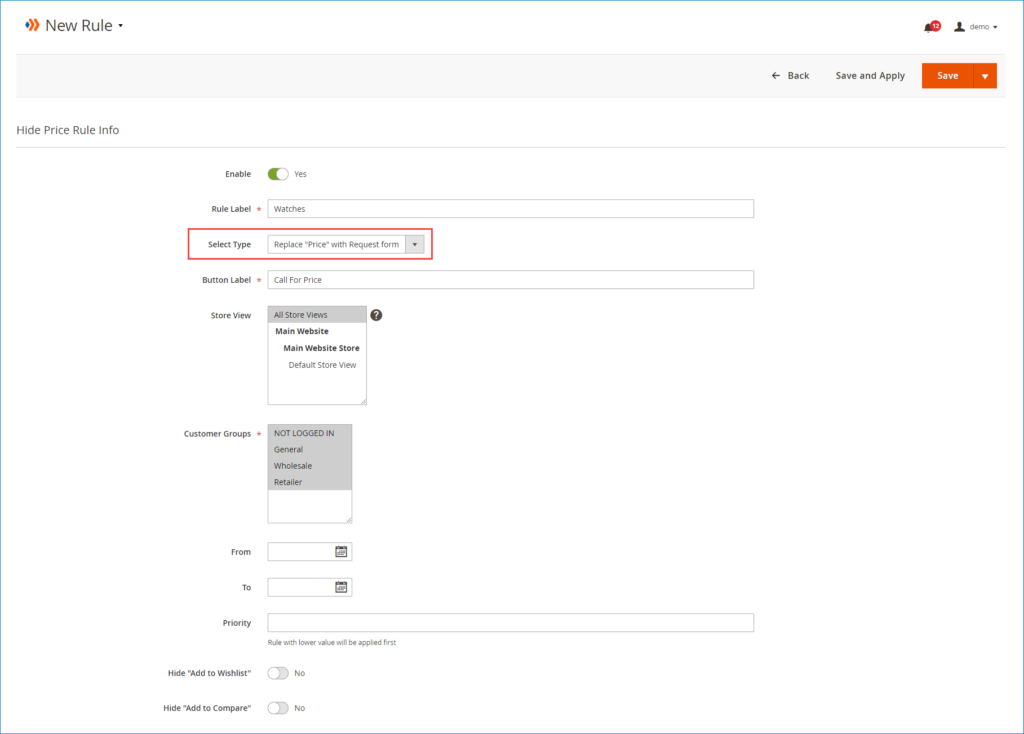
- Enable: Turn on/off the button to enable/disable the rule
- Rule label: Enter a label for the rule
- Select Type: There are 4 action types for choosing. Because this article shows you the way to collect customer information, so we’ll choose the “Replace “price” by Request form” option. It means that product prices will be replaced by a custom button. When customers click on the button, a request form will appear, then they must enter their info to know product price.
- Button Label: Enter a call-to-action message for the button to replace for price.
- Store View: Choose specific store view that apply the rule
- Customer Groups: Choose certain customer groups who the rule applies to.
- From – To: Set active time for the rule. If you leave it blank like this article, the rule will be applied forever.
- Priority: Enter a priority value for the rule. A rule with lower value will be applied first.
- Hide Add to Wishlist: Turn on/off to hide/show wish list
- Hide Add to Compare: Turn on/off button to hide/show compare list
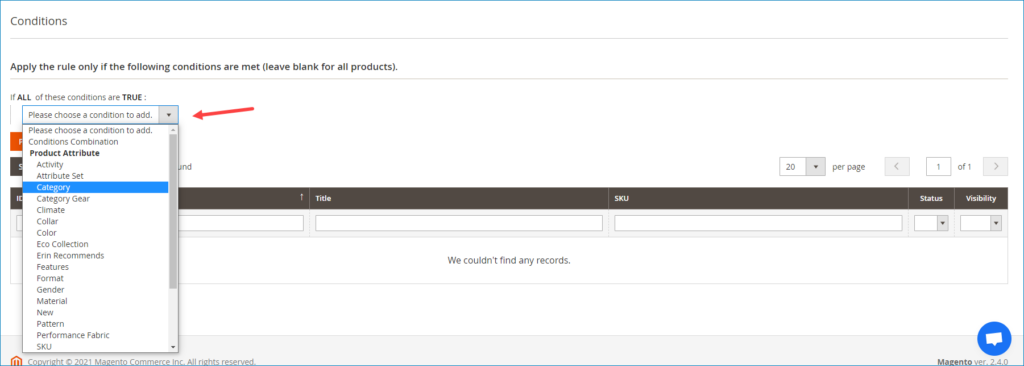
Next, move to set Conditions for rule:

Expand Conditions section, you can see a statement with 2 editable links: “If ALL of these conditions are TRUE”.
- Click the ALL link to choose ALL or ANY.
- Click the TRUE link to choose TRUE or FALSE.
- Leave the Conditions section blank if you want to apply this rule to all products.
Next, click on plus icon to add a new condition:

Expand the drop-down arrow and select your desired Product Attribute. The price of products belonging to the attribute you choose will be hidden on pages.
Hit the Preview Products button to preview your selected products.
Then move to hit the Save And Apply option to apply the rule to selected products. The rule will not be applied if you don’t choose this option.

2. Customize configuration section
After adding a new rule, navigate to the Configuration and configure 3 sections – Notification, Button, and Contact Form.
2.1: Notification
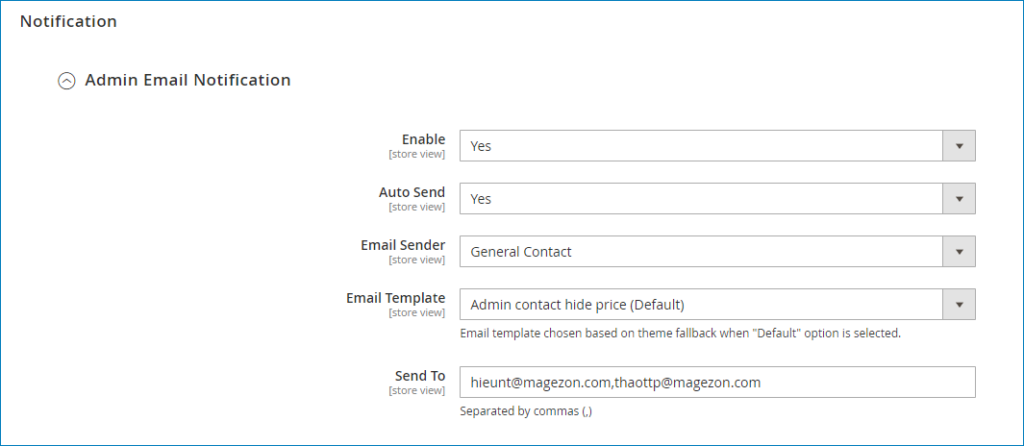
Expand the Notification and configure the Admin Email Notification section:
- Enable: Choose Yes/No to enable/disable admin email notification.
- Auto Send: Choose Yes to automatically send email notification to the admin when customers send contact forms.
- Email Sender: Choose a sender to send email notification to admin.
- Email Template: You can choose the default template to send email notification to admin or create your desired one.
- Send To: Enter the email that receives notifications when customers submit contact form. Admin can enter many emails to receive the notification simultaneously. Emails are separated by commas
2.2: Button
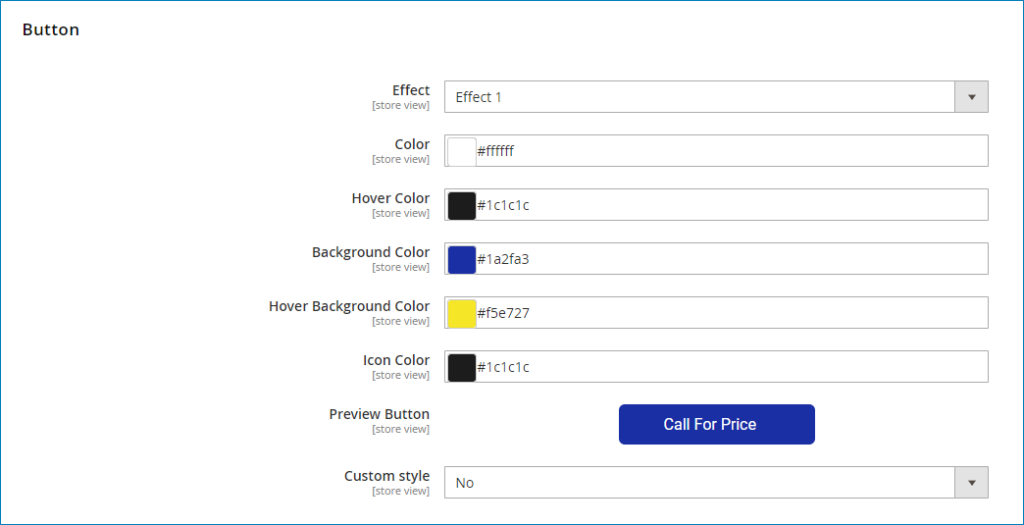
- Effect: There are 5 effects for choosing.
- Color: Set color for text in the button.
- Hover Color: Set color for text when you hover it.
- Background Color: Set background color for button.
- Hover Background Color: Set color for button background when you hover it.
- Icon Color: Set color for arrow icon in the button.
NOTE:
You can preview all button changes right on the backend in the Preview Button field. Besides, it’s possible to customize the button by CSS.
2.3: Contact Form
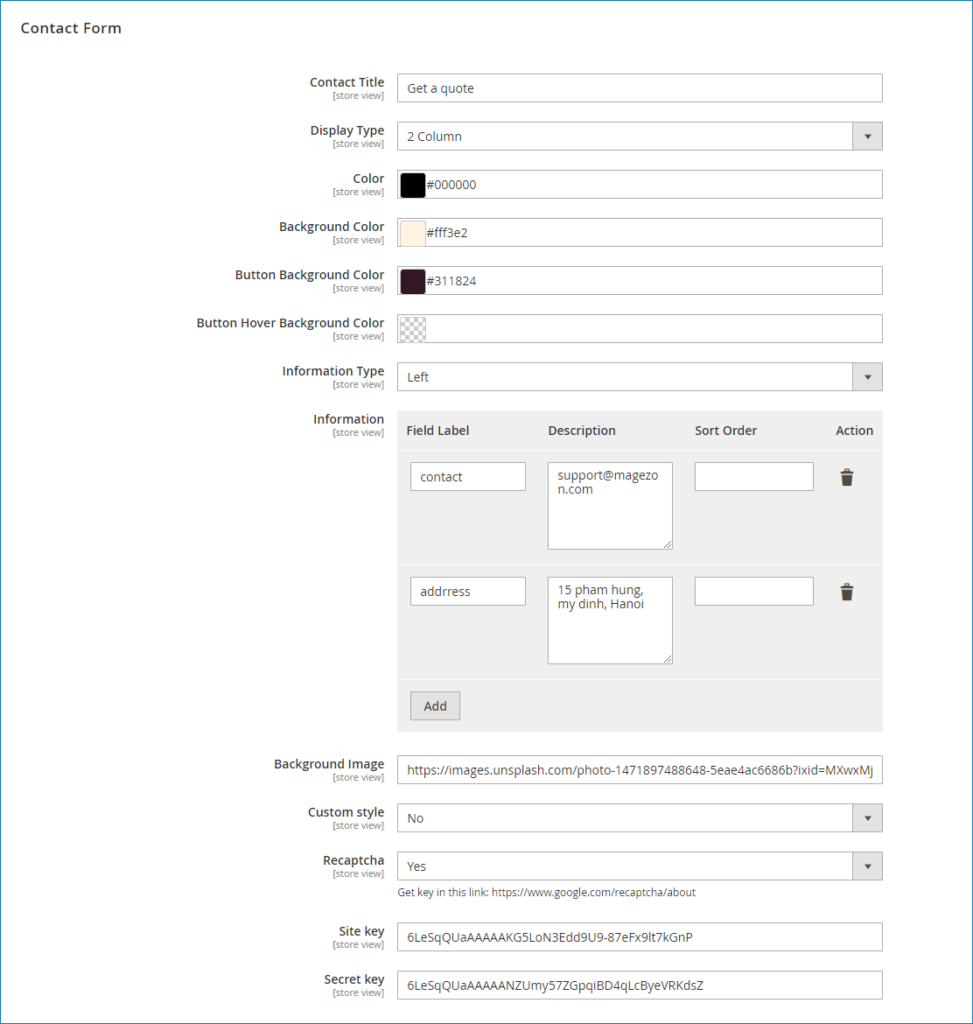
- Contact Title: Set a title for contact form
- Color: Set a color for text
- Background Color: Set color for contact form background
- Button Background Color: Set background color for the button of contact form
- Button Hover Background Color: Set hover background color for button of form
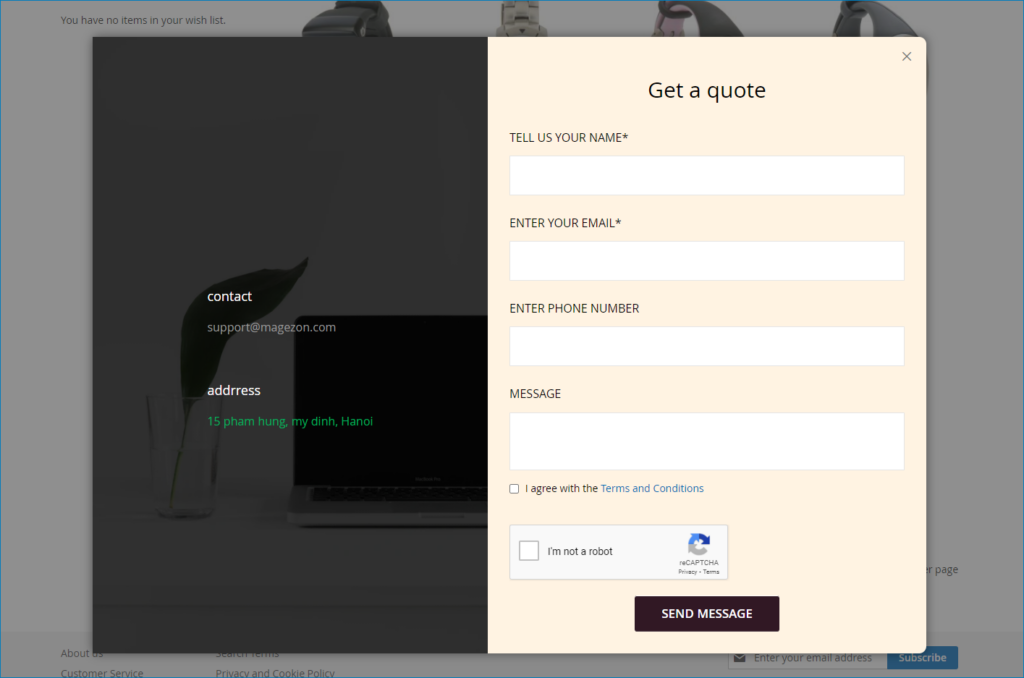
- Display Type: There are 3 types of contact form for choosing. It’s up to your desire! In this post, we’ll choose 2 Columns.
Then go to configure the next fields
- Information Type: Choose Right or Left position to display the information column. In this tutorial, we choose the Left option.
- Information: In this section, add fields to display them on the information column. Then specify a label, description, and sort order for each field.
- Background Image: Enter Url background image for information column in this field.
- Custom Style: You are able to customize contact form by CSS.
- Recaptcha: Choose Yes/No to enable/disable recaptcha and get Site Key & Secret Key here.
Now see the result we get on the frontend!
Price of all products belonging to Watches category is hidden by a custom button on frontend:
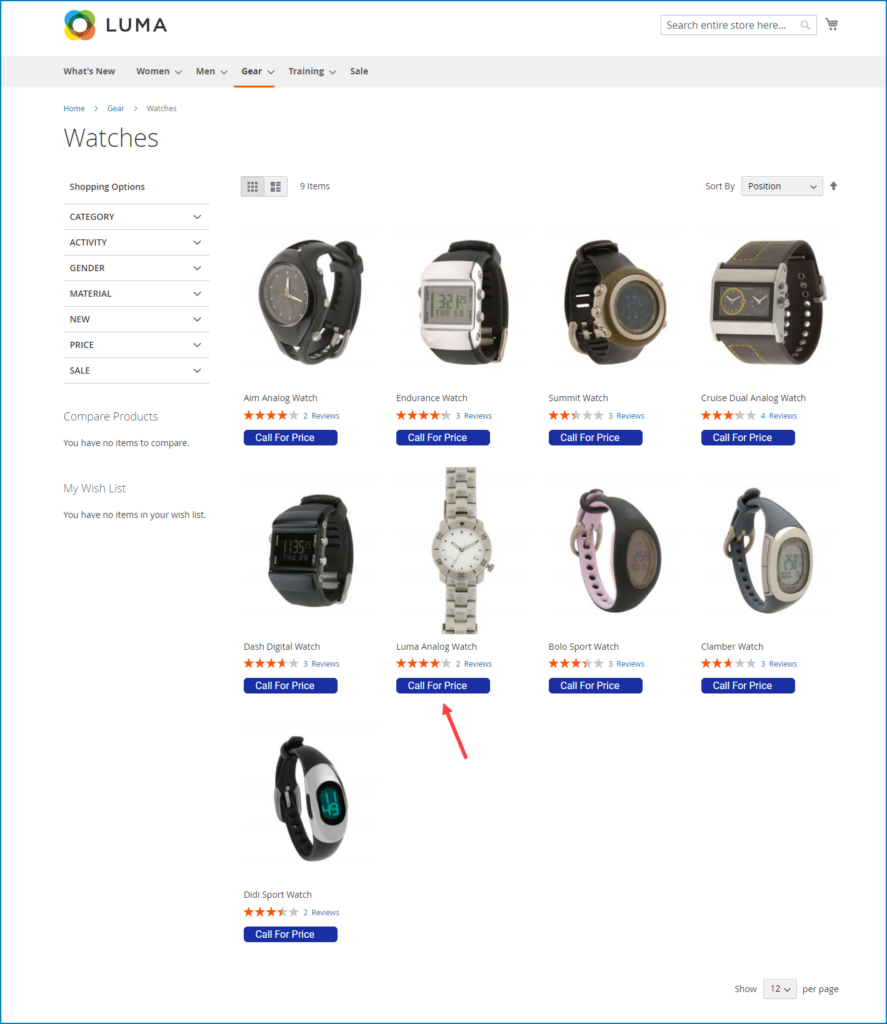
Click on the button, the following contact form will appear. This contact form is 2 Columns type, and the information column displays on the left hand. When customers fill their info in this form and send it, admin will get their info via email.
In short
Above is the solution of how to collect customer information we would like to suggest for you. If you find it useful and suitable for your business, why don’t you give Magento 2 Hide Price a try? Please contact us if you have any difficulties or questions.

Optimize Your Magento Store With Powerful Extensions
Looking for fast, efficient and well-coded extensions to build or optimize your Magento stores for sales boosting? Then visit Magezon website and grab necessary add-ons for yours today!
 Magezon Blog Help Merchants Build Comprehensive eCommerce Websites

