 Magezon Blog Help Merchants Build Comprehensive eCommerce Websites

Showing images only is not enough to express and introduce your products in more detail. So that Magento 2 allows you to upload product videos for any product you want to make it more attractive and lively. Watching videos will bring to customers a true overview of your products before making a purchase. It’s an essential part to motivate customers to buy products and drive more sales. In Magento 2, you can embed Youtube and Vimeo video links to the product settings. Quickly explore this tutorial to get a step-by-step guide on how to add Magento 2 product video.
Table of contents
How to Upload Magento 2 Product Video
To add Magento 2 product video, you must first get an API key from your Google account and paste it in your store configuration.
Let’s get started!
Step 1: Get Your Youtube API Key
Firstly, log in to your Google account and go to the Google Developers Console
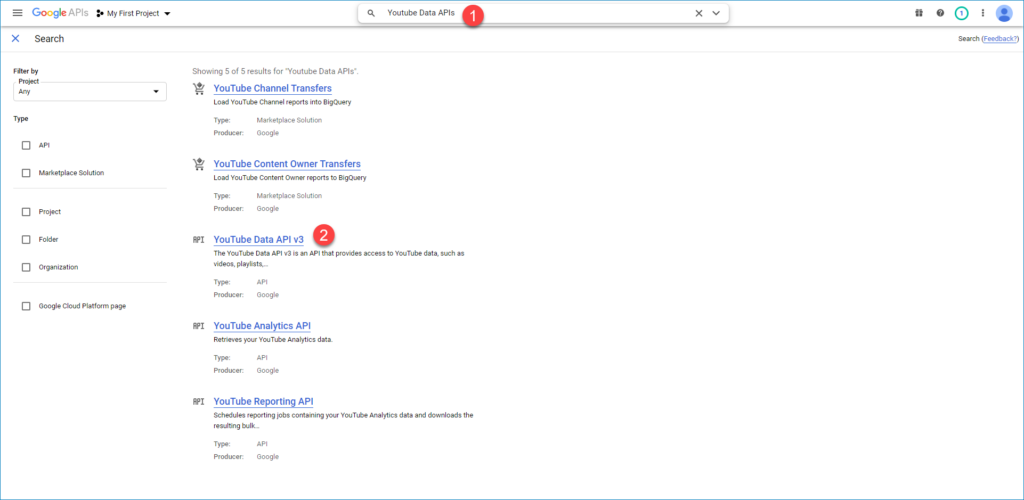
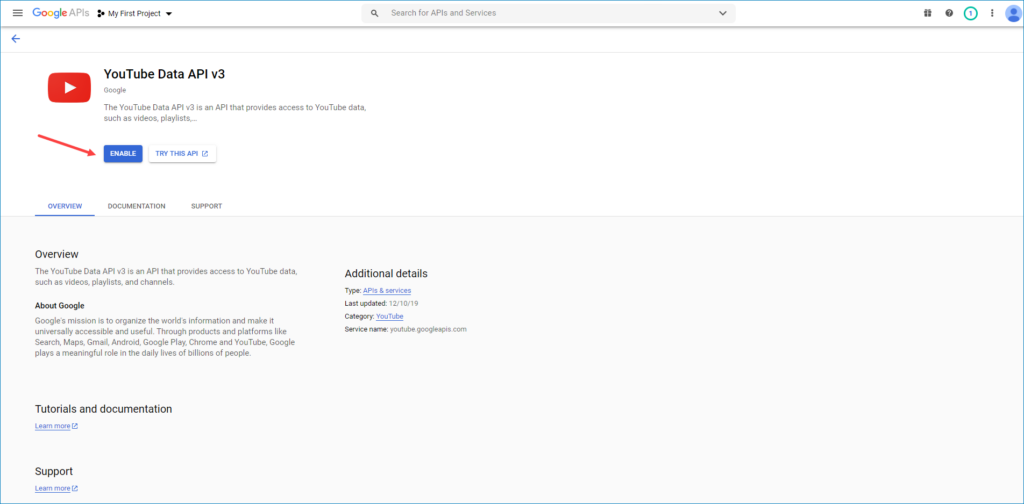
Next, enter YouTube Data API v3 in the search bar, then click Youtube Data API v3 and make sure to enable it.
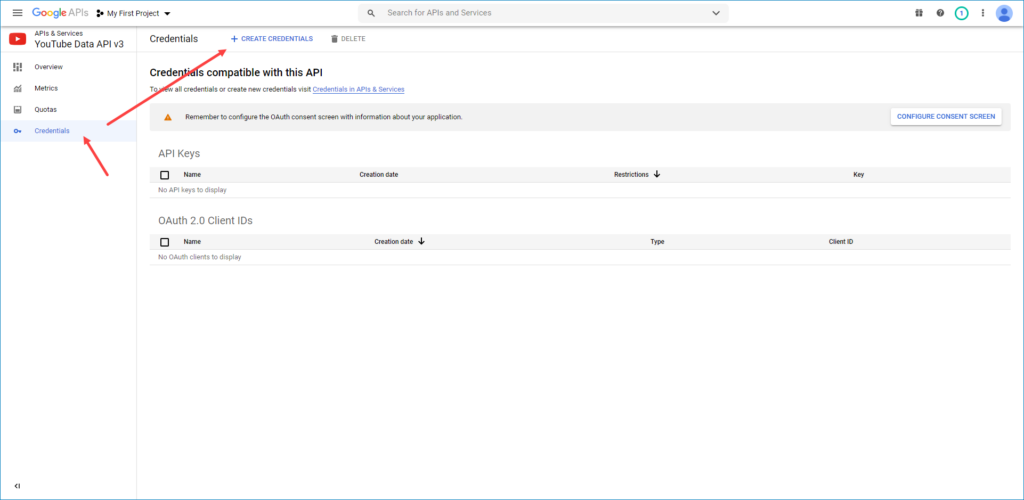
Once you’ve done, go to select Credentials option on the left panel and do one of the following:
- If you have your needed Credentials, just copy your API key in the API key table.
- If you don’t have your needed Credentials, click the Create Credentials to create a new key.
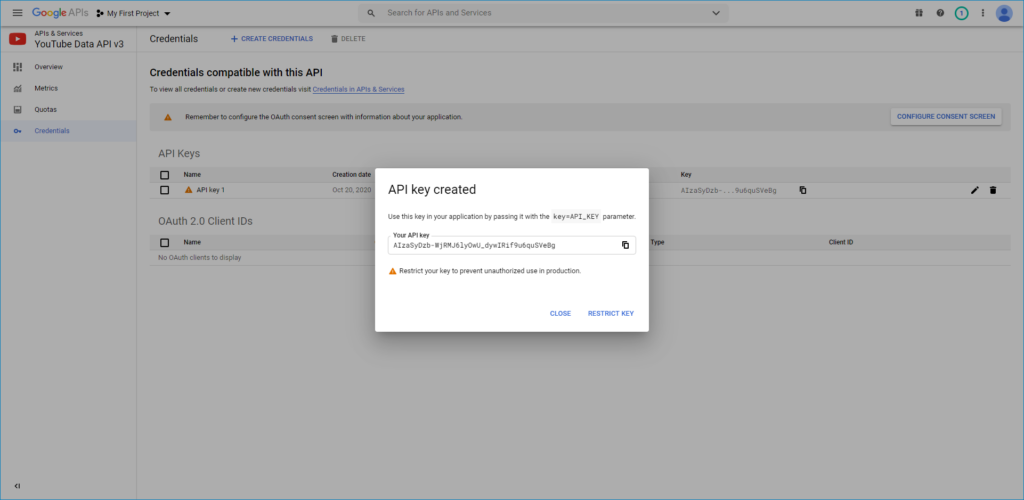
After that, copy your API key to the clipboard.
In the next step, you’ll go to paste your API key in your store configuration.
| These blogs can be useful to you: A Complete Guide to Your Product Videos for eCommerce 19+ Best Product Demo Videos to Inspire You and How to Create One |

Optimize Your Magento Store With Powerful Extensions
Looking for fast, efficient and well-coded extensions to build or optimize your Magento stores for sales boosting? Then visit Magezon website and grab necessary add-ons for yours today!
Step 2: Configure the Key in Magento
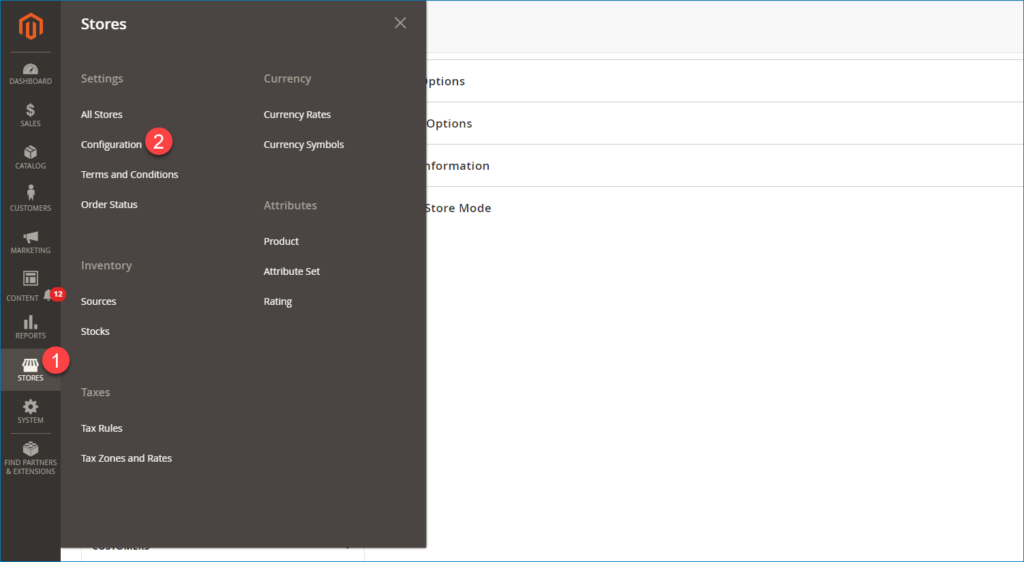
In the admin panel, follow these steps: Stores > Settings > Configuration.
On the left sidebar, under the Catalog section, choose the Catalog. Then go to expand the Product Video section and paste your API key into the Youtube API Key field.
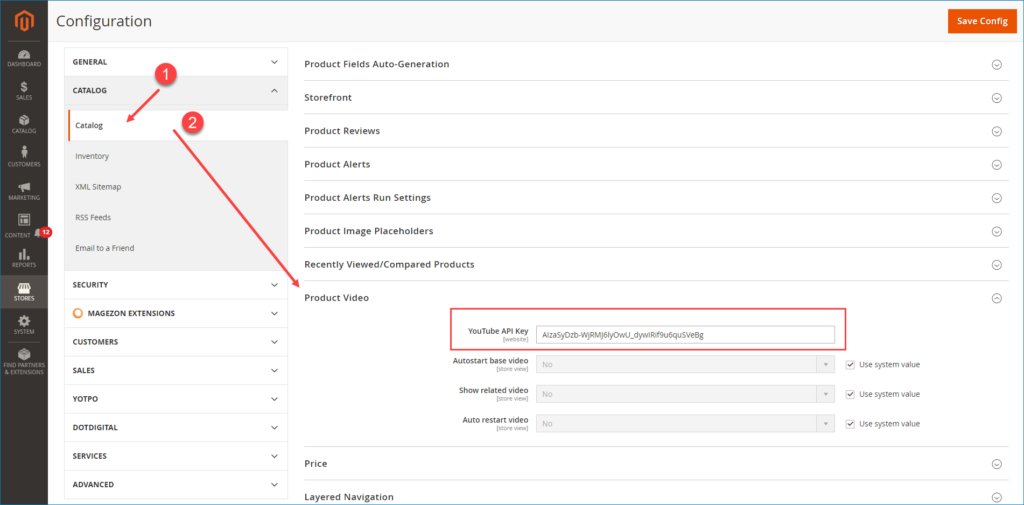
When complete, Save Config and go to refresh the Cache.
Step 3: Link to the Video
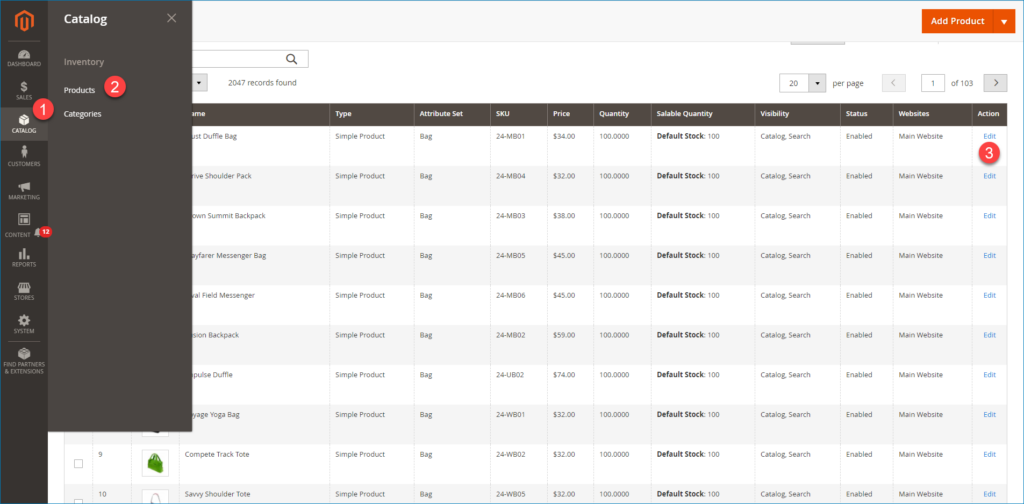
Open your product and click Edit.
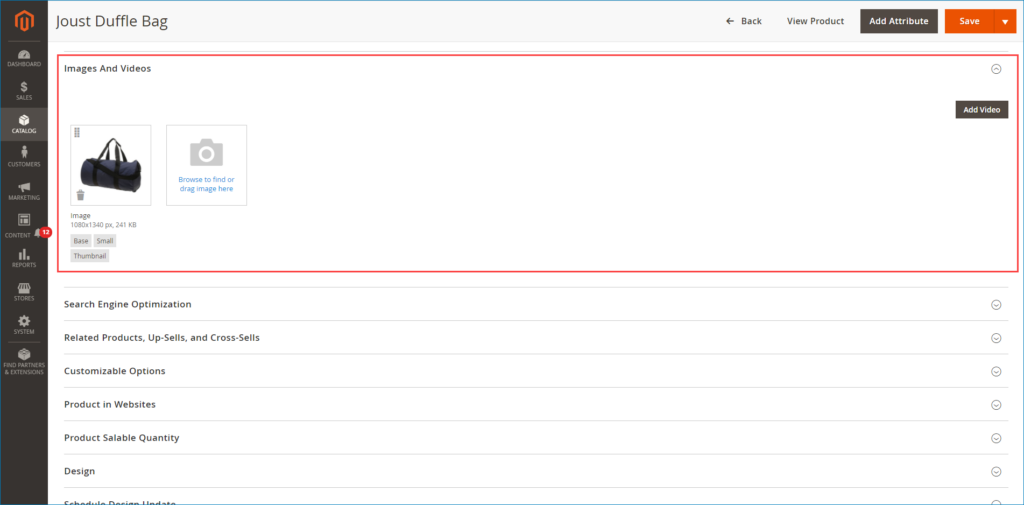
Next, go to expand the Images and Videos section and click on the Add Video button to add your product video.
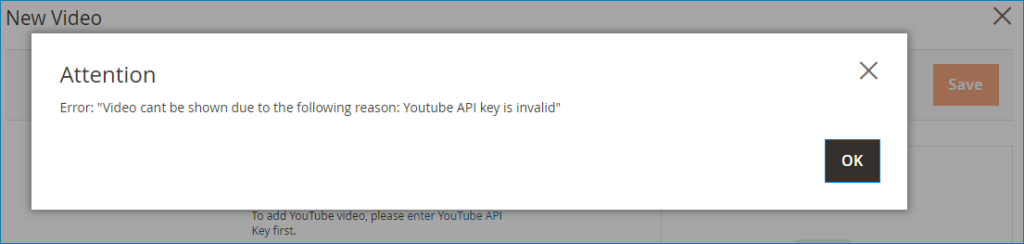
Enter the URL of Youtube or Vimeo video. In the URL field, if you have not yet entered your API key, the error message will automatically appear, click OK to continue. You won’t be able to link to a YouTube video, but you can go through the process.
Enter a title and description for your video. Click on the Choose File button to upload Preview Image for your video.
If you want to get video information on the host server, click the Get Video Information button, its information will be automatically filled in the Title, Description, and Preview Images field.
To determine the Role of your video in the store, choose one of the following options:
- Base
- Small
- Swatch
- Thumbnail
- Hide from Product Page
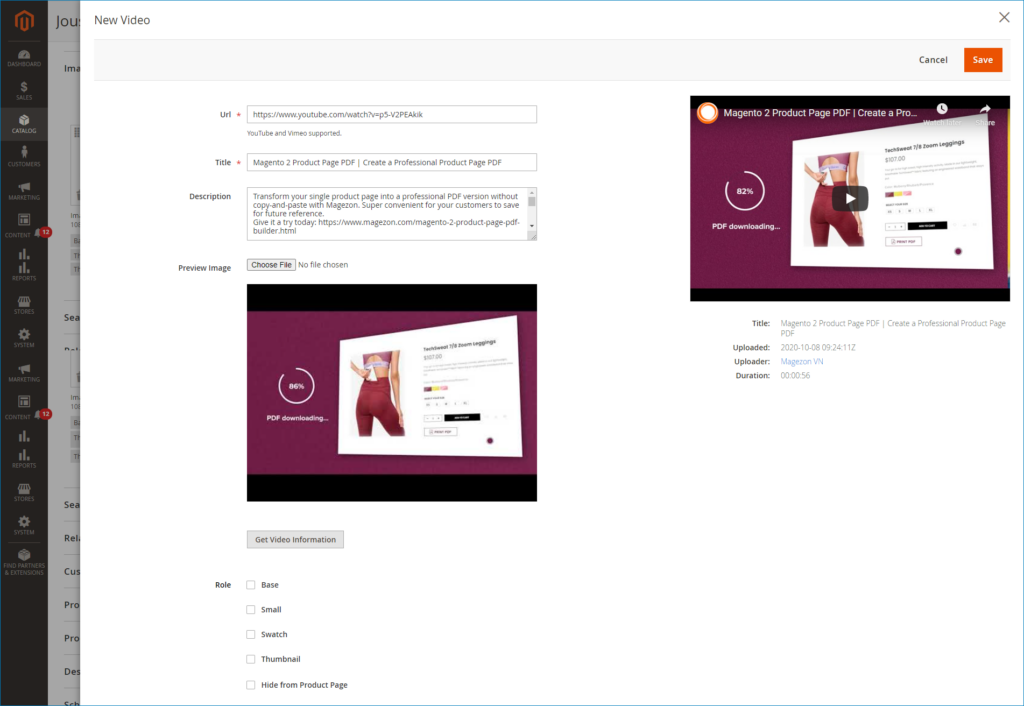
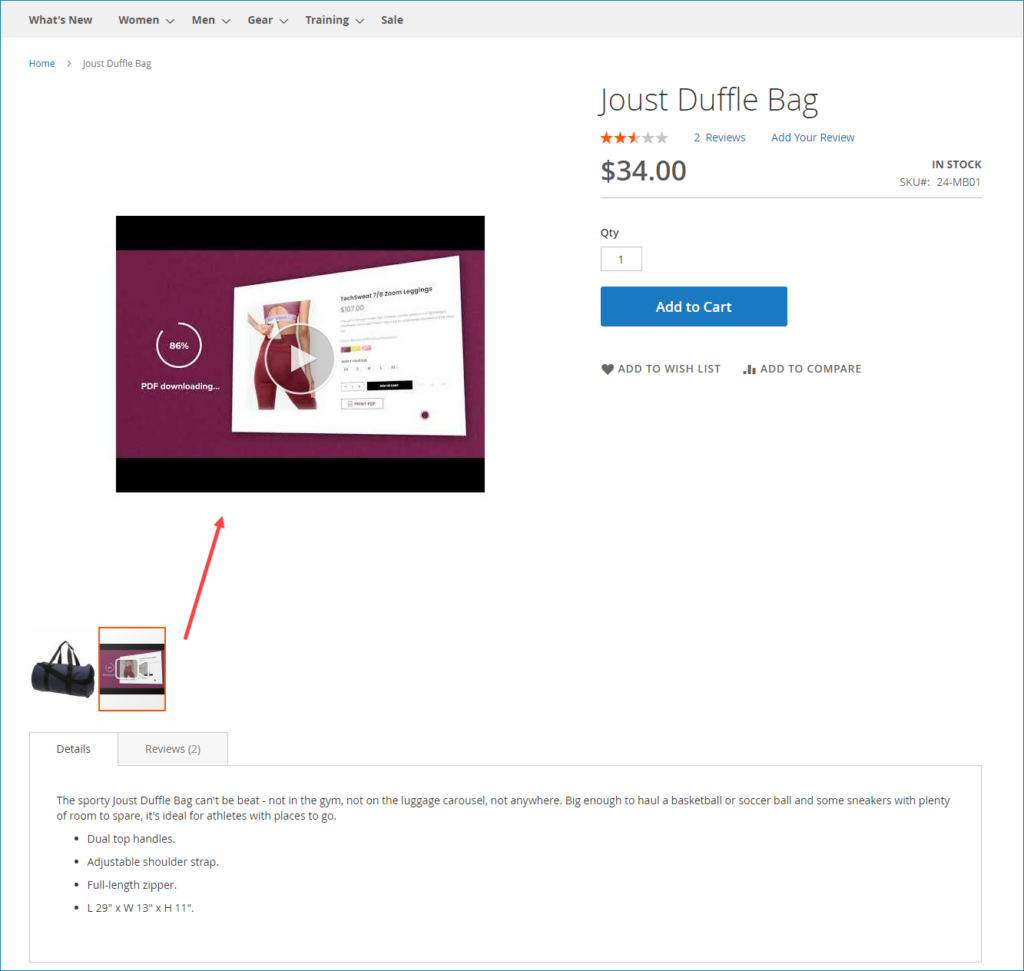
When you’ve finished, click on the Save button and see the result on the frontend!
II. Adding Magento 2 Product Video Using Magezon Image Gallery Extension
If you find it hard when applying all the steps in the first part to upload product videos in Magento 2, our Magento 2 Image Gallery is one the best solution you can take into consideration. This module allows you to create product albums and add unlimited product videos in it without doing any complex steps. With some clicks in minutes, you can upload as many videos as you want with our extension.
Besides, you can display your product videos in a gallery with attractive layouts such as Grid, and Masonry. So it’s easy to gain customer’s attention and help them quickly find their needed products.
Now, let’s get started to see how Magento 2 Image Gallery works!
Step 1: Create a New Album
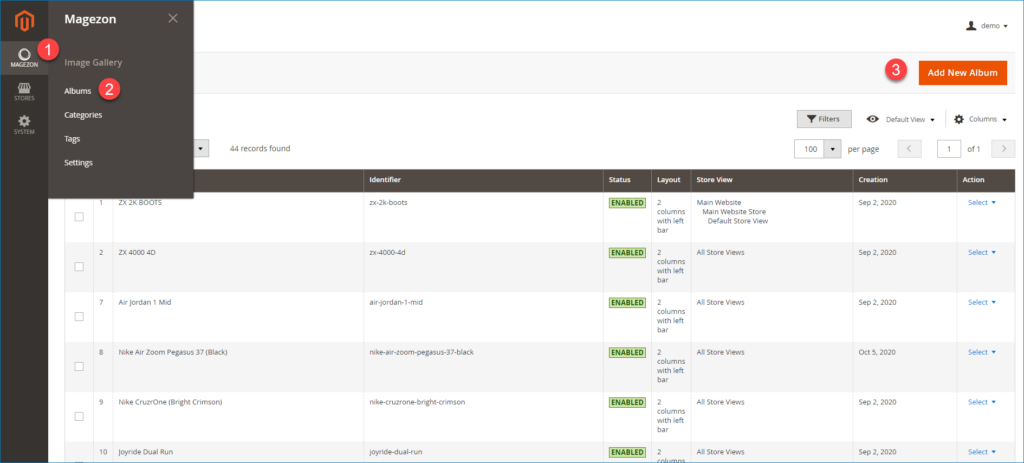
First, from the admin panel, go to Magezon > Image Gallery > Albums.
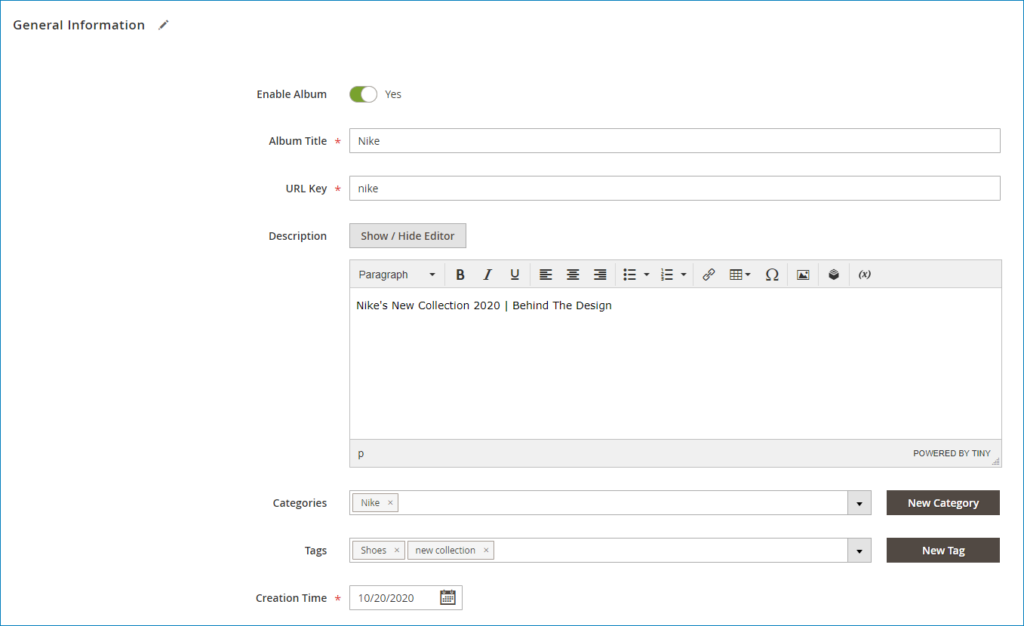
After that, go to edit the General Information for your new album
Enter a title and description for the album. Then specify a URL key for the album page.
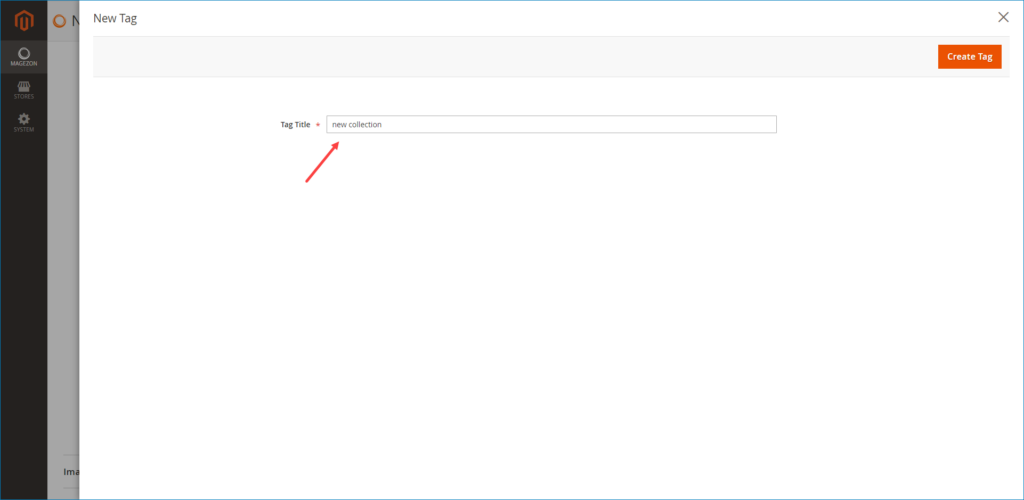
You can also group your new album by appropriate categories and tags. In case you have not yet had your desired categories and tags, click on the New Category and New Tag button to create new ones.
Step 2: Add Product Videos in the Album
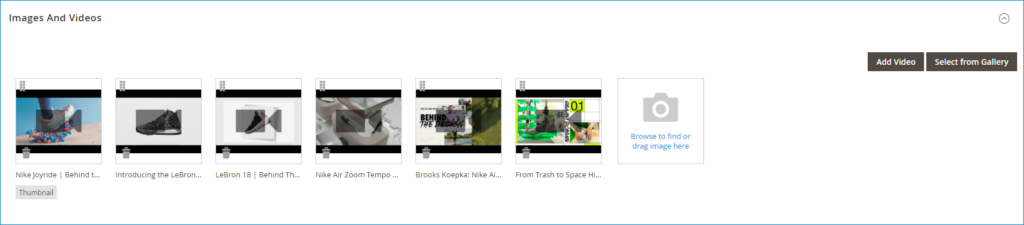
When completing the General Information section, go to expand the Images and Videos section to add your product videos.
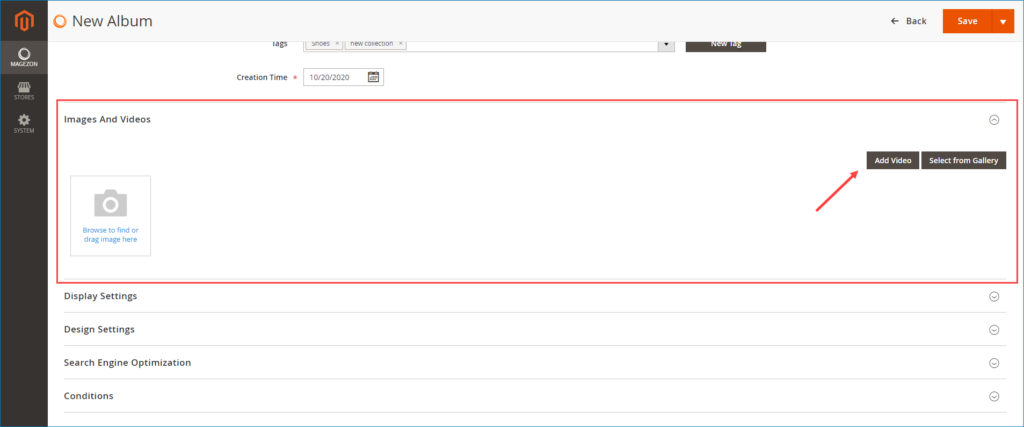
With our Magento 2 Image Gallery extension, you don’t have to go to get your API key and paste it in the store’s configuration. All you need to do is just click on the Add Video button and enter your product video Url in the Url field. Our module also supports Youtube and Vimeo videos.
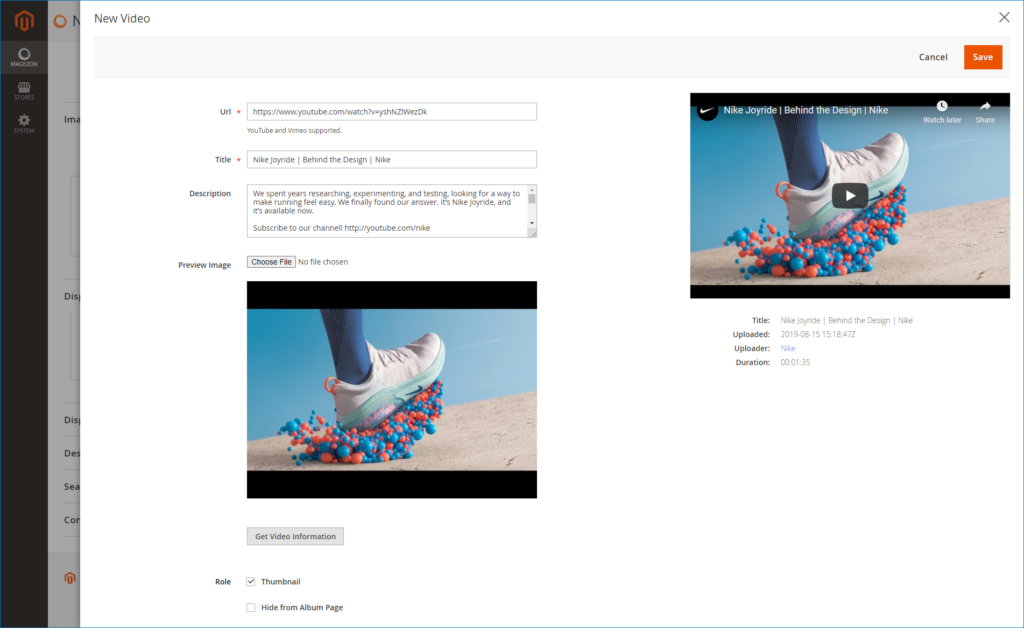
After pasting video Url in the Url field, edit your video information as the Step 3 that we’ve mentioned in the first part – How to upload Magento 2 product video.
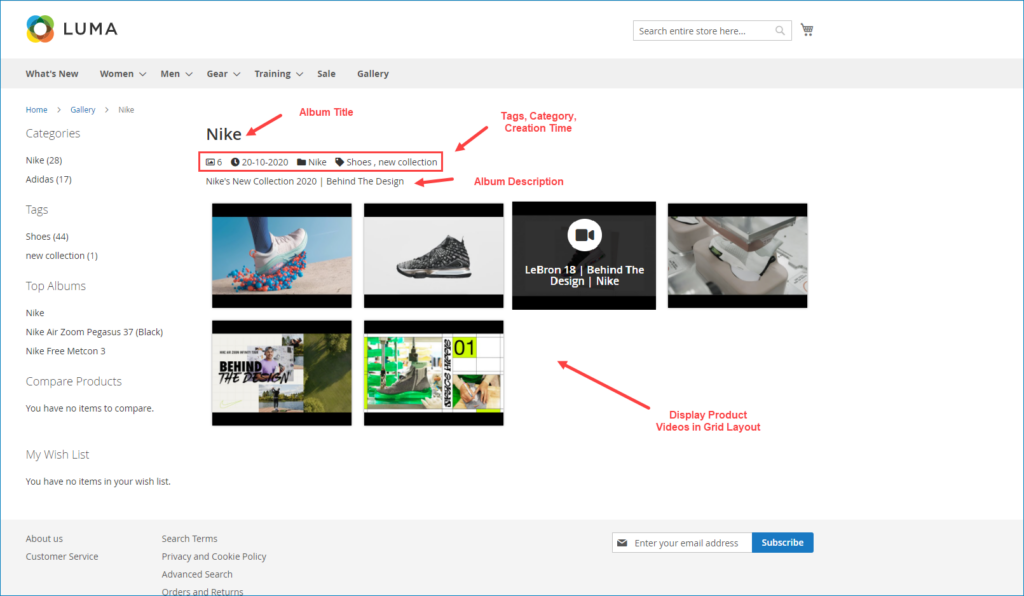
When you’ve completed the step above, your product videos will be added:
Step 3: Set Layout Type for the Album
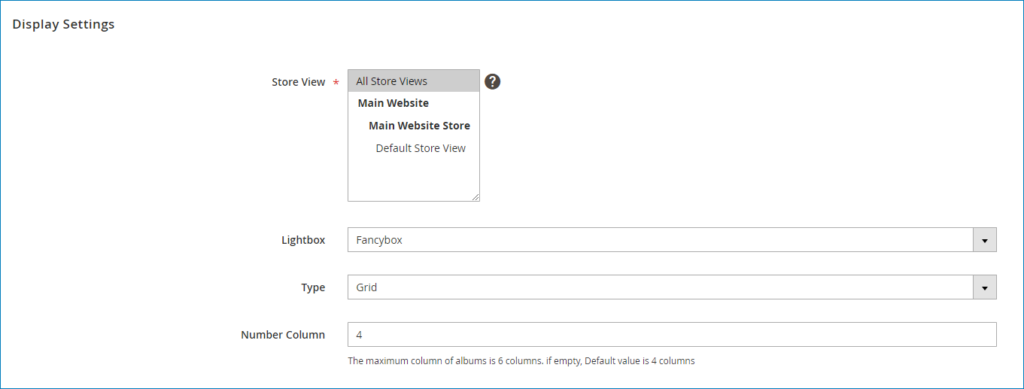
Next, go to the Display Settings section to set the display type for your videos in the album on the frontend.
Choose a specific store view to display your videos. Select an effect in the Lightbox field to display videos more attractive on the frontend. You can choose one the effect below:
- Fancybox
- Lightbox
- Magnific Popup
Then choose a type to display videos in the albums. You can choose the Grid type or Masonry type.
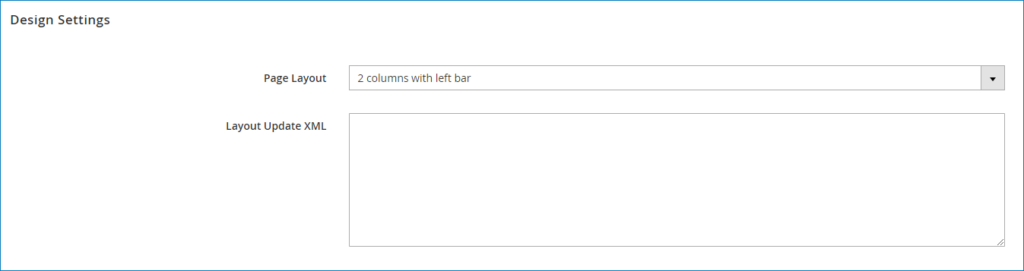
Next move to set page layout for the album page in the Design Settings section. It offers 5 options:
- Empty
- 1 column
- 2 columns with left bar
- 2 columns with right bar
- 3 columns
Step 4: Place Video Album on the Product Page
Go to expand the Conditions section to display your product album that contain product videos on the relevant product pages.
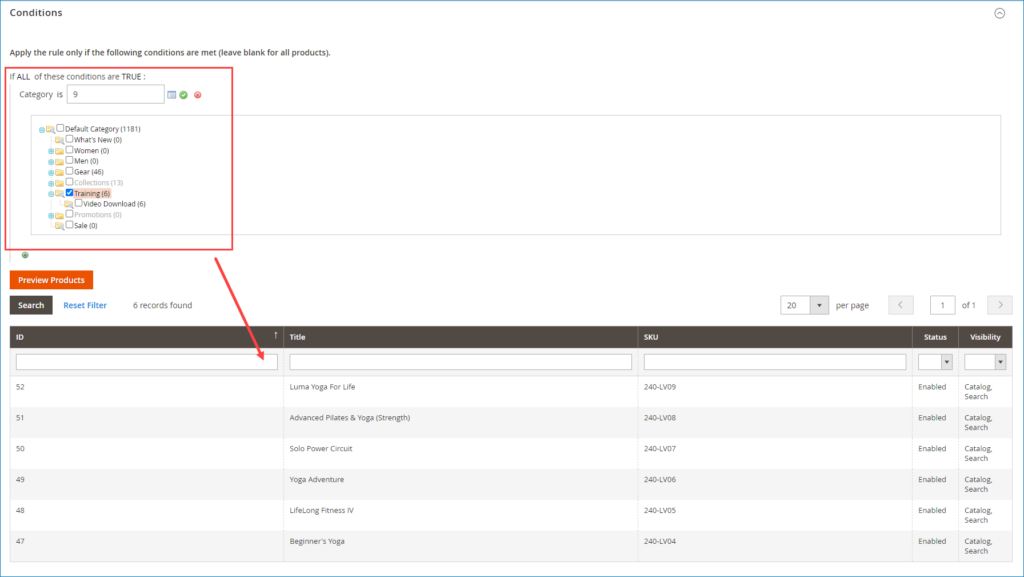
Be noted that, to make this condition be active, you have to open the Configuration section and enable the Product Settings option.

After finishing all the steps above, go to Save and view the album that contains your product videos on the frontend!
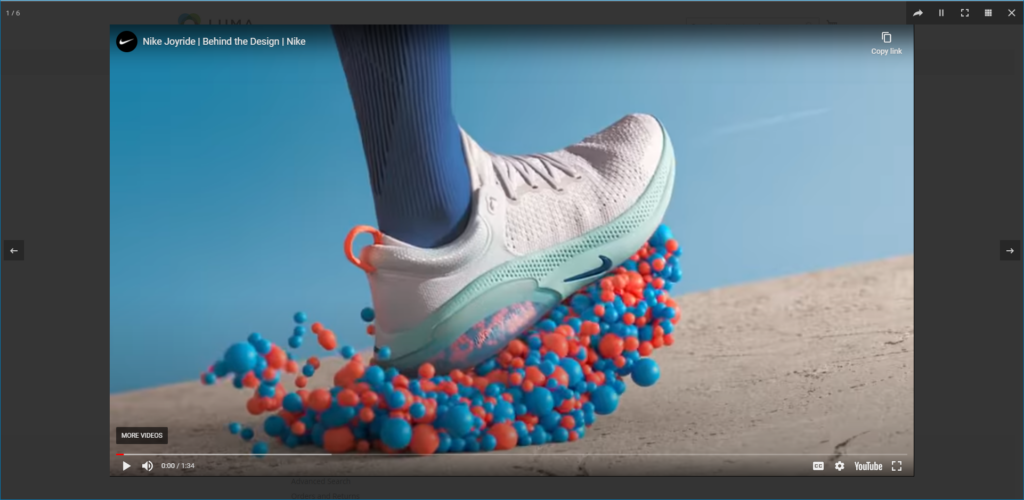
Show and view the video on the frontend with Fancybox effect:
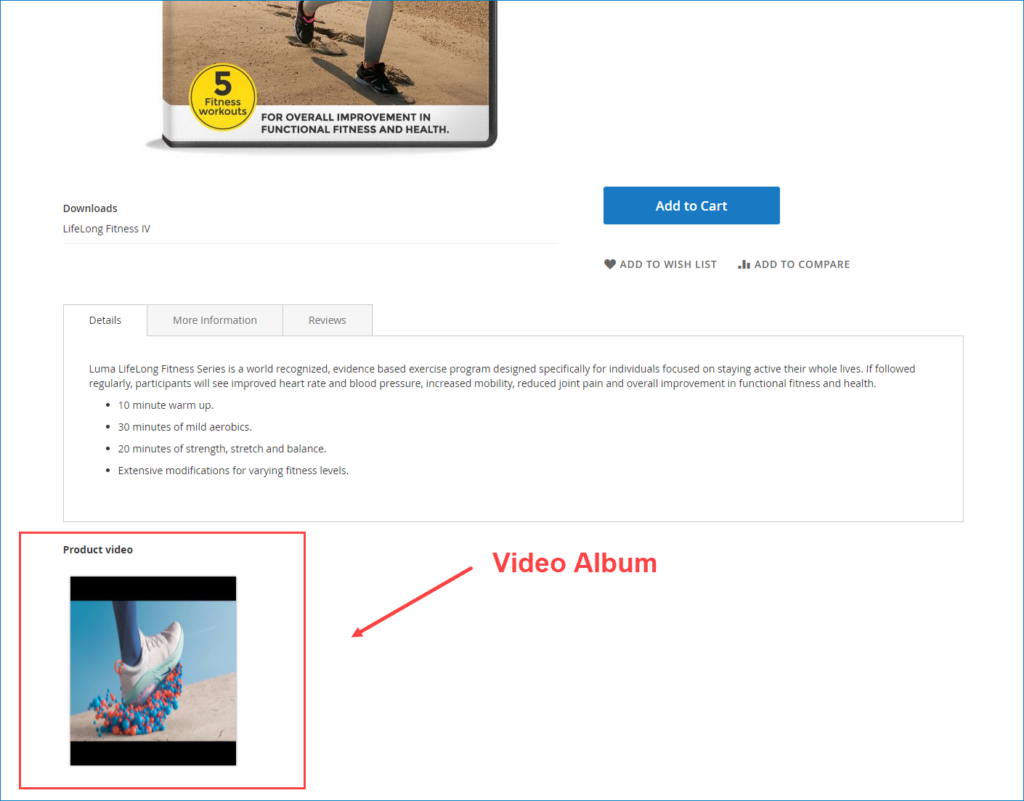
Video album on the product page:
As you can see, it’s so easy and fast to add product videos with Magento 2 Image Gallery.
Conclusion
We’ve walked through 2 ways to add Magento 2 product video. One uses Magento 2 default, and the other one uses Magento 2 Image Gallery extension by Magezon. After reading this tutorial, we hope you can find your most suitable way to add your product videos. If you are stuck with anything when applying this tutorial, feel free to contact us or leave comments below.
And if you’re looking for extensions to optimize your Magento store, visit Magezon.
Optimize Your Magento Store With Powerful Extensions
Looking for fast, efficient and well-coded extensions to build or optimize your Magento stores for sales boosting? Then visit Magezon website and grab necessary add-ons for yours today!
