Magento 2 doesn’t give store owners the ability to add extra custom fields to the default customer registration form. That is the real obstacle if you want to collect necessary information about your customers. If you are looking for a way to add as many important fields as you want, this blog can help.
| In case you’re still afraid of touching codes or saving your time and effort, we recommend you should use Advanced Magento 2 Customer Attributes module from Magezon. This useful tool allows you to add extra custom fields to the customer registration page and ultimately gain deep customer insights. |
Table of contents
Step 1: Register for a Module
First of all, create a registration.php file. In this example:
- Module: Avatar
- Vendor: Magezon
Then, enter the codes below:
<?php
use \Magento\Framework\Component\ComponentRegistrar;
ComponentRegistrar::register(ComponentRegistrar::MODULE, 'Magezon_Avatar', __DIR__);

etc\module.xml:

<?xml version="1.0"?>
<config xmlns:xsi="http://www.w3.org/2001/XMLSchema-instance" xsi:noNamespaceSchemaLocation="urn:magento:framework:Module/etc/module.xsd">
    <module name="Magezon_Avatar" setup_version="1.0.0">
        <sequence>
            <module name="Magento_Customer"/>
        </sequence>
    </module>
</config>
| People also read: How to add custom fields to the checkout page in Magento 2 programmatically [In-Depth Review] 5 Best Magento 2 Customer Attributes Extensions |
Step 2: Create a Customer Attribute Named Avatar
Create the \Setup\InstallData.php file.
<?php

namespace Magezon\Avatar\Setup;

use Magento\Customer\Setup\CustomerSetupFactory;
use Magento\Customer\Model\Customer;
use Magento\Eav\Model\Entity\Attribute\Set as AttributeSet;
use Magento\Eav\Model\Entity\Attribute\SetFactory as AttributeSetFactory;
use Magento\Framework\Setup\InstallDataInterface;
use Magento\Framework\Setup\ModuleContextInterface;
use Magento\Framework\Setup\ModuleDataSetupInterface;


class InstallData implements InstallDataInterface
{

    /**
     * @var CustomerSetupFactory
     */
    protected $customerSetupFactory;

    /**
     * @var AttributeSetFactory
     */
    private $attributeSetFactory;

    /**
     * @param CustomerSetupFactory $customerSetupFactory
     * @param AttributeSetFactory $attributeSetFactory
     */
    public function __construct(
        CustomerSetupFactory $customerSetupFactory,
        AttributeSetFactory $attributeSetFactory
    ) {
        $this->customerSetupFactory = $customerSetupFactory;
        $this->attributeSetFactory = $attributeSetFactory;
    }


    /**
     * {@inheritdoc}
     */
    public function install(ModuleDataSetupInterface $setup, ModuleContextInterface $context)
    {

        /** @var CustomerSetup $customerSetup */
        $customerSetup = $this->customerSetupFactory->create(['setup' => $setup]);

        $customerEntity = $customerSetup->getEavConfig()->getEntityType('customer');
        $attributeSetId = $customerEntity->getDefaultAttributeSetId();

        /** @var $attributeSet AttributeSet */
        $attributeSet = $this->attributeSetFactory->create();
        $attributeGroupId = $attributeSet->getDefaultGroupId($attributeSetId);

        $customerSetup->addAttribute(Customer::ENTITY, 'avatar', [
            'type' => 'varchar',
            'label' => 'Avatar',
            'input' => 'image',
            'backend' => 'Magezon\Avatar\Model\Attribute\Backend\Avatar',
            'required' => false,
            'visible' => true,
            'user_defined' => true,
            'sort_order' => 10,
            'position' => 10,
            'system' => 0,
            'is_used_in_grid' => true,
            'is_visible_in_grid' => true,
            'is_html_allowed_on_front' => true,
            'visible_on_front' => true
        ]);

        $attribute = $customerSetup->getEavConfig()->getAttribute(Customer::ENTITY, 'avatar')
        ->addData([
            'attribute_set_id' => $attributeSetId,
            'attribute_group_id' => $attributeGroupId,
            'used_in_forms' => ['adminhtml_customer', 'customer_account_edit', 'customer_account_create'],
        ]);

        $attribute->save();
    }
}
To set up the module and add the attribute to the Customer Information page from the back end, run the CLI command below:
php bin/magento setup:upgrade
php bin/magento setup:static-content:deploy -f
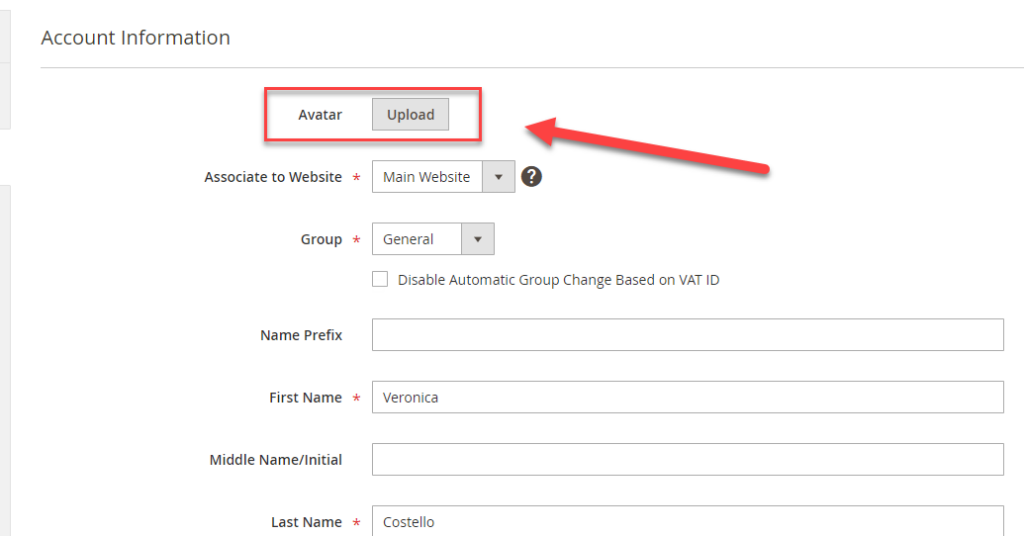
After that, the Avatar attribute field appears in the Account Information tab on the customer view page.
From the admin sidebar, navigate to the Customer -> All Customers. Then select any customer and choose Edit. In the Customer Information panel on the left, click the Account Information tab. You can see the Avatar attribute field below:

Step 3: Set the Input Validation Rule for the Avatar Attribute Field
Create the Model\Attribute\Backend\Avatar.php file.
<?php

namespace Magezon\Avatar\Model\Attribute\Backend;

class Avatar extends \Magento\Eav\Model\Entity\Attribute\Backend\AbstractBackend
{
    /**
     * @param \Magento\Framework\DataObject $object
     *
     * @return $this
     */
    public function beforeSave($object)
    {
        $attrCode = $this->getAttribute()->getAttributeCode();
        if ($attrCode == 'avatar') {
            if (!empty($_FILES[$attrCode]['tmpp_name'])) {
                $imageFile = @getimagesize($_FILES[$attrCode]['tmpp_name']);
                if ($imageFile === false) {
                    throw new \Magento\Framework\Exception\LocalizedException(
                        __('The avatar picture is not a valid image.')
                    );
                } else {
                    $valid_types = ['image/gif', 'image/jpeg', 'image/png'];
                    if (!in_array($imageFile['mime'], $valid_types)) {
                        throw new \Magento\Framework\Exception\LocalizedException(
                            __('The avatar picture is not a valid image.')
                        );
                    }
                }
            }
        }

        return parent::beforeSave($object);
    }
}
Step 4: Display the Attribute Field in the Customer Registration Form
First, you must decide where to place this customer attribute field on the customer registration form. To do it, create a view/frontend/layout/customer_account_create.xml file layout.
<?xml version="1.0"?>

<page xmlns:xsi="http://www.w3.org/2001/XMLSchema-instance" layout="1column" xsi:noNamespaceSchemaLocation="urn:magento:framework:View/Layout/etc/page_configuration.xsd">
    <body>
        <referenceBlock name="form.additional.info">
            <block class="Magezon\Avatar\Block\Avatar" name="magezon.customer.avatar"/>
        </referenceBlock>
    </body>
</page>
Also, create a file template named view/frontend/templates/avatar.phtml to determine how this attribute field will be displayed in the frontend.
<div class="field avatar required">
    <label for="avatar"
     class="label"><span><?= __('Avatar') ?></span></label>
     <div class="control">
        <label for="avatar" class="custom-file-upload">
            <?= __('Image Upload') ?>
        </label>
        <input type="file" id="avatar" name="avatar" class="validate-file" accept=".jpg, .jpeg, .png, .gif"/>
        <div class="file-uploader-preview">
            <a class="preview-link preview-image" target="_blank">
                <img id="img-avatar" alt="<?= __('Avatar') ?>" class="mgz-cusrattr-image-preview">
            </a>
        </div>
    </div>
</div>
<script type="text/javascript">
    require(['jquery'], function($) {
        $('#avatar').on('change', function() {
            if (this.files && this.files[0]) {
                var id = '#img-avatar';
                var img = document.querySelector(id);
                img.src = URL.createObjectURL(this.files[0]);
                img.href = URL.createObjectURL(this.files[0]);
                $('#img-avatar').attr('href', URL.createObjectURL(this.files[0]));
                img.alt = this.files[0].name;
                $(this).parent().children('.file-uploader-preview').addClass('mediaReview');
            }
        });
    })
</script>
<style>
	.file-uploader-preview {
	  display: none !important;
	}
	.mediaReview {
	  display: block !important;
	}
</style>
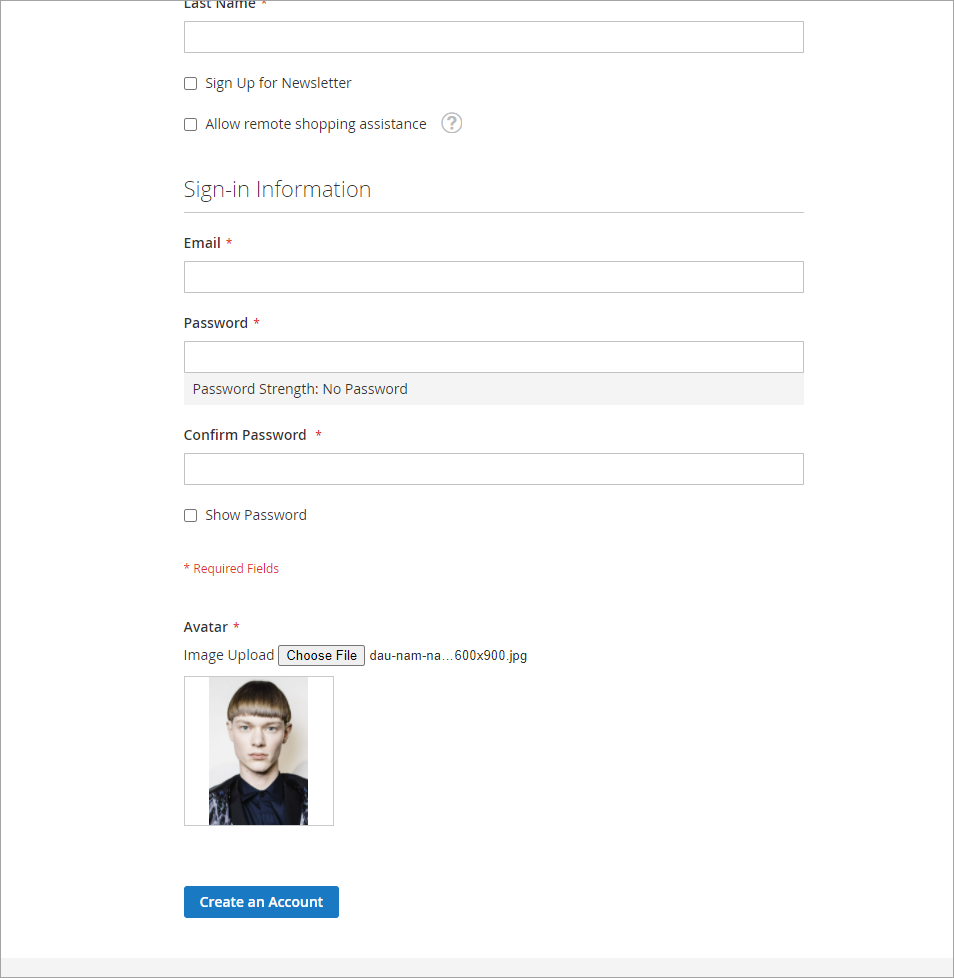
Now, it’s time to check the result:

That’s How to Create Customer Attribute 2 in Magento
Collecting important customer information is the key to your business’s success. Being a Magento 2 store owner wanting to understand customers, you need to know how to add custom attributes to the customer registration form in Magento 2 programmatically or using a third-party module like Magezon Advanced Customer Attributes. We hope you can now put it into practice. If you have any problems, don’t hesitate to reach us.
At Magezon, we also provide you with many other fast, well-coded, yet affordable extensions for your store optimization. Visit our website to opt for the necessary ones!

Optimize Your Magento Store With Powerful Extensions!
Looking for fast, efficient, and well-coded extensions to build or optimize your Magento stores for sales-boosting? Then visit the Magezon website and grab the necessary add-ons for yours today!
 Magezon Blog Help Merchants Build Comprehensive eCommerce Websites
