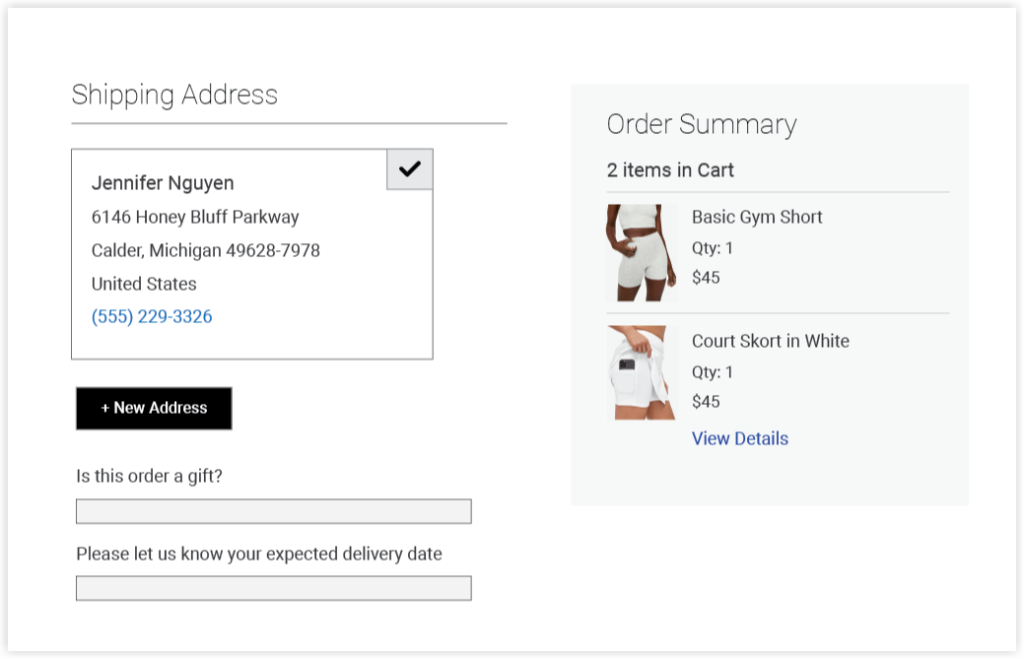
The default Magento checkout page is not informative enough. It doesn’t offer extra checkout fields for customers to let store owners know their additional order requirements. This often causes cart abandonment which is when customers drop out of the checkout process before completing their purchases. No worries. If you are not afraid of touching codes, read this blog to learn how to programmatically add custom fields to the checkout page in Magento 2. In other words, you will surely know how to add order attributes in Magento 2 programmatically.
| Note: If you want to save time and effort, it’s ideal to use the Advanced Magento 2 Order Attributes module that lets you add custom fields to various positions on the checkout page. It also provides you with other out-of-box features helping improve customers’ checkout experiences. |
No further, let’s get started.
Table of contents
- Step 1: Create a Module
- Step 2: Add the New Column Named delivery_date to Some Tables
- Step 3: Add This Order Attribute Field to the Checkout Page Using a Plugin
- Step 4. Save the Selected Value of the Delivery Date Field
- Step 5: Display the Attribute Value in the Sales Order Grid
- That’s How to Add Custom Field to the Checkout Page
Step 1: Create a Module
First of all, we’ll create the registration.php file as below:
- Module name: Deliverydate
- Vendor: Magezon
registration.php

<?php
use \Magento\Framework\Component\ComponentRegistrar;
ComponentRegistrar::register(ComponentRegistrar::MODULE, 'Magezon_Deliverydate', __DIR__);

etc\module.xml:

<?xml version="1.0"?>
<config xmlns:xsi="http://www.w3.org/2001/XMLSchema-instance" xsi:noNamespaceSchemaLocation="urn:magento:framework:Module/etc/module.xsd">
    <module name="Magezon_Deliverydate" setup_version="1.0.0">
        <sequence>
            <module name="Magento_Sales"/>
        </sequence>
    </module>
</config>
| You may also like: How to Add Custom Attributes to Customer Registration Form in Magento 2 Review Top 5+ Magento 2 Order Attributes Extensions to Add Checkout Fields |
Step 2: Add the New Column Named delivery_date to Some Tables
The next thing is to add a new column called delivery_date to the following tables:
- quote
- sales_order
- sales_order_grid
<?php
namespace Magezon\Deliverydate\Setup;
use Magento\Framework\Setup\InstallSchemaInterface;
use Magento\Framework\Setup\ModuleContextInterface;
use Magento\Framework\Setup\SchemaSetupInterface;

class InstallSchema implements InstallSchemaInterface
{
    public function install(SchemaSetupInterface $setup, ModuleContextInterface $context)
    {
        $installer = $setup;
        $installer->startSetup();

        $installer->getConnection()->addColumn(
            $installer->getTable('quote'),
            'delivery_date',
            [
                'type' => 'datetime',
                'nullable' => false,
                'comment' => 'Delivery Date',
            ]
        );

        $installer->getConnection()->addColumn(
            $installer->getTable('sales_order'),
            'delivery_date',
            [
                'type' => 'datetime',
                'nullable' => false,
                'comment' => 'Delivery Date',
            ]
        );

        $installer->getConnection()->addColumn(
            $installer->getTable('sales_order_grid'),
            'delivery_date',
            [
                'type' => 'datetime',
                'nullable' => false,
                'comment' => 'Delivery Date',
            ]
        );

        $setup->endSetup();
    }
}
In this example, we’ll create an order attribute field named Date. So, the field type should be DateTime. If you want to save the data type as a string, you can assign “text” to its input type.
Step 3: Add This Order Attribute Field to the Checkout Page Using a Plugin
etc\frontend\di.xml

<?xml version="1.0"?>
<config xmlns:xsi="http://www.w3.org/2001/XMLSchema-instance" xsi:noNamespaceSchemaLocation="urn:magento:framework:ObjectManager/etc/config.xsd">
    <type name="Magento\Checkout\Block\Checkout\LayoutProcessor">
        <plugin name="add_delivery_date_field"
                type="Magezon\Deliverydate\Plugin\Checkout\LayoutProcessorPlugin" sortOrder="10"/>
    </type>
</config>


Magezon\Deliverydate\Plugin\Checkout\LayoutProcessorPlugin.php:

<?php
namespace Magezon\Deliverydate\Plugin\Checkout;

class LayoutProcessorPlugin
{
    /**
     * @param \Magento\Checkout\Block\Checkout\LayoutProcessor $subject
     * @param array $jsLayout
     * @return array
     */
    public function afterProcess(
        \Magento\Checkout\Block\Checkout\LayoutProcessor $subject,
        array  $jsLayout
    ) {
        $jsLayout['components']['checkout']['children']['steps']['children']['shipping-step']['children']
        ['shippingAddress']['children']['before-form']['children']['delivery_date'] = [
            'component' => 'Magento_Ui/js/form/element/date',
            'config' => [
                'customScope' => 'shippingAddress',
                'template' => 'ui/form/field',
                'elementTmpl' => 'ui/form/element/date',
                'options' => [],
                'id' => 'delivery_date'
            ],
            'dataScope' => 'shippingAddress.delivery_date',
            'label' => __('Delivery Date'),
            'provider' => 'checkoutProvider',
            'visible' => true,
            'validation' => [],
            'sortOrder' => 200,
            'id' => 'delivery_date'
        ];


        return $jsLayout;
    }
}
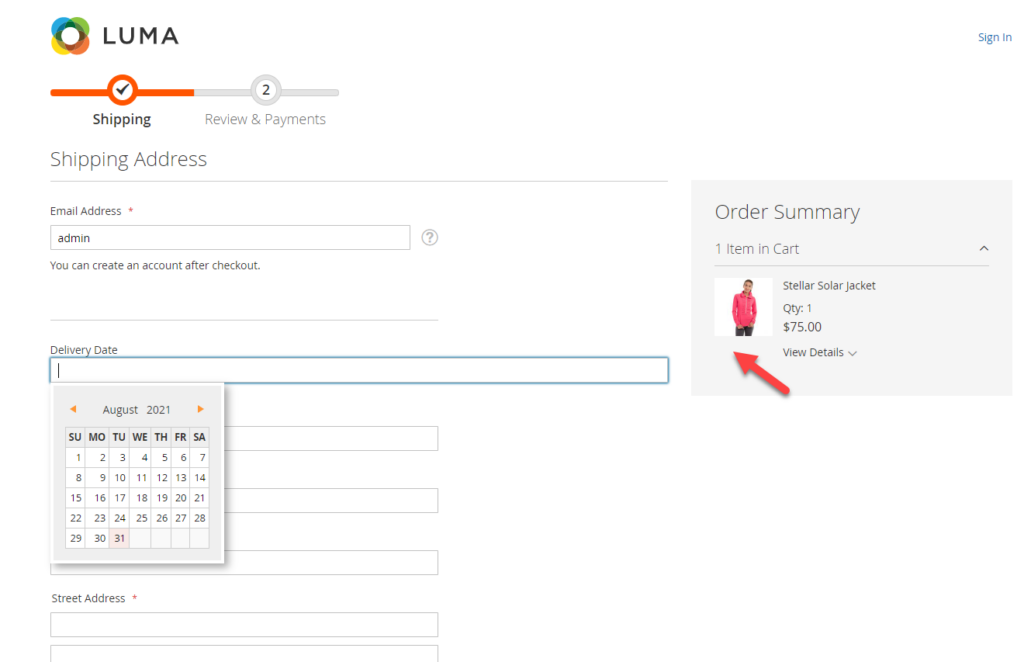
And let’s check how it looks in the frontend:

Then, selected values are selected or filled in after orders are submitted.
Step 4. Save the Selected Value of the Delivery Date Field
There are several ways to save the chosen attribute value. Our choice is to use Knockout JS as the simplest way.
First, override some .js files by adding them to the requirejs-config.js. Do the following:
var config = {
config: {
    mixins: {
        'Magento_Checkout/js/action/place-order': {
            'Magezon_Deliverydate/js/order/place-order-mixin': true
        },
    }
};
- For the place-order-mixin.js file, save the attribute value of the Delivery Date to the quote using Ajax.
define([
    'jquery',
    'mage/utils/wrapper',
    'Magento_CheckoutAgreements/js/model/agreements-assigner',
    'Magento_Checkout/js/model/quote',
    'Magento_Customer/js/model/customer',
    'Magento_Checkout/js/model/url-builder',
    'mage/url',
    'Magento_Checkout/js/model/error-processor',
    'uiRegistry'
], function (
    $,
    wrapper,
    agreementsAssigner,
    quote,
    customer,
    urlBuilder,
    urlFormatter,
    errorProcessor,
    registry
) {
    'use strict';

    return function (placeOrderAction) {

        /** Override default place order action and add agreement_ids to request */
        return wrapper.wrap(placeOrderAction, function (originalAction, paymentData, messageContainer) {
            agreementsAssigner(paymentData);
            var isCustomer = customer.isLoggedIn();
            var quoteId = quote.getQuoteId();

            var url = urlFormatter.build('mgzcustom/quote/save');

            var deliveryDate = $('[name="delivery_date"]').val();

            if (deliveryDate) {

                var payload = {
                    'cartId': quoteId,
                    'delivery_date': deliveryDate,
                    'is_customer': isCustomer
                };

                if (!payload.delivery_date) {
                    return true;
                }

                var result = true;

                $.ajax({
                    url: url,
                    data: payload,
                    dataType: 'text',
                    type: 'POST',
                }).done(
                    function (response) {
                        result = true;
                    }
                ).fail(
                    function (response) {
                        result = false;
                        errorProcessor.process(response);
                    }
                );
            }

            return originalAction(paymentData, messageContainer);
        });
    };
});
And create the Controller\Quote\Save.php file.
<?php

namespace Magezon\Deliverydate\Controller\Quote;

class Save extends \Magento\Framework\App\Action\Action
{
    protected $quoteIdMaskFactory;

    protected $quoteRepository;

    public function __construct(
        \Magento\Framework\App\Action\Context $context,
        \Magento\Quote\Model\QuoteIdMaskFactory $quoteIdMaskFactory,
        \Magento\Quote\Api\CartRepositoryInterface $quoteRepository
    ) {
        parent::__construct($context);
        $this->quoteRepository = $quoteRepository;
        $this->quoteIdMaskFactory = $quoteIdMaskFactory;
    }

    /**
     * @return \Magento\Framework\Controller\Result\Raw
     */
    public function execute()
    {
        $post = $this->getRequest()->getPostValue();
        if ($post) {
            $cartId       = $post['cartId'];
            $deliveryDate = $post['delivery_date'];
            $loggin       = $post['is_customer'];

            if ($loggin === 'false') {
                $cartId = $this->quoteIdMaskFactory->create()->load($cartId, 'masked_id')->getQuoteId();
            }

            $quote = $this->quoteRepository->getActive($cartId);
            if (!$quote->getItemsCount()) {
                throw new NoSuchEntityException(__('Cart %1 doesn\'t contain products', $cartId));
            }

            $quote->setData('delivery_date', $deliveryDate);
            $this->quoteRepository->save($quote);
        }
    }
}
Now we need to set up a router so that Ajax can send the data of the delivery date field to the controller. To do it, create a file etc/frontend/routes.xml.
<?xml version="1.0"?>
<config xmlns:xsi="http://www.w3.org/2001/XMLSchema-instance" xsi:noNamespaceSchemaLocation="urn:magento:framework:App/etc/routes.xsd">
    <router id="standard">
        <route id="mgzcustom" frontName="mgzcustom">
            <module name="Magezon_Deliverydate" />
        </route>
    </router>
</config>
Next, we’ll save the selected values of delivery_date to the sale_order.table. Default Magento offers an event sales_model_service_quote_submit_before, an action that is performed before orders are placed.
Now, it’s time to create the etc/events.xml file.
<?xml version="1.0"?>
<config xmlns:xsi="http://www.w3.org/2001/XMLSchema-instance" xsi:noNamespaceSchemaLocation="urn:magento:framework:Event/etc/events.xsd">
    <event name="sales_model_service_quote_submit_before">
        <observer name="save_delivery_date_to_order" instance="Magezon\Deliverydate\Observer\SaveToOrder" />
    </event>
</config>

Và file Observer\SaveToOrder.php
<?php
namespace Magezon\Deliverydate\Observer;
class SaveToOrder implements \Magento\Framework\Event\ObserverInterface
{
    public function execute(\Magento\Framework\Event\Observer $observer)
    {
        $event = $observer->getEvent();
        $quote = $event->getQuote();
    	$order = $event->getOrder();
           $order->setData('delivery_date', $quote->getData('delivery_date'));
    }
}
Step 5: Display the Attribute Value in the Sales Order Grid
To show the attribute value in the order grid, we’ll create the sales_order_grid.xml and then add an extra column called Delivery Date to the path: View\adminhtml\ui_component\sales_order_grid.xml.
<?xml version="1.0"?>
<listing xmlns:xsi="http://www.w3.org/2001/XMLSchema-instance" xsi:noNamespaceSchemaLocation="urn:magento:module:Magento_Ui:etc/ui_configuration.xsd">
    <columns name="sales_order_columns">
        <column name="delivery_date">
            <argument name="data" xsi:type="array">
                <item name="config" xsi:type="array">
                    <item name="visible" xsi:type="boolean">true</item>
                    <item name="label" xsi:type="string" translate="true">Delivery Date</item>
                    <item name="dateFormat" xsi:type="string">Y-MM-dd</item>
                    <item name="component" xsi:type="string">Magento_Ui/js/grid/columns/date</item>
                    <item name="dataType" xsi:type="string">date</item>
                </item>
            </argument>
        </column>
    </columns>
</listing>
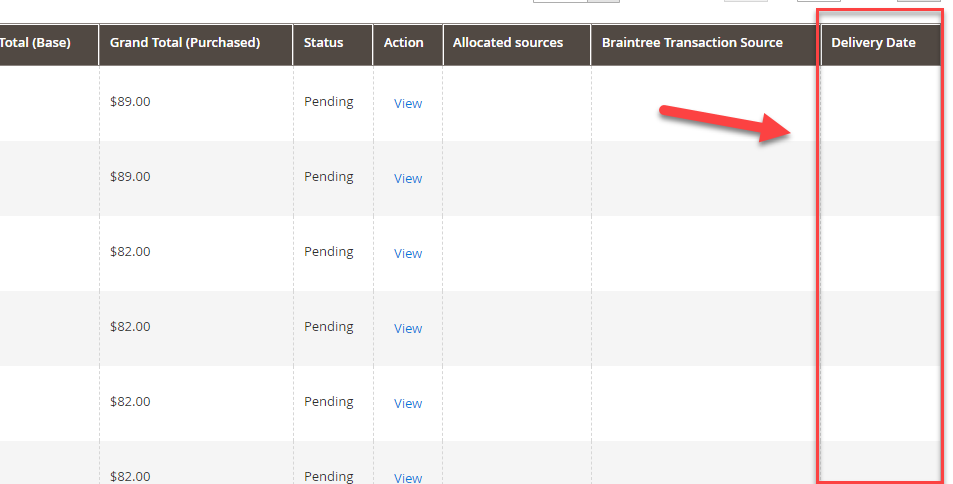
We now have a new column named Delivery Date, as in the image below. However, this column is blank because it can’t read the corresponding values. To solve it, we’ll change a little bit <column name=”delivery_date” class=”Magezon\DeliveryDate\Ui\Component\Listing\Column\DeliveryDate”> and create an additional file Ui\Component\Listing\Column\DeliveryDate.php.

Ui\Component\Listing\Column\DeliveryDate.php:
<?php
namespace Magezon\DeliveryDate\Ui\Component\Listing\Column;

use \Magento\Sales\Api\OrderRepositoryInterface;
use \Magento\Framework\View\Element\UiComponent\ContextInterface;
use \Magento\Framework\View\Element\UiComponentFactory;
use \Magento\Ui\Component\Listing\Columns\Column;
use \Magento\Framework\Api\SearchCriteriaBuilder;

class DeliveryDate extends Column
{
    protected $_orderRepository;
    protected $_searchCriteria;

    public function __construct(ContextInterface $context, UiComponentFactory $uiComponentFactory, OrderRepositoryInterface $orderRepository, SearchCriteriaBuilder $criteria, array $components = [], array $data = [])
    {
        $this->_orderRepository = $orderRepository;
        $this->_searchCriteria  = $criteria;
        parent::__construct($context, $uiComponentFactory, $components, $data);
    }

    public function prepareDataSource(array $dataSource)
    {
        if (isset($dataSource['data']['items'])) {
            foreach ($dataSource['data']['items'] as & $item) {

                $order  = $this->_orderRepository->get($item["entity_id"]);
                $date = $order->getData("delivery_date");
                $item[$this->getData('name')] = $date;
            }
        }

        return $dataSource;
    }
}
And let’s check the result.

That’s How to Add Custom Field to the Checkout Page
I hope this tutorial can help you to add a custom field to the shipping address in Magento. If you have any difficulties or it doesn’t work perfectly, don’t hesitate to leave a comment below. We are willing to support you. Follow Magento tutorials to learn more about Magento.
At Magezon, we also provide you with many other fast, well-coded, yet affordable extensions for your store optimization. Visit our website to opt for the necessary ones!

Optimize Your Magento Store With Powerful Extensions!
Looking for fast, efficient, and well-coded extensions to build or optimize your Magento stores for sales-boosting? Then visit the Magezon website and grab the necessary add-ons for yours today!
 Magezon Blog Help Merchants Build Comprehensive eCommerce Websites
