 Magezon Blog Help Merchants Build Comprehensive eCommerce Websites


Magento 2 Pagination is the control of Magento 2 Product Listing. Before starting to configure Magento 2 Pagination, we will explore what it is and what it contains.
Table of contents
What Is Pagination in Magento 2?
Pagination is a numbering system of pages, usually appearing at the site’s top or bottom. Pagination improves user experience, helping users seek products or content more intelligently and faster. However, imagine an eCommerce website containing hundreds of products placed on a single page. It will confuse users with a bunch of different content.
On the Magento 2 frontend, whenever a product list has many products more than the allowance, the pagination block is about to display. There are 4 Pagination Controls in Magento 2:
- View as: the option allows users to choose between Listing format or Grid format
- Sort By: the option will enable users to sort the products by attributes
- Show Per Page: this option will enable users to select the maximum number of products shown per page.
- Pagination Links: this option numbers the pages and navigates users to other pages.
How to Configure Pagination in Magento 2
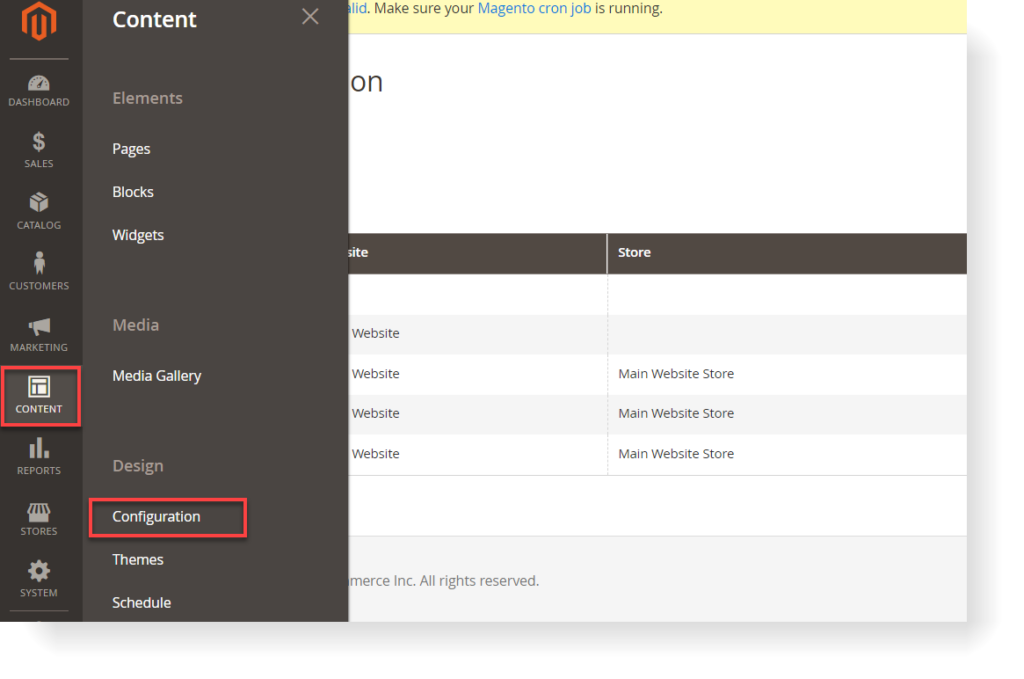
Step 1: Go to Content > Design > Configuration.
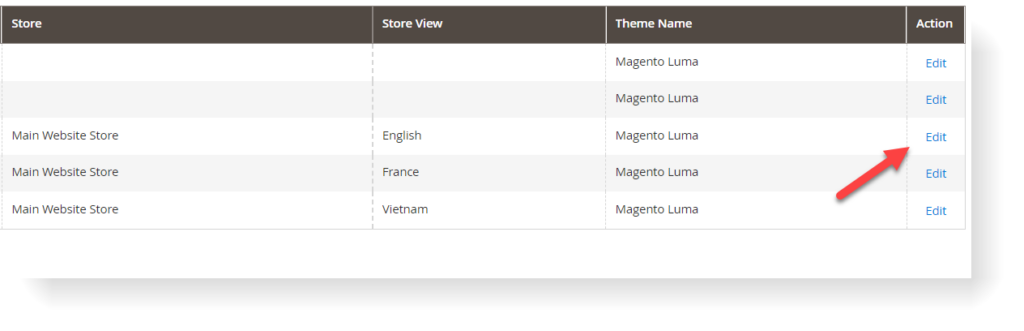
Step 2: Select the store view you want to configure and choose Edit in the Action column.
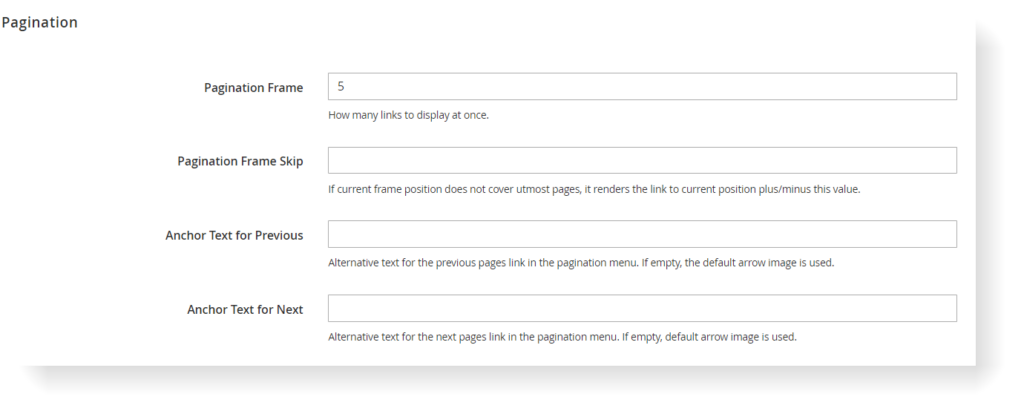
Step 3: Expand the Pagination section, and do some settings:
| You may also concern: Magento 2 Layered Navigation: Detailed Guide Magento 2 Breadcrumbs: How to Show/Remove, Custom & Add Breadcrumbs XML |
- Pagination Frame: This option is the number of links (pages) that you want to display in the pagination block.
- Pagination Frame Skip: This option is the number of links you want to jump ahead when navigating to the next page. For example, if you’re going to navigate to the next page, enter the number 1. Suppose you want to skip ahead from page number 1 to number 4, enter the number 4.
- Anchor Text for Previous: Enter the text you want to display for the Previous button. Leave it blank if you’re going to use the default.
- Anchor Text for Next: Enter the text you want to display for the Next button. Leave it blank if you’re going to use the default.

Optimize Your Magento Store With Powerful Extensions!
Looking for fast, efficient, and well-coded extensions to build or optimize your Magento stores for sales-boosting? Then visit the Magezon website and grab the necessary add-ons for yours today!
How to Add Pagination in Custom Module
If your website has some customized pages, you must add pagination in the custom module.
Step 1: Create controller file Index.php at app/code/Dolphin/CustomModule/Controller/Index and add the below code.
<?php

namespace Dolphin\CustomModule\Controller\Index;

use Magento\Framework\App\Action\Action;
use Magento\Framework\Controller\ResultFactory;

class Index extends \Magento\Framework\App\Action\Action
{
    protected $resultPageFactory;

    public function __construct(
        \Magento\Framework\App\Action\Context $context,
        \Magento\Framework\View\Result\PageFactory $resultPageFactory
    ) {
        $this->resultPageFactory = $resultPageFactory;
        parent::__construct($context);
    }

    public function execute()
    {
        $resultRedirect = $this->resultFactory->create(ResultFactory::TYPE_REDIRECT);
        $resultPage = $this->resultPageFactory->create();
        $resultPage->getConfig()->getTitle()->set(__('Custom Pagination'));
        return $resultPage;
    }
}
Step 2: Create block file Pager.php at app/code/Dolphin/CustomModule/Block and add the below code.
<?php

namespace Dolphin\CustomModule\Block;

use Magento\Framework\View\Element\Template;

class Pager extends Template
{
    protected $customFactory;
    protected $customdataCollection;

    public function __construct(
        Template\Context $context,
        \Dolphin\CustomModule\Model\CustomData $customFactory, // Add your custom Model
        \Dolphin\CustomModule\Model\ResourceModel\CustomData\CollectionFactory $customdataCollection, // Add your custom Model
        array $data = []
    ) {
        parent::__construct($context, $data);
        $this->customFactory = $customFactory;
        $this->customdataCollection = $customdataCollection;
    }
    protected function _prepareLayout()
    {
        $this->pageConfig->getTitle()->set(__('My Custom Pagination'));
        parent::_prepareLayout();
        $page_size = $this->getPagerCount();
        $page_data = $this->getCustomData();
        if ($this->getCustomData()) {
            $pager = $this->getLayout()->createBlock(
                \Magento\Theme\Block\Html\Pager::class,
                'custom.pager.name'
            )
                ->setAvailableLimit($page_size)
                ->setShowPerPage(true)
                ->setCollection($page_data);
            $this->setChild('pager', $pager);
            $this->getCustomData()->load();
        }
        return $this;
    }
    public function getPagerHtml()
    {
        return $this->getChildHtml('pager');
    }

    public function getCustomData()
    {
        // get param values
        $page = ($this->getRequest()->getParam('p')) ? $this->getRequest()->getParam('p') : 1;
        $pageSize = ($this->getRequest()->getParam('limit')) ? $this->getRequest()->getParam('limit') : 5; // set minimum records
        // get custom collection
        $collection = $this->customFactory->getCollection();
        $collection->setPageSize($pageSize);
        $collection->setCurPage($page);
        return $collection;
    }

    public function getPagerCount()
    {
        // get collection
        $minimum_show = 5; // set minimum records
        $page_array = [];
        $list_data = $this->customdataCollection->create();
        $list_count = ceil(count($list_data->getData()));
        $show_count = $minimum_show + 1;
        if (count($list_data->getData()) >= $show_count) {
            $list_count = $list_count / $minimum_show;
            $page_nu = $total = $minimum_show;
            $page_array[$minimum_show] = $minimum_show;
            for ($x = 0; $x <= $list_count; $x++) {
                $total = $total + $page_nu;
                $page_array[$total] = $total;
            }
        } else {
            $page_array[$minimum_show] = $minimum_show;
            $minimum_show = $minimum_show + $minimum_show;
            $page_array[$minimum_show] = $minimum_show;
        }
        return $page_array;
    }
}
Here _prepareLayout() method is called immediately after a block has been added to the layout for the first time and sets custom pagination with data. We added dynamic pagination count using getPagerCount() method. In this method, we set a minimum record count of 5. You can also change this record count.
Step 3: Create template file pager.phtml at app/code/Dolphin/CustomModule/view/frontend/templates and add the below code.
<?php
// get custom data
$custom_data = $block->getCustomData();
?>
<fieldset class="fieldset">
    <?php
    if (count($custom_data)) {
        ?>
        <div class="table-wrapper custom-data ">
            <table class="data table table-data-items ">
                <caption class="table-caption"><?= $block->escapeHtml('Custom Pagination') ?></caption>
                <thead>
                    <tr>
                        <th scope="col" class="col name"><?= $block->escapeHtml('Name') ?></th>
                        <th scope="col" class="col orders"><?= $block->escapeHtml('Orders') ?></th>
                        <th scope="col" class="col orderitem"><?= $block->escapeHtml('Items') ?></th>
                    </tr>
                </thead>
                <tbody>
                <?php foreach ($custom_data as $item): ?>
                    <tr>
                        <td data-th="Name" class="col name">
                     	<span><?= $block->escapeHtml($item->getName()) ?></span>
                        </td>
                        <td data-th="Orders" class="col orders">
                            <span><?= $block->escapeHtml($item->getOrders()) ?></span>
                        </td>
                        <td data-th="Items" class="col orderitem">
                            <span><?= $block->escapeHtml($item->getOrderItem()) ?></span>
                        </td>
                    </tr>
                <?php endforeach; ?>
                </tbody>
            </table>
        </div>
        <?php if ($block->getPagerHtml()): ?>
                <div class="order-products-toolbar toolbar bottom">
                    <?= $block->getPagerHtml() ?>
                </div>
        <?php endif ?>
    <?php } else { ?>
                <div class="message info empty">
                    <span><?= $block->escapeHtml('You have no data in table.') ?></span>
                </div>
    <?php  } ?>
</fieldset>
Here below code is responsible for showing custom pagination.
<?php if ($block->getPagerHtml()): ?>
        <div class="order-products-toolbar toolbar bottom">
            <?= $block->getPagerHtml() ?>
        </div>
<?php endif ?>
Step 4: Create layout file frontroutename_index_index.phtml at app/code/Dolphin/CustomModule/view/frontend/layout and add the below code.
<?xml version="1.0"?>

<page xmlns:xsi="http://www.w3.org/2001/XMLSchema-instance" xsi:noNamespaceSchemaLocation="../../../../../../../lib/internal/Magento/Framework/View/Layout/etc/page_configuration.xsd">
<update handle="customer_account"/>
<body>
<referenceContainer name="content">
<block class="Dolphin\CustomModule\Block\Pager"
   name="your_block_name"
   template="Dolphin_CustomModule::pager.phtml"
   cacheable="false"
   />
</referenceContainer>
</body>
</page>
In this file, the name must be like this frontroutename_controllername_actionfilename.xml
Step 5: Run Magento upgrade and flush the cache command.
bin/magento setup:upgrade
bin/magento c:f
Step 6: Run the URL below:
http://<yourhostname.com>/frontroutename/index/indexConclusion
Here is the essential guide to Magento 2 Pagination for beginners. I hope that it will help you in the first steps of approaching Magento 2. If you have any questions about Magento, feel free to leave a comment below. We also have a Magento 2 Tutorial Series for newbies. Explore it to learn more about Magento 2.
At Magezon, we also provide you with many fast, well-coded, yet affordable extensions for your store optimization. Visit our website to opt for the necessary ones!
Optimize Your Magento Store With Powerful Extensions!
Looking for fast, efficient, and well-coded extensions to build or optimize your Magento stores for sales-boosting? Then visit the Magezon website and grab the necessary add-ons for yours today!
