 Magezon Blog Help Merchants Build Comprehensive eCommerce Websites


In a highly competitive digital landscape, online shopping is no longer something strange to today’s consumers. With this massive growth, e-commerce platforms have to innovate their features, including multi-currency, to meet – or even exceed the customer’s demand. The multi-currency feature is considered an integral piece of international Magento 2 stores in particular and e-commerce based stores in general.
So why does a global online store need multi-currency? How to setup multi-currency in Magento 2? Let’s dive into it right away!
Table of contents
Why an Online Store Needs a Multi-Currency Feature?
Do you own an international online store? Or are you having global expansion strategies for your store in the near future? If the answer is yes, it’s crucial to know the range of benefits when using a multi-currency platform.
1. Enhance Customer’s Shopping Experience
Customer satisfaction is always the ultimate goal of businesses. Shopping online with customer’s currencies makes them find comfort. Because they will see your product price and settle orders without having to convert from foreign to local currency. As a result, it can save a great deal of time.
2. Display a Consistent Price
Your website may let third parties calculate product prices from foreign to local money. But this method can not avoid an unrounded number. Consequently, it affects the user experience. Furthermore, the exchange rate is constantly moving every day. Your customers may get confused when they see the product price varied depending on the exchange rate. That means an international online store needs a stable price for its foreign store views.
3. Increase Your Cross-Border Sales
A multinational online store needs not only domestic sales but also international customers. Therefore, it must be flexible in transaction and payment methods. Multi-currency helps you gain more happy overseas customers and turn them into your loyal ones. In this way, it’s easy to upscale your store’s conversion rate, especially in the cross-border segment.
4. Localize Your Store Views
Going globally, store owners will display appropriate languages for different store views. Why not apply this strategy to currency? That is to say, localizing payment helps store owners build a store view as if it’s created just for a specific area of this world.

Optimize Your Magento Store With Powerful Extensions
Looking for fast, efficient and well-coded extensions to build or optimize your Magento stores for sales boosting? Then visit Magezon website and grab necessary add-ons for yours today!
How to Setup Multi-Currency in Magento 2
Step 1: Define Your Accepted Currency
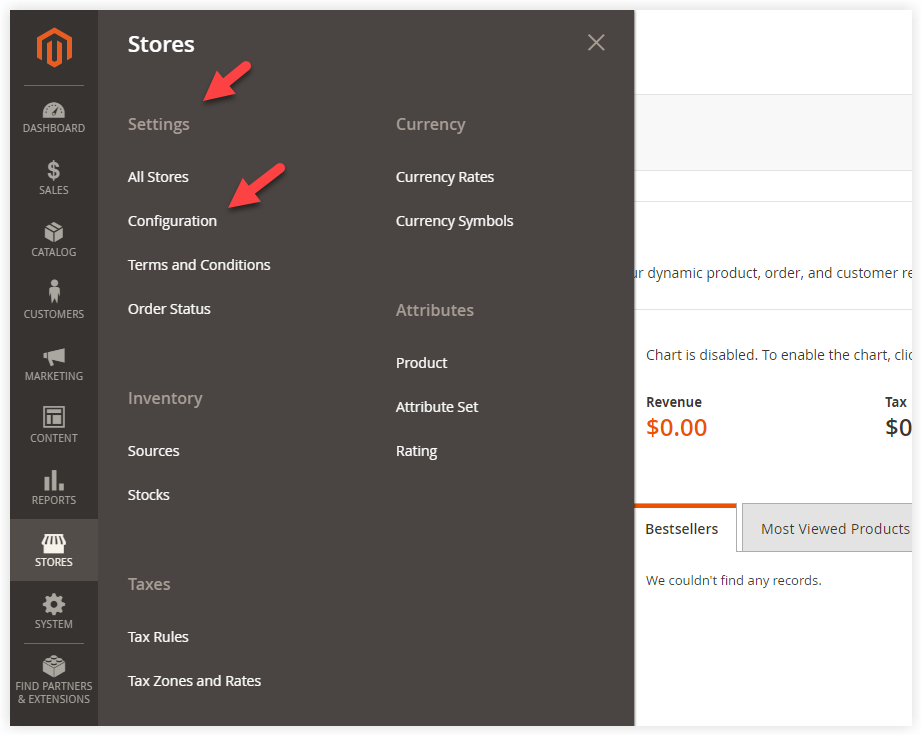
- Firstly, navigate to Stores > Settings > Configuration:
2. Secondly, in the upper left corner, select a store view that you want these settings to apply to:
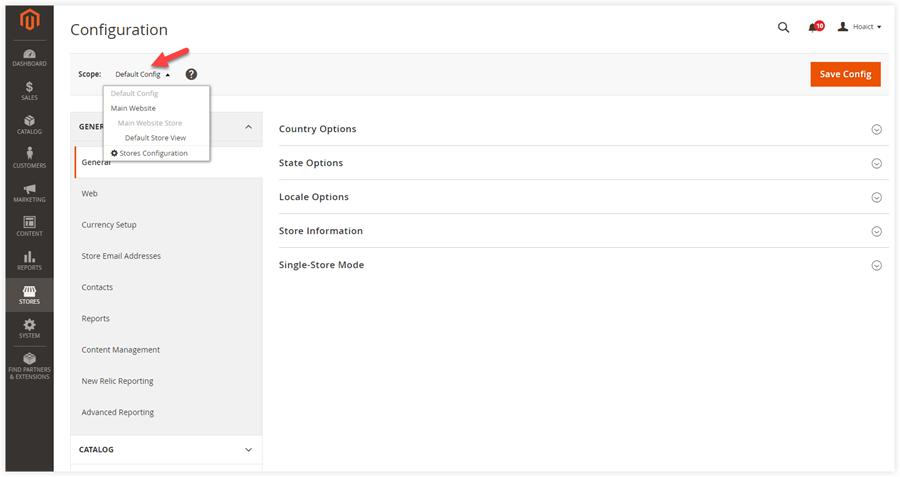
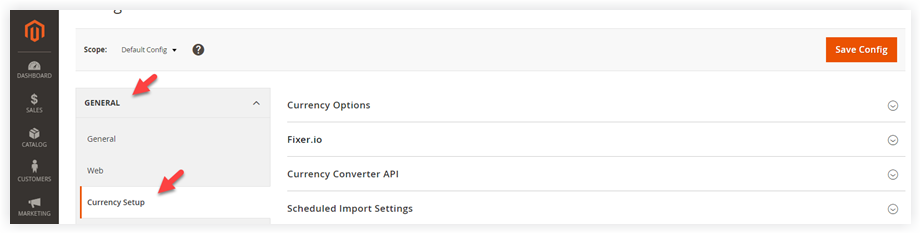
3. Look at the left panel, navigate to General > Currency Setup:
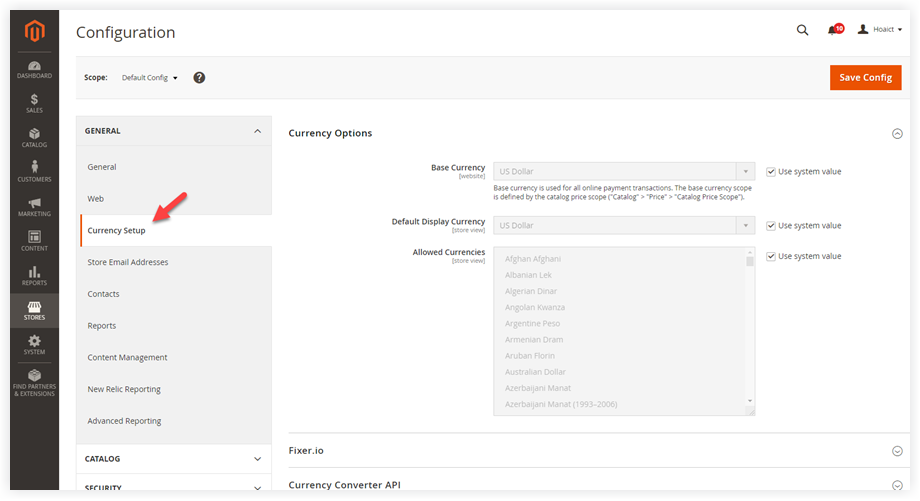
4. After that, follow the Currency Options instructions as below:
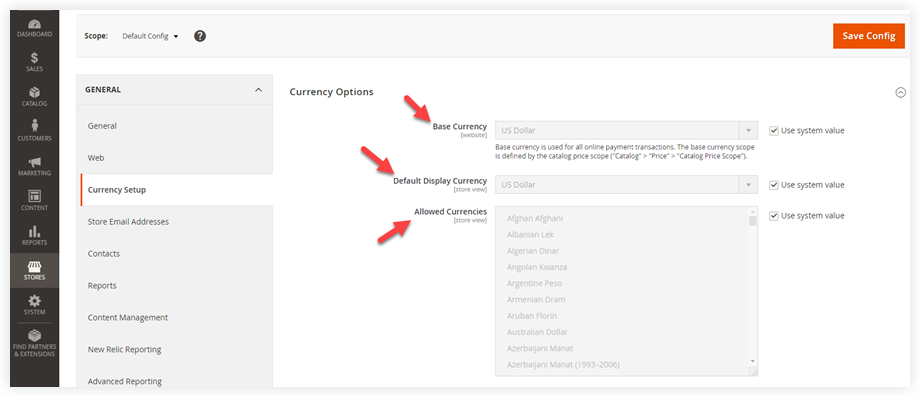
Please untick the checkmark Use system value before making changes.
- Base Currency: Choose the base currency for your online transaction.
- Default Display Currency: This is the currency displayed for your store’s product prices.
- Allowed Currency: You can choose more than one currency in this field. They are the list of currency your store will accept for transactions. Be sure you also select the primary currency.
After these settings, the system will ask you to refresh the cache. Just ignore it by clicking the X symbol. We’ll refresh the cache later.
5. Next, in the left panel, open Catalog > Catalog, then expand the Price section:

Choose either Global or Website in the Catalog Price Scope field. Shortly speaking, catalog Price Scope determines the base currency for your product price applied for a global or website level. If you set the Price Scope to “Global,” your product price will be the same throughout the store hierarchy. If the option is “Website,” the product price can be varied depending on which store it is located. As you can see in the image, the default value of this field is “Global.”
Step 2: Setup the Import Connection
- In the left panel, go back to General > Currency Setup:
2. There are two currency service connections: Fixer.io and Currency Converter API.
a. If you want to connect Fixer.io:
In case you may not know, Fixer.io is an API created for foreign exchange rates. It supports around 170 currencies, and the data is updated every 60 seconds.
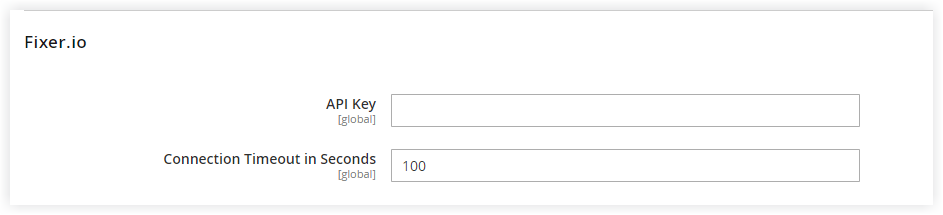
- Span Fixer.io section.
- API Key: Enter your API key in this field.
- Connection Timeout in Seconds: Setup the accepted inactivity seconds before the connection timeouts.
b. If you want to connect Currency Converter API:
Currency Converter API is a JSON API offering free currency conversion services for web developers worldwide. The forex rate is updated every 60 minutes, and it may be faster if you use premium service.
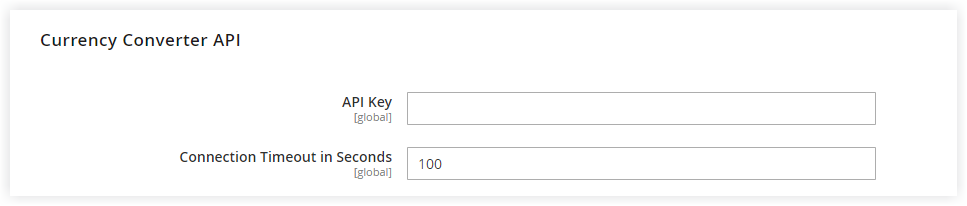
- Span the Currency Converter API section.
- API Key: Enter your currency converter API key.
Connection Timeout in Seconds: Setup the accepted inactivity seconds before the connection timeouts.
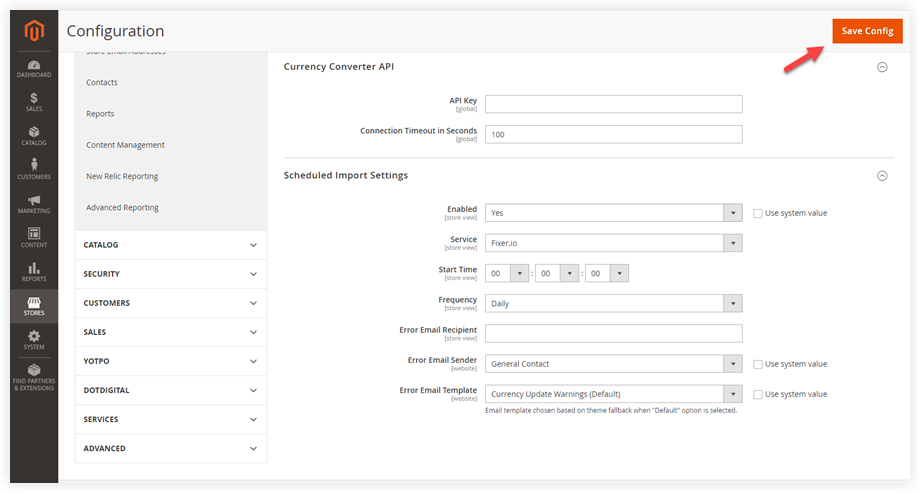
Step 3: Setup the Scheduled Import Settings
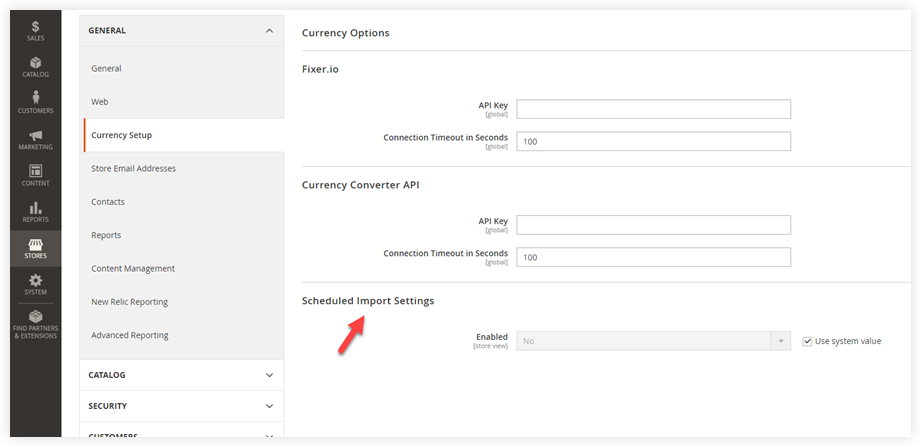
Scroll down to the Scheduled Import Settings. This section is to schedule the automatic update of the currency rate.
Please untick the checkmark Use system value.
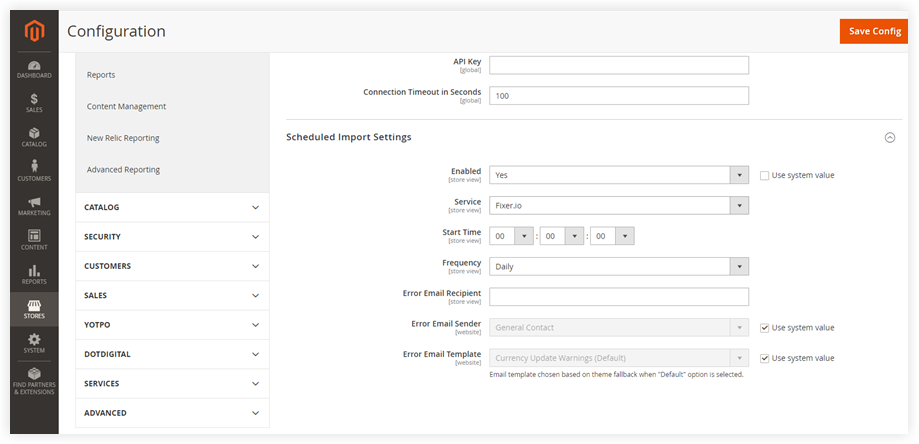
- Enabled: Choose Yes.
- Service: The default option is Fixer.io. You can choose the other rate provider as your desired.
- Start Time: Define the hour, minute, and second when the rate will be updated.
- Frequency: You can decide how often you want to update the rate by daily, weekly, and monthly options.
- Error Email Recipient: Enter an email address that will receive messages if an error occurs. If you want to apply multiple recipients in this field, separate each email address by a comma.
- Error Email Sender: Choose any of the available store contacts that will be the sender of the error message.
- Error Email Template: Choose an available email template for the error message.
After these settings, click Save Config.
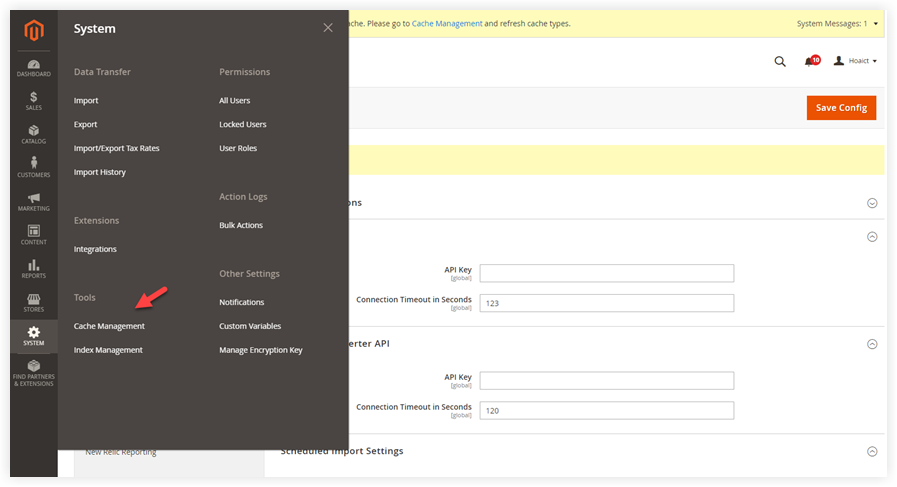
Step 4: Refresh the Cache
Go to System > Cache Management:
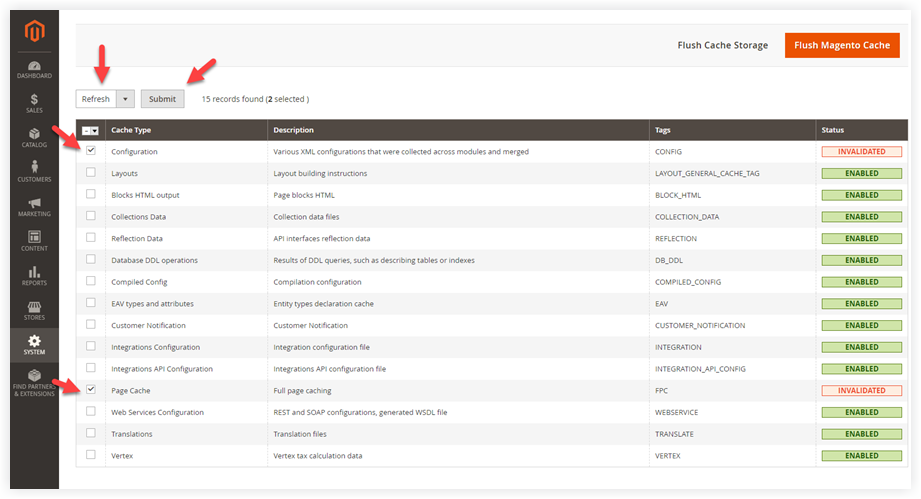
Tick Configuration and Page Cache. Be sure the action is Refresh and click Submit:
Watch this video to know how to set up multi-currency in details.
Final Words
So, you have done the multicurrency settings in Magento 2. Find the blog helpful? Let me know in the comment field. If you want more Magento tutorials like this, don’t forget to subscribe to our newsletter.
At Magezon, we also provide you with many fast, well-coded yet affordable extensions for your store optimization. Visit our website to opt for necessary ones!
Optimize Your Magento Store With Powerful Extensions
Looking for fast, efficient and well-coded extensions to build or optimize your Magento stores for sales boosting? Then visit Magezon website and grab necessary add-ons for yours today!
