 Magezon Blog Help Merchants Build Comprehensive eCommerce Websites

Being one of 6 product types in Magento 2, virtual products are non-tangible products that can’t be shipped or downloadable. For example, warranties, membership, or services are virtual products. You can sell these products individually or combine them with other product types to create a grouped or bundled product. Virtual products are like simple products, but they have no weight, hence no shipping options at the checkout.
In this blog, we will walk you through 6 steps to create a Magento 2 virtual product.

Table of contents
Step 1: Select the Product Type
First, you must select the type “Virtual Product” for the product.
From the admin sidebar, navigate to Catalog. Then, click Products.

Then, choose Virtual Product as the product type from the orange drop-down list Add Product:

Step 2: Assign an Attribute Set to the Virtual Product
Choose the attribute set that features typical attributes of this product.

Step 3: Complete Required Fields
- Product Name: Enter the name of the product.
- SKU: If you don’t fill in this field, the system will automatically update the product SKU based on the product name. Or, you can change this default SKU if needed.
- Price: Enter the price of the product.
If you want to give customers a special price on this product, click on Advanced Pricing for settings. Then, read Magento 2 Advanced Pricing Explained to know how to configure it.

Enable Product makes the product visible on your site. If you create the product or make changes, set Enable Product to No. If you have finished all settings and get ready to publish the product, toggle Enable Product to Yes.
Click Save to save and continue editing. After that, the product name appears. And the scope – All Store Views also shows up, which allows you to choose the scope where the product will be available.


Optimize Your Magento Store With Powerful Extensions!
Looking for fast, efficient, and well-coded extensions to boost sales for your Magento stores? Then visit the Magezon website and grab the necessary add-ons to optimize yours today!
Step 4: Fill in the Optional Fields (If Needed)

- Tax Class: Select Taxable Goods if you want to apply the tax to this virtual product. And None if you don’t.
- Quantity: Enter the quantity of the product.
- Stock: Set In Stock if the product is available.
- Weight: This product type is non-tangible so it has no weight. By default, the Weight field is disabled, and this item has no weight.
- Categories: Select the category that the product belongs to. If you can’t find the right one for the product from the existing categories, create a new one by clicking on the New Category button.
- Visibility: Choose where customers can find or see the product. There are 4 options for you to take.

- Catalog: With this option, customers can see the product on the catalog listing page but can’t find it on the search results page.
- Search: The product will appear on the search results page but not the Catalog listings page.
- Catalog, Search: This option lets the product appear on these two pages.
- Not Visible Individually: If this virtual product is a part of other products, such as bundle products or grouped products, your customers can’t find this product on the two pages above but can see it on the page of a bundle or grouped products.
6. Set Product as New From…To: Set the product as the new one within a specific date range. This product will be listed in the New Product list on the Homepage.
Step 5: Complete Other Product Details
Please refer to Step 5 of the blog “How to Create a Magento 2 Simple Product.” to complete the following section:

- Content
- Images and Videos
- Search Engine Optimization
- Related Products, Up-Sells, and Cross-Sells
- Customizable Options
- Products in Websites
- Product Salable Quantity
- Design
- Schedule Design Update
- Gift Options
The Downloadable section is used for the downloadable product. The Configurable section is for the configurable product. So, you can skip these two sections for this Magento 2 virtual product.
Step 6: Publish the Product
After completing the product, you can publish the product by a toggle on Enable Product.
You can choose 3 ways to save the product, depending on what you will do next after saving.

- Choose Save & New if you want to continue creating a new product after saving.
- Take Save & Duplicate option if you want to create a similar product after saving.
- Select Save & Close to save the product and go back to the product grid.
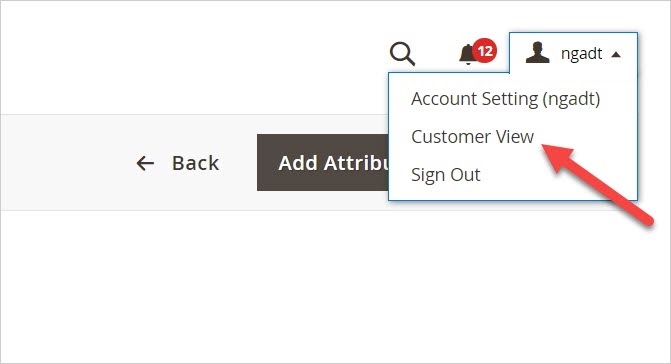
Click View Customers on the drop-down list menu to check the newly-created product in the front end.
That’s How to Create a Virtual Product in Magento 2
You have now fully grasped how to create a Magento 2 virtual product for your Magento 2 site. Follow our Magento tutorial to learn to build your robust Magento stores
Visit the Magezon store to own the desired extension at an affordable price.
Optimize Your Magento Store With Powerful Extensions!
Looking for fast, efficient, and well-coded extensions to boost sales for your Magento stores? Then visit the Magezon website and grab the necessary add-ons to optimize yours today!
