 Magezon Blog Help Merchants Build Comprehensive eCommerce Websites


In the blog post “6 Product Types In Magento 2: A Simple, Clear Explanation”, we explained what Magento 2 bundle product is, along with its example. As its continuation, this blog will walk you through 7 steps to create a Magento 2 bundle product.
Before moving on to the main part, please note that:
- Each item in a bundle can be created by simple products, virtual products, or both.
- Minimum Advertised Price (MAP) of the bundle products is disabled because the price of this product type isn’t fixed, varying depending on the items customers select (Price range or As low as).
You may also like: Magento 2 Advanced Pricing Explained
 of the bundle products is disabled")
Okay, that’s it. Let’s begin.
Table of contents
- Step 1: Select the Product Type
- Step 2: Select an Attribute Set
- Step 3: Fill in the Required Information
- Step 4: Complete the Optional Settings
- Step 5: Add the Child Item to the Bundle
- Step 6: Complete the Product Information
- Step 7: Publish the Bundle Product
- Let’s Create Your Bundle Product in Magento 2
Step 1: Select the Product Type
- From the sidebar, navigate to Catalog → Products.

- On the drop-down menu, select Bundle Product.

| Keep reading to build your comprehensive catalog: Magento Grouped Product vs Bundle Product: Key Differences Create Magento Grouped Product In 10 Minutes With This Easy Guide How to Create Configurable Product In Magento |
Step 2: Select an Attribute Set
- From the drop-down menu of the Attribute Set, select the attribute set that describes the product’s characteristics. Or type its name in the Search box.
In this case, we choose Gear.

- After choosing Gear as the product’s attribute set, all attributes in this set will immediately appear on the current page.

Step 3: Fill in the Required Information
- Product Name: Give the product a name
- SKU: Enter the SKU. Or use the SKU that is based on the product name.
- Dynamic SKU allows you to add the SKU of child products to the default SKU of the bundle product. In this case, the SKU of child products will be a suffix of this bundle item. Thanks to it, you can do a quick check on the product ordered. Also, this is valuable data for analysis.

- When you set Dynamic SKU to Yes, here is how the Magento dynamic SKU looks on the order details page:


- If No is your choice, the SKU of the bundle product will remain unchanged.

- Dynamic Price: If you set Dynamic Price to Yes, the bundle price is calculated by the total price of all child products a customer orders. If you toggle Dynamic Price to No, you can offer customers a fixed price.
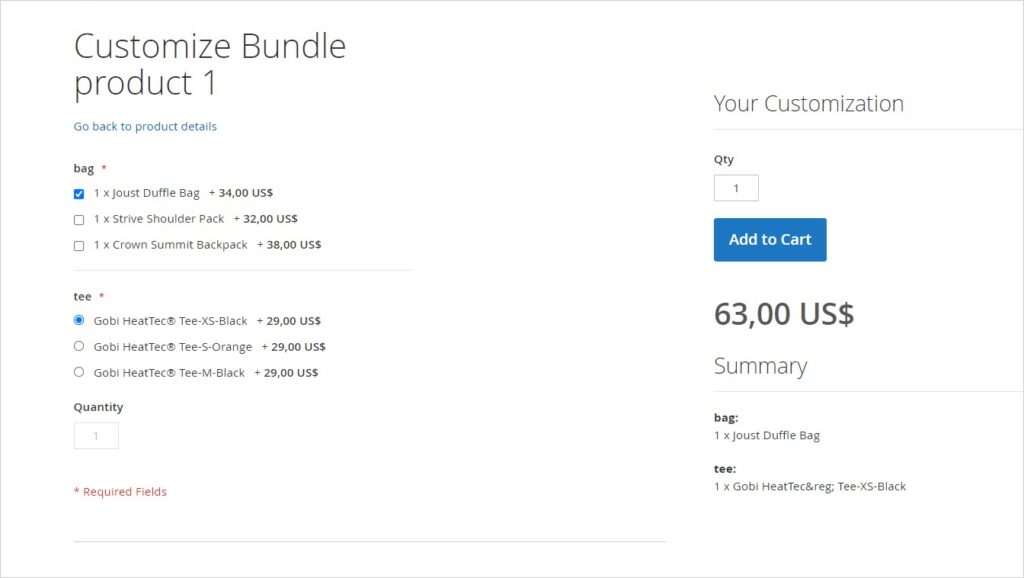
For example, Joust Duffle Bag & Gobi Heat Tec-S-Orange are two child products of the bundle product “Bundle Product 1”. The price of the Joust Duffle Bag is $34.00. The Gobi Heat Tec-S-Orange’s is $29. Therefore, when you enable Dynamic Price, the price customers have to pay is the total price, $63.

The price of the bundle depends on the child products a customer selects. So, you can’t determine a fixed price for it. That’s why you need to set Price View as Price Range (From…to) or As Low As (The possibly lowest price). To do it, click on Advanced Pricing under the Price field.

After completing the required fields, set Enable Product to No because we haven’t finished the product.

Click Save and continue to edit. After that, the product name and Scope appear. Next, choose the place in which the product is available.


Optimize Your Magento Store With Powerful Extensions
Looking for fast, efficient and well-coded extensions to boost sales for your Magento stores? Then visit Magezon website and grab necessary add-ons to optimize yours today!
Step 4: Complete the Optional Settings
- Tax Class: Enables you to apply the tax to the product. If the bundle product price is fixed, you can select the following options for the product: None or Taxable.
- If the bundle price is dynamic (set Dynamic Price to Yes), the tax will be calculated by each child item in the bundle. This case, its Tax Class field will be disabled.

6. Quantity: You can’t fill in this field because it is determined by the quantity of every child in the bundle.

7. Stock Status: The availability of the bundle product depends on the availability of each child’s stock. So, you can skip this field which is set In Stock by default.
8. Weight: To determine the product’s weight, you need to start with Dynamic Weight.
- If you set Dynamic Weight to Yes, the bundle weight is determined by the total weight of all the child products a customer selects. So, the Weight field is now unavailable to fill in.
- If toggle Dynamic Weight to No, you can set a fixed weight for the weight of the bundle product.

9. Categories: Choose the categories you want to assign the product to. Or type its name in the Search box for a quick search. To create a New Category, click on the black New Category button.

10. Visibility: Enables you to decide the position to display the products. Here are four options:

- Not Visible Individually: Hide the bundle product from both the catalog and search result page.
- Catalog: Show the product on the catalog page.
- Search: Show the product on the search results page.
- Catalog, Search: Allows the product to appear on both the catalog and search results pages.
11. Set Product as New From…To: With this option, you can mark the product as New in the Product New List of the Home Page.
12. Country of Manufacture: Select the manufacturing country.
Step 5: Add the Child Item to the Bundle
Now take a closer look at the Bundle Items section.
- In the Ship Bundle Items:
- Select Together if you want to deliver all selected child items together.
- Choose Separately if you want to ship items separately.

- To add the child items to the bundle, click Add Options first.

Then, a table appears like below:

Now, to add child products to the bundle, do the following steps:
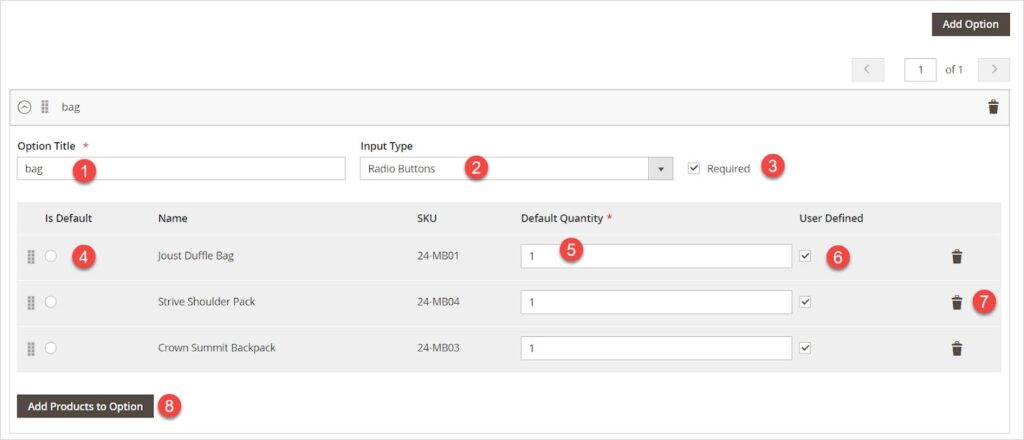
(1) Enter the title of the option that includes the related child products.
(2) Select the following input types that demonstrate information in the selection forms: Drop-down, Radio Button, Checkbox and Multiple Select.
(3) Tick the checkbox Required if you want customers to select the option.
(4) In the Is Default, choose the item as the pre-selected option in the front-end.
(5) In the Default Quantity, enter the default quantity of each child product.
(6) Tick the User Defined to let your customers enter their desired quantity of each child product. If you don’t select User Defined, customers can’t change the quantity of the item in the bundle.
NOTE: When the input type is Checkbox or Multiple Select that enables customers
to choose MORE THAN ONE, the User Define column will NOT be shown.
(7) To remove the options and their selections, click on the trash bin icon.
(8) If you need to add products to the option above, click on Add Products to Option.
Let’s check the front-end to know each component exactly:

Also, you can change the order of the child items by dragging and dropping the icon like below:

After finished, close each option to have a better view of the workspace.

And click Save when done.
Step 6: Complete the Product Information
Complete the following section if needed. In addition, please read Step 5 of the blog post “How to Create a Magento 2 Simple Product – The Ultimate Guide.”
- Content
- Images and Videos
- Search Engine Optimization
- Related Products, Up-Sells, and Cross-Sells
- Customisable Options
- Products in Websites
- Design
- Gift Options
Step 7: Publish the Bundle Product
- If everything is okay, toggle Enable Product to Yes to publish the product.

- Then Save.
- To check the newly-created product in the frontend, select Customer View from the Admin menu.

And, below is the bundle product we’ve created:

Let’s Create Your Bundle Product in Magento 2
That’s all about how to create a bundle product in Magento 2. Now, it’s time to get to work. If any problem occurs, feel free to leave a comment right on the section below. We’re pleased to help you.
Visit Magento tutorials to get more knowledge about Magento and eCommerce.
Also, if you are looking for rich-feature and affordable Magento 2 extensions, why not take a quick tour around our website to pick your desired one?
Optimize Your Magento Store With Powerful Extensions
Looking for fast, efficient and well-coded extensions to boost sales for your Magento stores? Then visit Magezon website and grab necessary add-ons to optimize yours today!
