Magento enables store owners to configure inventory settings that are applied for:
- an individual product on its edit page (Catalog → Products → Advanced Inventory)
- or the whole catalog at the global level (Stores → Settings → Configuration → Catalog → Inventory)
These settings are applied for source availability, the products on the front end, and order shipment. Specifically, you can do configurations to show inventory data in the storefront like the number of items per product in stock, the product’s availability (In stock or out of stock), and the maximum and minimum quantity per product to add a shopping cart. A typical case to apply the stock availability threshold is to put limits on high-demand products. For example, let’s suppose you have planned to get new customers instead of selling wholesale customers or encouraging bulk purchases. In this case, it’s wise to set a maximum quantity so that a single buyer cannot take the entire inventory.
Besides you can also set the out-of-stock threshold to alert you that it’s time to reorder this product.
I think it’s enough for you to understand the benefits of Magento inventory management. Now, let’s learn how to configure it.
Table of contents
How to Manage the Whole Inventory in Magento
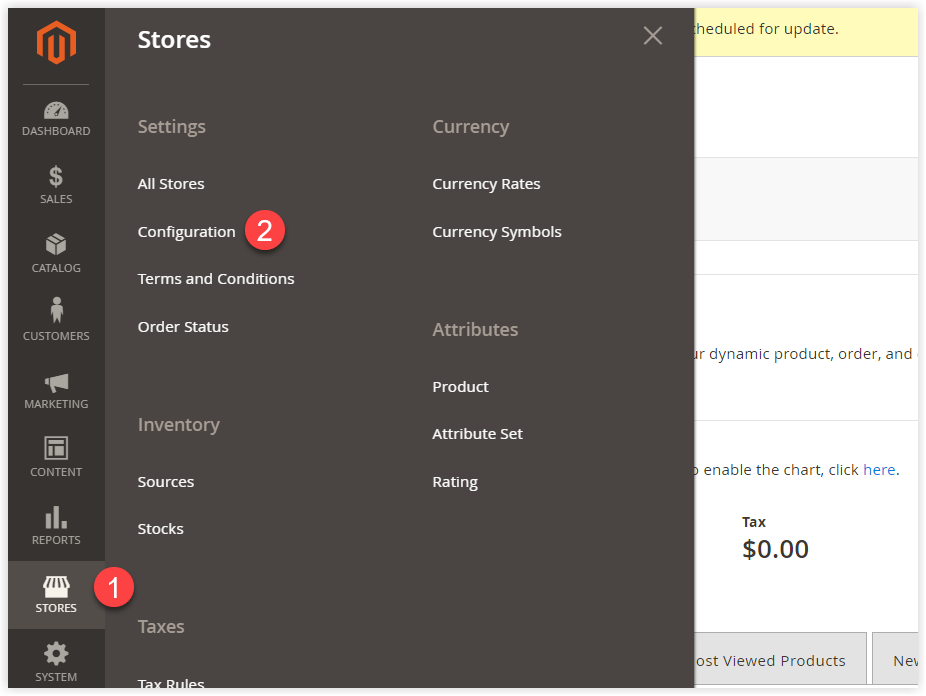
From the admin sidebar, go to Stores → Settings → Configuration.
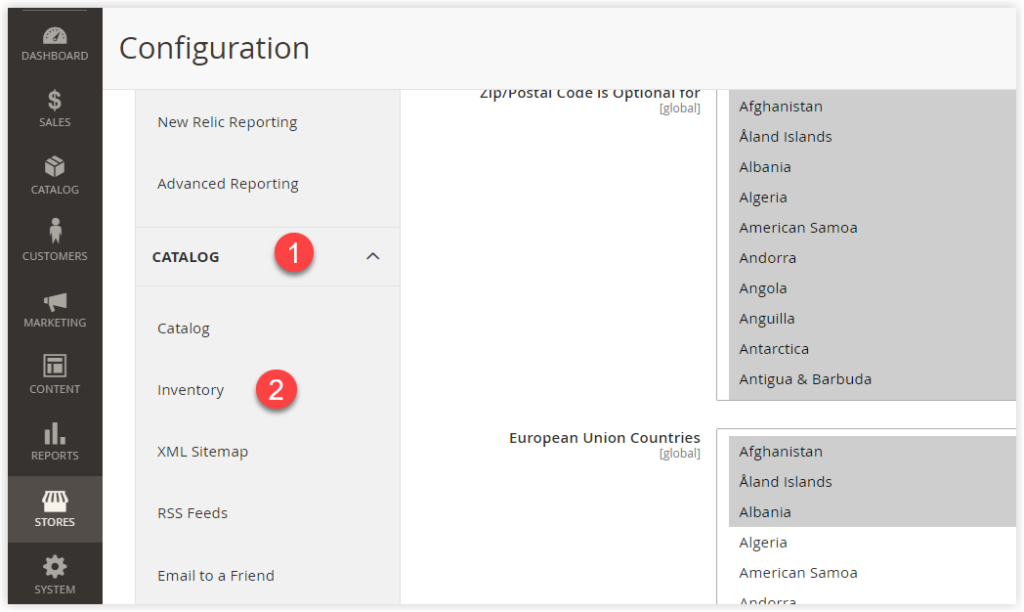
You will later be redirected to the Configuration page. In the left panel, scroll down to Catalog. Expand Catalog and choose Inventory.
And the Inventory Configuration page shows up with the following sections as below:
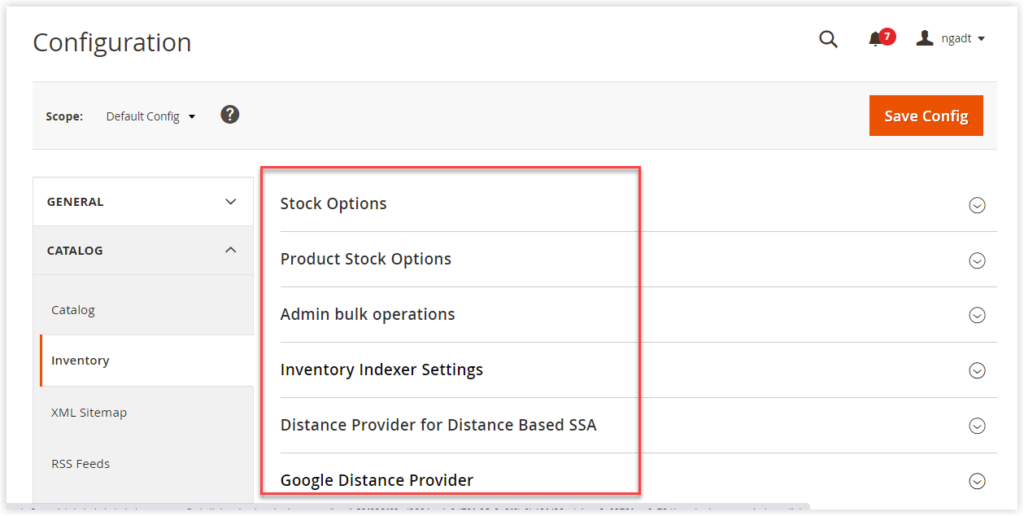
Keep in mind we only focus on two first sections as the main ones, namely:
- Stock Options
- Product Stock Options
| Note: You can learn the functionality of 2 other sections, namely Distance Provider for Distance Based SSA and Google Distance Provider in the blog: How to configure Distance Priority Algorithm in Magento 2 MSI. |
1. Stock Options
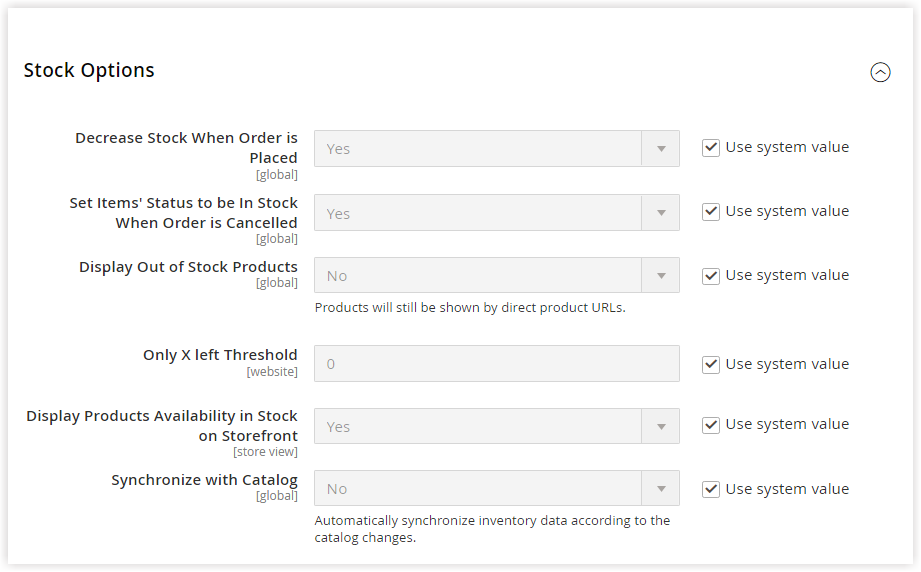
Note: To change the options for the alternative, untick the checkbox Use system value. You can then select the option you want.
- Decrease Stock When Order is Placed: Choose Yes to decrease the product quantity in stock when the order is placed.
- Set Items’ Status to be in Stock When Order is Cancelled: Choose Yes to restore the item to the stock after a canceled order.
- Display Out-of-Stock Products: Select Yes if you want to show products out of stock. In case you set product alerts to notify customers when the products are back in stock.
Note: Customers need to sign up to receive the notification that the products are restocked.
| Magento 2 Out of Stock From Magezon helps keep your customers updated with any changes in products they’re concerned about via email. Boost sales and build customer loyalty with our advanced module from us. |
- Only X Left Threshold: This allows you to set a certain quantity of items per product left in stock. If the quantity in stock is equal to or fewer than this threshold, users will get a message “Only X left.” Let’s say that you set 5 for this field, and four items are in stock. You will later get a notification “Only four left.” If you set the field value to 0, the message doesn’t appear.
- Display Products Availability in Stock on the Storefront: If you take the Yes option, the availability of products displayed on the front store (In stock, Out of stock).
- Synchronize with Catalog: If you make any catalog changes, like product SKUs, and you want the inventory data to be adjusted based on these changes at the same time, set Yes for this field.

Optimize Your Magento Store With Powerful Extensions!
Looking for fast, efficient, and well-coded extensions to boost sales for your Magento stores? Then visit the Magezon website and grab the necessary add-ons to optimize yours today!
1.2. Product Stock Options
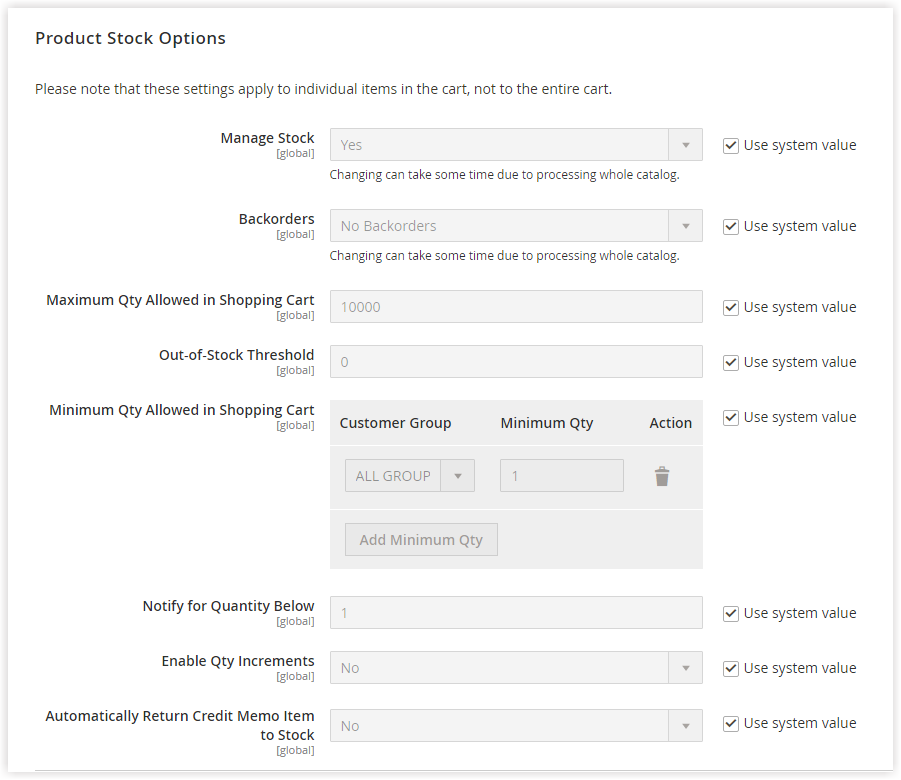
Be noted that these settings are applied to individual items in the cart, not the cart as a whole.
- Manage Stock: Choose Yes if you want to know the number of items currently in stock in your catalog. Otherwise, select No.
- Backorders enable customers to order products that are temporarily out of stock. The order processing status remains unchanged, and the shipment is still on hold until the stock becomes available. Below are the options to select from:

- No Backorders: When you take this option, backorders are not accepted. It means if the products are out of stock, orders can’t be placed.
- Allow Qty Below 0: Backorders are allowed when the product’s quantity falls below zero.
- Allow Qty Below 0 and Notify Customer: Backorders are accepted when the product’s quantity falls below zero. In addition, a notification is sent to customers that they can still place this order.
- Maximum Qty Allowed in Shopping Cart: Enter the maximum number of products customers can buy in a single order. The maximum quantity is, by default, 1000.
- Out-of-Stock Threshold: Enter the number at which a product is deemed to be out of stock.
- Positive number: Enter the positive number if backorders are not accepted (No Backorders in the Backorders field). Or else, this positive out-of-stock threshold is of no use at all.
- Negative number: You should enter a negative number if backorders are enabled. The quantity at this number is added to the product’s Salable quantity.
- Minimum Qty Allowed in Shopping Cart: This allows you to set the minimum item quantity of a product that customers in specific groups can add to their shopping cart. The minimum number for the quantity is set to 1 by default.
Note: When you set a minimum quantity that a customer can add to their cart, the Qty field on product details pages will appear with that number as default. Therefore, even though customers buy the items in a lower quantity, the fixed minimum quantity will still be added to their cart when they hit the button Add to Cart.
(1) Select the customer group to which you want to apply the minimum quantity.
(2) Enter the number in the Minimum Qty field.
(3) Hit Add Minimum Qty to assign the specific quantity for a particular group.
(4) Remove the Minimum Qty by clicking on the trash bin icon.

- Notify for Quantity Below: Enter the specific quantity at which you will receive a notification of warning about the low stock. By default, the field value is set to 1; therefore, you will be notified when the stock per product reaches 1. This amount is not subtracted from the inventory quantity but the salable quantity.
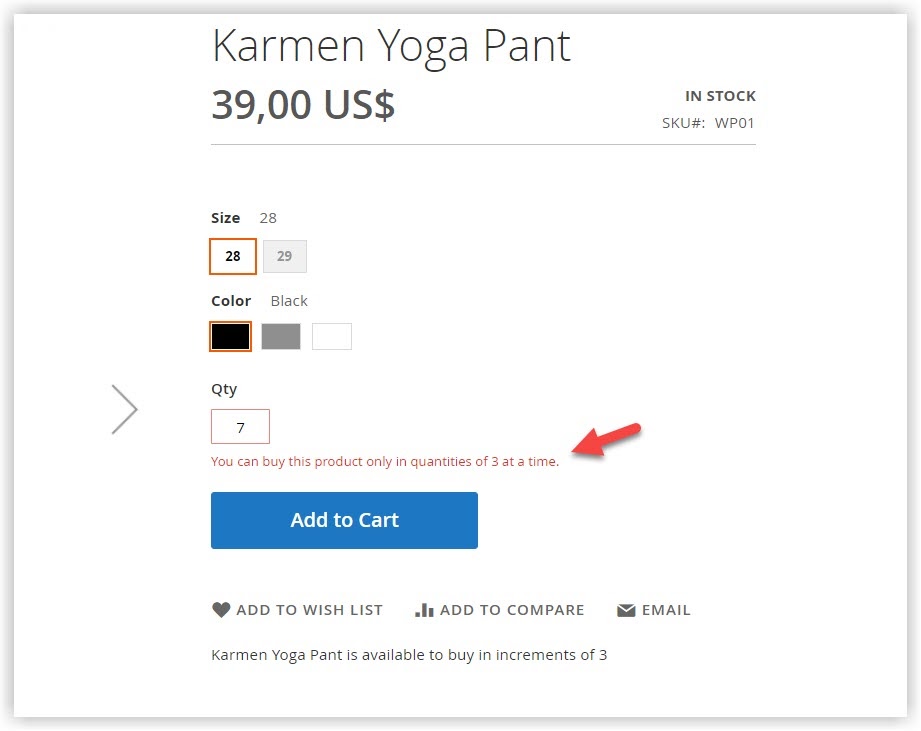
- Enable Qty Increments is disabled by default. When you choose Yes for this field, a field named Qty Increments will show up under it. This field enables you to set the quantity per product customers have to buy each product at that quantity. It means customers can’t enter the number that is higher or lower than the set quantity.

Let’s suppose a customer wants to buy seven items for a product. When they enter 7 in the Qty field, a notification suggests that they can buy three units per product at a time.
And what happens if this customer buys another product in a lower quantity? Here is the answer.
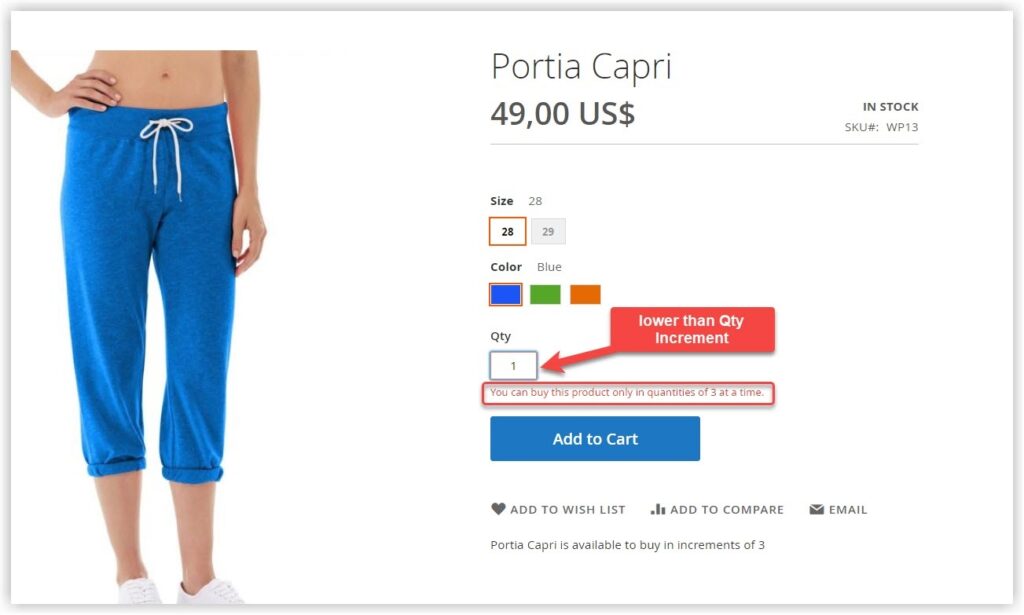
See? This entered quantity is accepted, neither.
- Automatically Return Credit Memo Item to Stock field is, by default, set to No. Like other system options in Product Stock Options, this option is used to configure the catalog as a whole. The difference is that it is not available to configure for a single product.
Choose Yes to return the product to the stock after any item is refunded.
Note: To return your wanted product to the stock, go to the New Memo details page of the order refunded. In the Items to Refund section, there is a column labeled Return to Stock. Then, tick the checkboxes of the products that you want to restore to the stock. Whether you have configured the Automatically Return Credit Memo Item to Stock field as “enabled” or “disabled,” these products will be restocked.
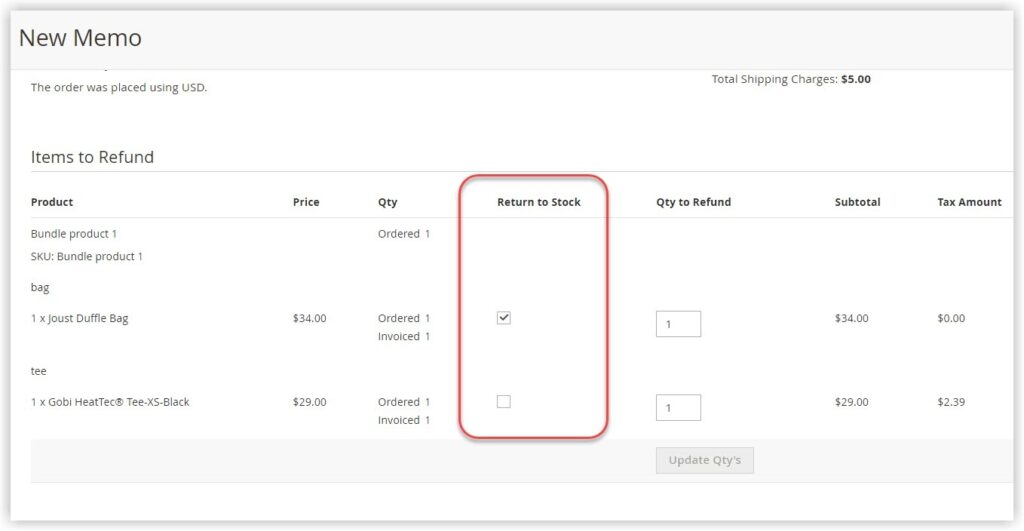
After finishing, click Save Config.
| You may also like: Magento 2 Multi-Source Inventory (MSI): An Ultimate Guide How to Create a New Category in Magento 2 |
How to Manage Individual Product Inventory in Magento
In the last part, we have introduced the system inventory settings applied to all products in your catalog. In this part, you are shown the inventory settings of a single product. These settings help you override some system settings, giving the product different value(s) for the same setting(s).
Suppose we set Quantity Increments to 3 for the whole catalog. But we want customers to buy a product named Layla Tee only in quantities of 5 at a time. In this case, we will configure the inventory settings of this individual product.
From the admin sidebar, navigate to Catalog → Products. Next, go to the product details edit page of the product you want to configure its inventory settings. In our case, we chose the product named Joust Duffle Bag.
Under the Quantity field, there is a clickable text Advanced Inventory.
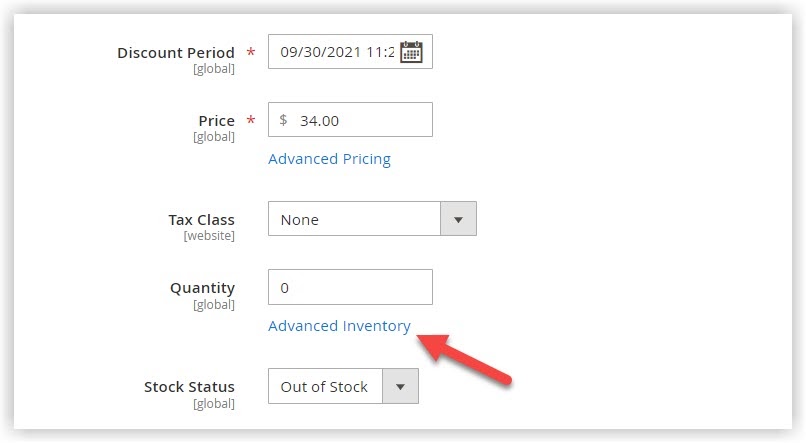
If you create several additional sources for your catalog, which leads to the new section named Sources on the product edit page. In this case, the Advanced Inventory will be placed in the Sources section.
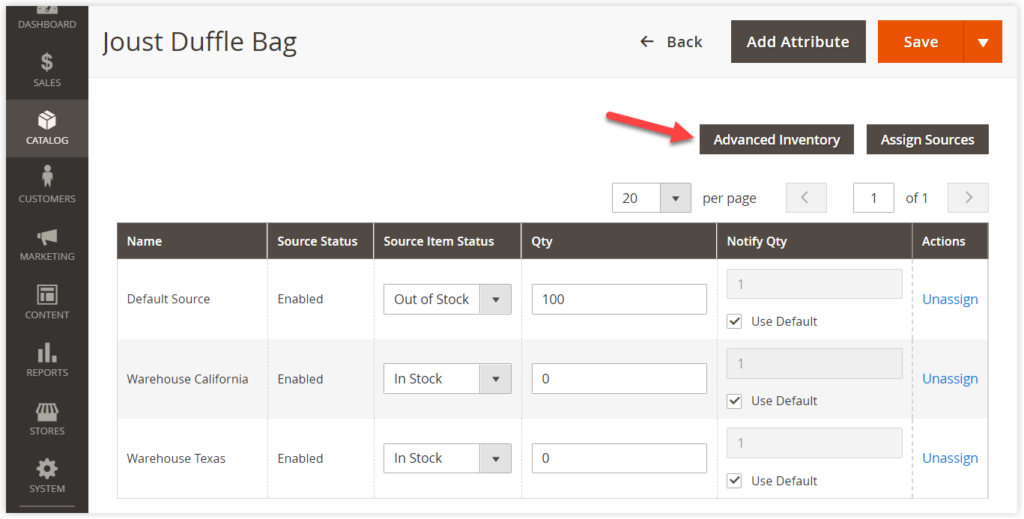
Click on Advanced Inventory. A new form will appear afterward.
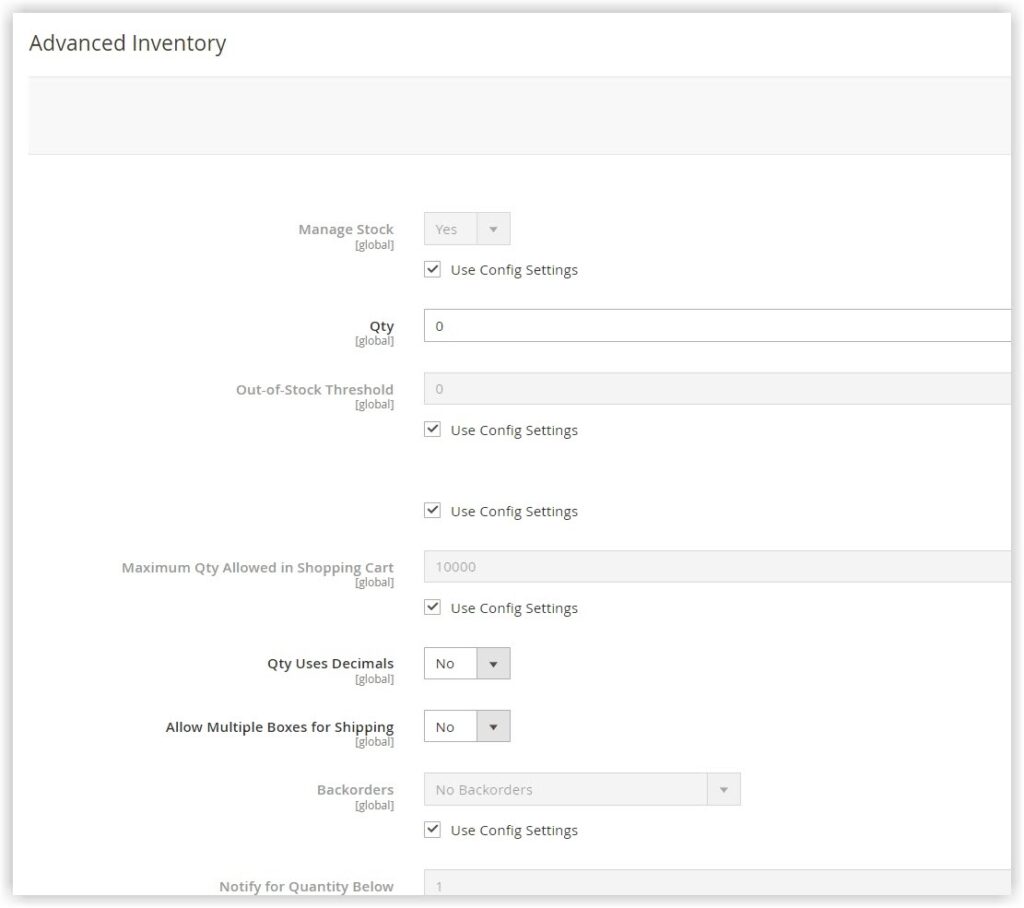
To change the field value, unmark the checkbox Use Config Settings for each particular option.
- Manage Stock is set to Yes by default. If you remain unchanged, you are given a set of options to manage the product inventory.
Choose No if you don’t want to manage it. At this time, the list of options will not be shown. In this scenario, the product will permanently be offered to your consumers in your store.
- Qty: Enter the number of the quantity for this product in your inventory.
- Out-of-Stock Threshold enables you to set the product’s quantity at which its status is considered out of stock.
- Maximum Qty Allowed in Shopping Cart option enables limiting the maximum quantity of a product in a single purchase. By default, the field value is set to 10000.
Say that you set 5 in this field for a product. It means customers should only buy equal to or lower items than 5.
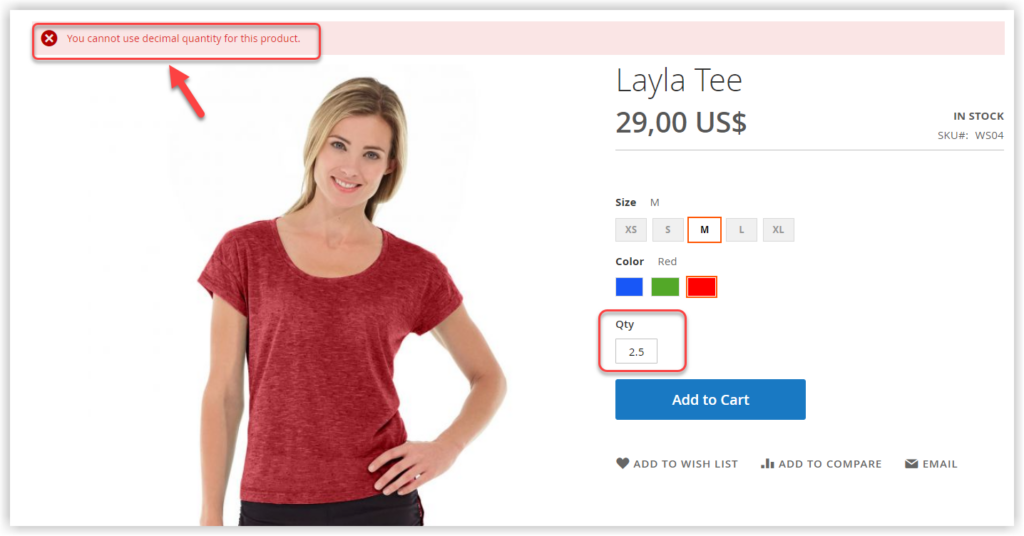
- Qty Uses Decimals: The system doesn’t accept when customers order the product in the decimal unit. That’s because users set this field to No, which prevents customers from entering the decimal value.
- Allow Multiple Boxes for Shipping: Choose Yes to allow shipping of different parts of a single product in separate packages. Set No to ship it in the same package.
- Backorders: Explained in Backorders in 1.2. Product Stock Options. The difference is that this field is applied to an individual product.
- Notify for Quantity Below: You will be notified when the quantity of the product reaches a certain number. Enter the number in this field.
- Enable Qty Increments: This field was already explained in section 1.2. Product Stock Options.
- Stock Status: You should use this field to determine the product’s availability on the storefront (In Stock or Out of Stock).
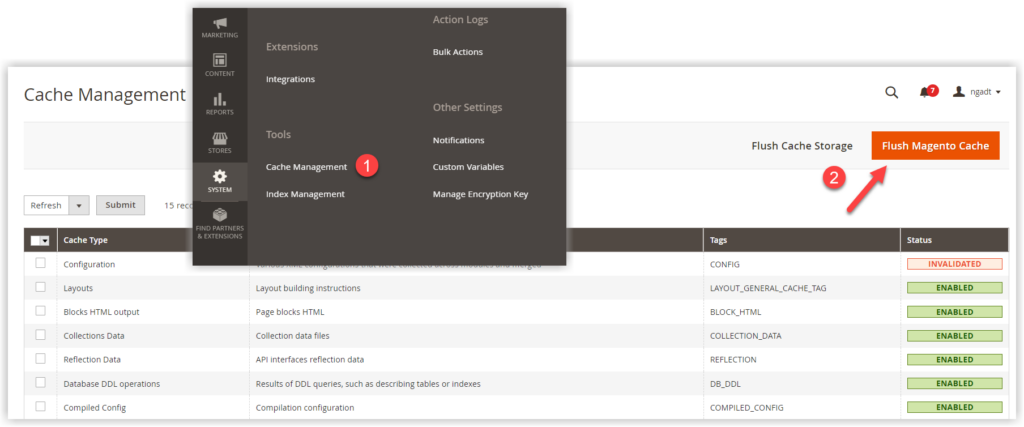
Click Save when necessary changes are made. Unless you see changes, simply clear the cache.
That’s How to Manage Inventory and Stock in Magento
We hope this blog may help you understand how to manage inventory and stock in Magento. Should you have any questions, feel free to let us know through the comments section right below.
Visit Magento 2 tutorials to learn more about Magento.

Optimize Your Magento Store With Powerful Extensions!
Looking for fast, efficient, and well-coded extensions to boost sales for your Magento stores? Then visit the Magezon website and grab the necessary add-ons to optimize yours today!
 Magezon Blog Help Merchants Build Comprehensive eCommerce Websites

